Agents
An agent is just a small Windows console application that does all the work with data. It can run either on your local computer, on the client’s server or even on Microsoft Azure. It is important that the resource, which the agent will work with, must be accessible from that location. For example, if you want to import data from the client’s database (which is not accessible from the internet) and export it into the local file in your computer, you will need two agents; the first one will run on the client’s server (it will export the data from the client’s database) and the second one will run on your PC (it will save the data into the local file in your disc).
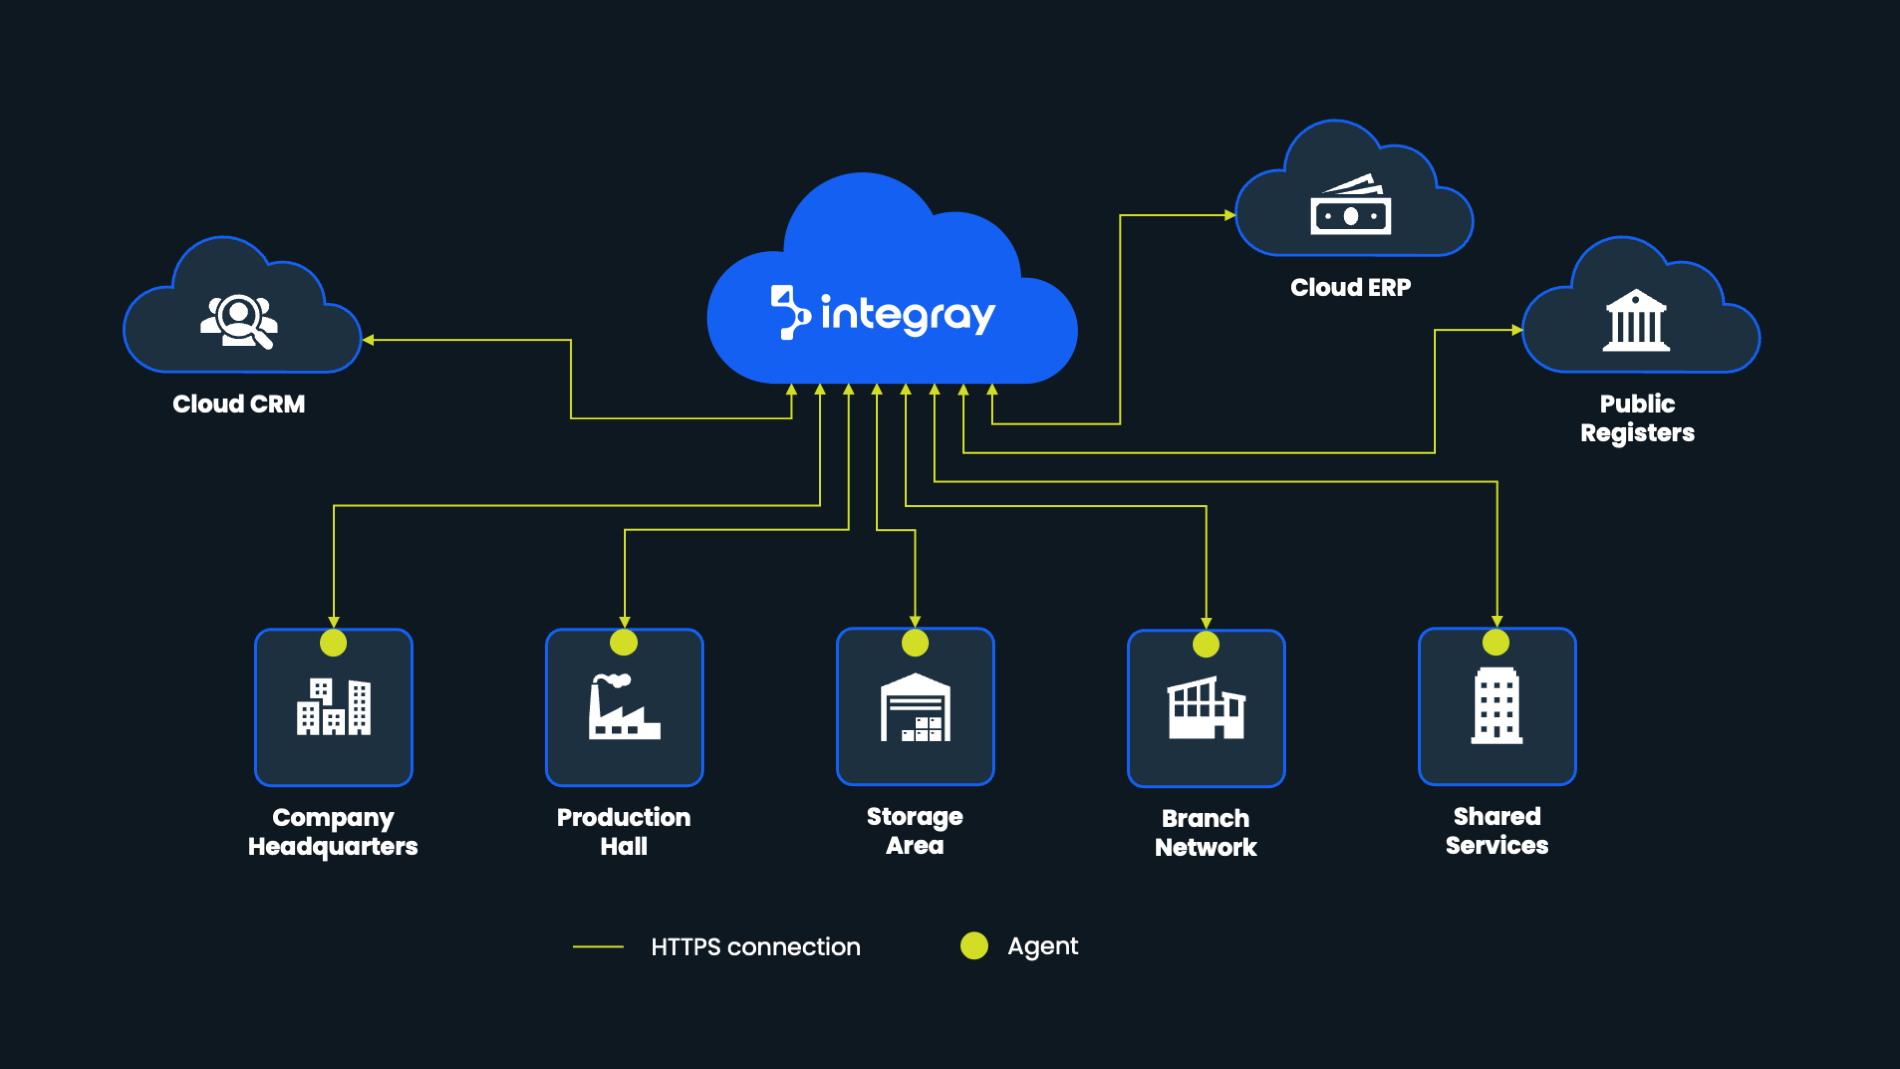
In the integray platform the agent is encapsulated into a "wrapper" - a program, which manages and maintains the agent. The wrapper is a vital part of ensuring flawless operation of the agent itself. The wrapper has certain benefits compared to the original agent as it takes less space on the disc, and it manages a series of activities, which the agent itself is not capable of. It downloads, launches, updates, restarts, maintains alive in case of unexpected errors, and notifies backend about the failure.
Agent types: Shared and Remote
The integray platform operates with two types of agents used to execute task steps:
-
Shared agent – default agent type for executing task steps. It is selected by default when creating a new task step.
-
Remote agent – an agent installed in your environment to securely access protected local or enterprise systems and services (e.g., behind firewalls).
The main benefit of the Shared agent is improved scalability – task step execution can run on multiple Shared agent instances. Typically, there are at least two instances for higher availability (so if one becomes unavailable, another can continue), and depending on your license, more instances can be added. This enables higher throughput and faster processing under increased load. The runtime focuses on orchestration and data flow, while the Shared agent executes integration procedures. This separation also strengthens security through separation of concerns and creates a more flexible foundation for future growth.
The other type of agent is the Remote agent, which you need to install in the same environment as the resources served. It provides a secure and efficient method for accessing various local or enterprise systems and services that are typically protected by firewalls and other security mechanisms. These critical resources can include databases, file systems, and other key enterprise services essential for your organization’s operations. The remote agent in Integray enables the execution of tasks that require access to local drives without compromising security.
This approach ensures seamless and secure access, helping businesses maintain productivity and operational integrity when performing tasks that require connection to local infrastructure.
Next chapters will guide you through the process.
3rd party connectors must be served by remote agents.
Every integration task comprises one or more task steps. Each task step is linked to selected connector and the connector requires an agent to serve the task step. It is important to understand that only original integray built-in connectors can be served by the shared agent. Any 3rd party developed connector, even if not reaching out for external/remote resource must be served by remote agent. It is forbidden by the platform to serve any task step utilizing 3rd party connector by the shared agent.
Wrapper and agent settings
Each agent is uniquely identified with its name and login credentials, which can be defined in the platform Administration. Installation is then very easy – just download it from platform Administration and execute. No more effort is required because each agent is always fully preconfigured.
In case you would need to modify the settings of the wrapper e.g. to launch it from proxy server (one which sees the integray agent), the settings file named: appsettings.json is located in the main folder. The structure of the file is as follows:
{
  "Logging": {
    "LogLevel": {
      "Default": "Information",
      "Microsoft.Hosting.Lifetime": "Information"
    }
  },
  "Settings": {
    "AllowAutoUpdate": true,
    "Username": "b10db7c4-6698-....-9c0c-7d7bbfa9e300",
    "Password": "........-9100-4d21-8eae-ae28fa5cde6d",
    "ServerAddress": "https://..............xeelo.net",
    "ReconnectTimeoutSeconds": 15,
    "FileLogLevel": "Trace",
    "ConsoleLogLevel": "Trace",
    "LogAPICallBody": true,
    "NotifyUpdated": true,
    "SuppressUpdate": false,
    "IsTesting": false,
    "ProxyUsername": null,
    "ProxyPassword": null,
    "ProxyServerAddress": null,
    "PrintQueueEvents": false
  }
}
You can configure the access via proxy server using
-
ProxyUsername
-
ProxyPassword
-
ProxyServerAddress
Further, you can set up if you don't want to get new version updates - AllowAutoUpdate, reconnection timeout to resend failed messages - ReconnectTimeoutSeconds, logging of the log message body - LogAPICallBody etc.
This is the wrapper appsettings file. Note, the agent does have the same appsettings.json file as well included in the Agent folder. The wrapper and agent appsettings files are by default identical.
Create new agent
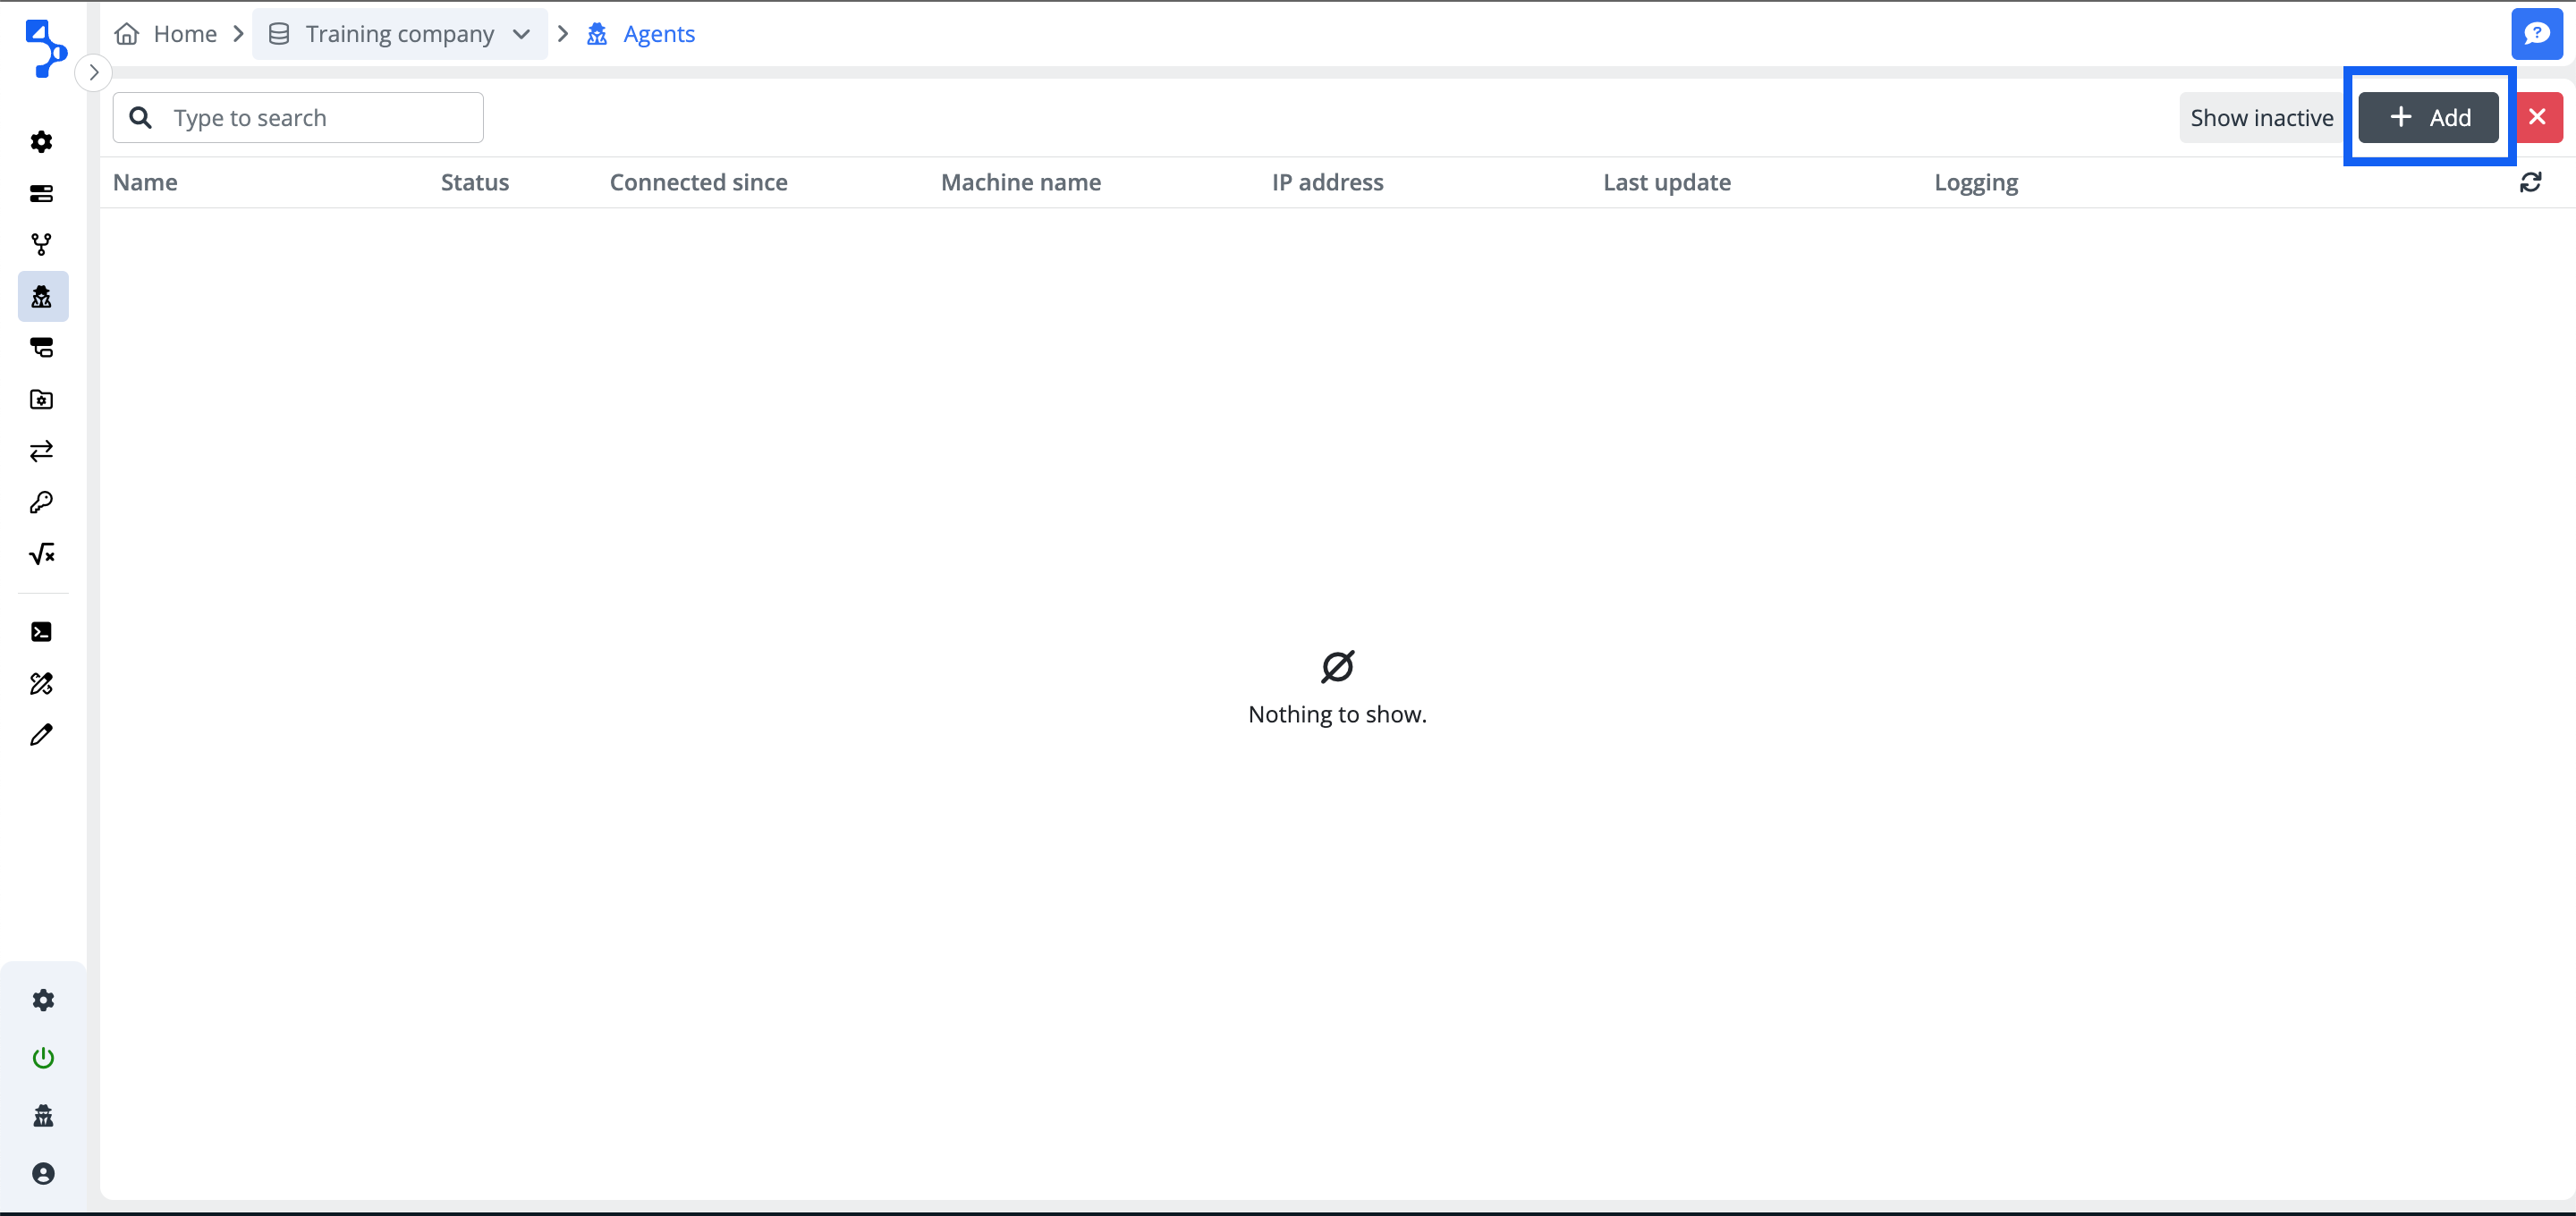
Open the company screen and select the Agents on the left content navigation menu. You will enter the agents' list. In case you are going to create the first agent for the company, the list will be empty with the message "Nothing to show". This is going to be your starting point for the new agent creation.
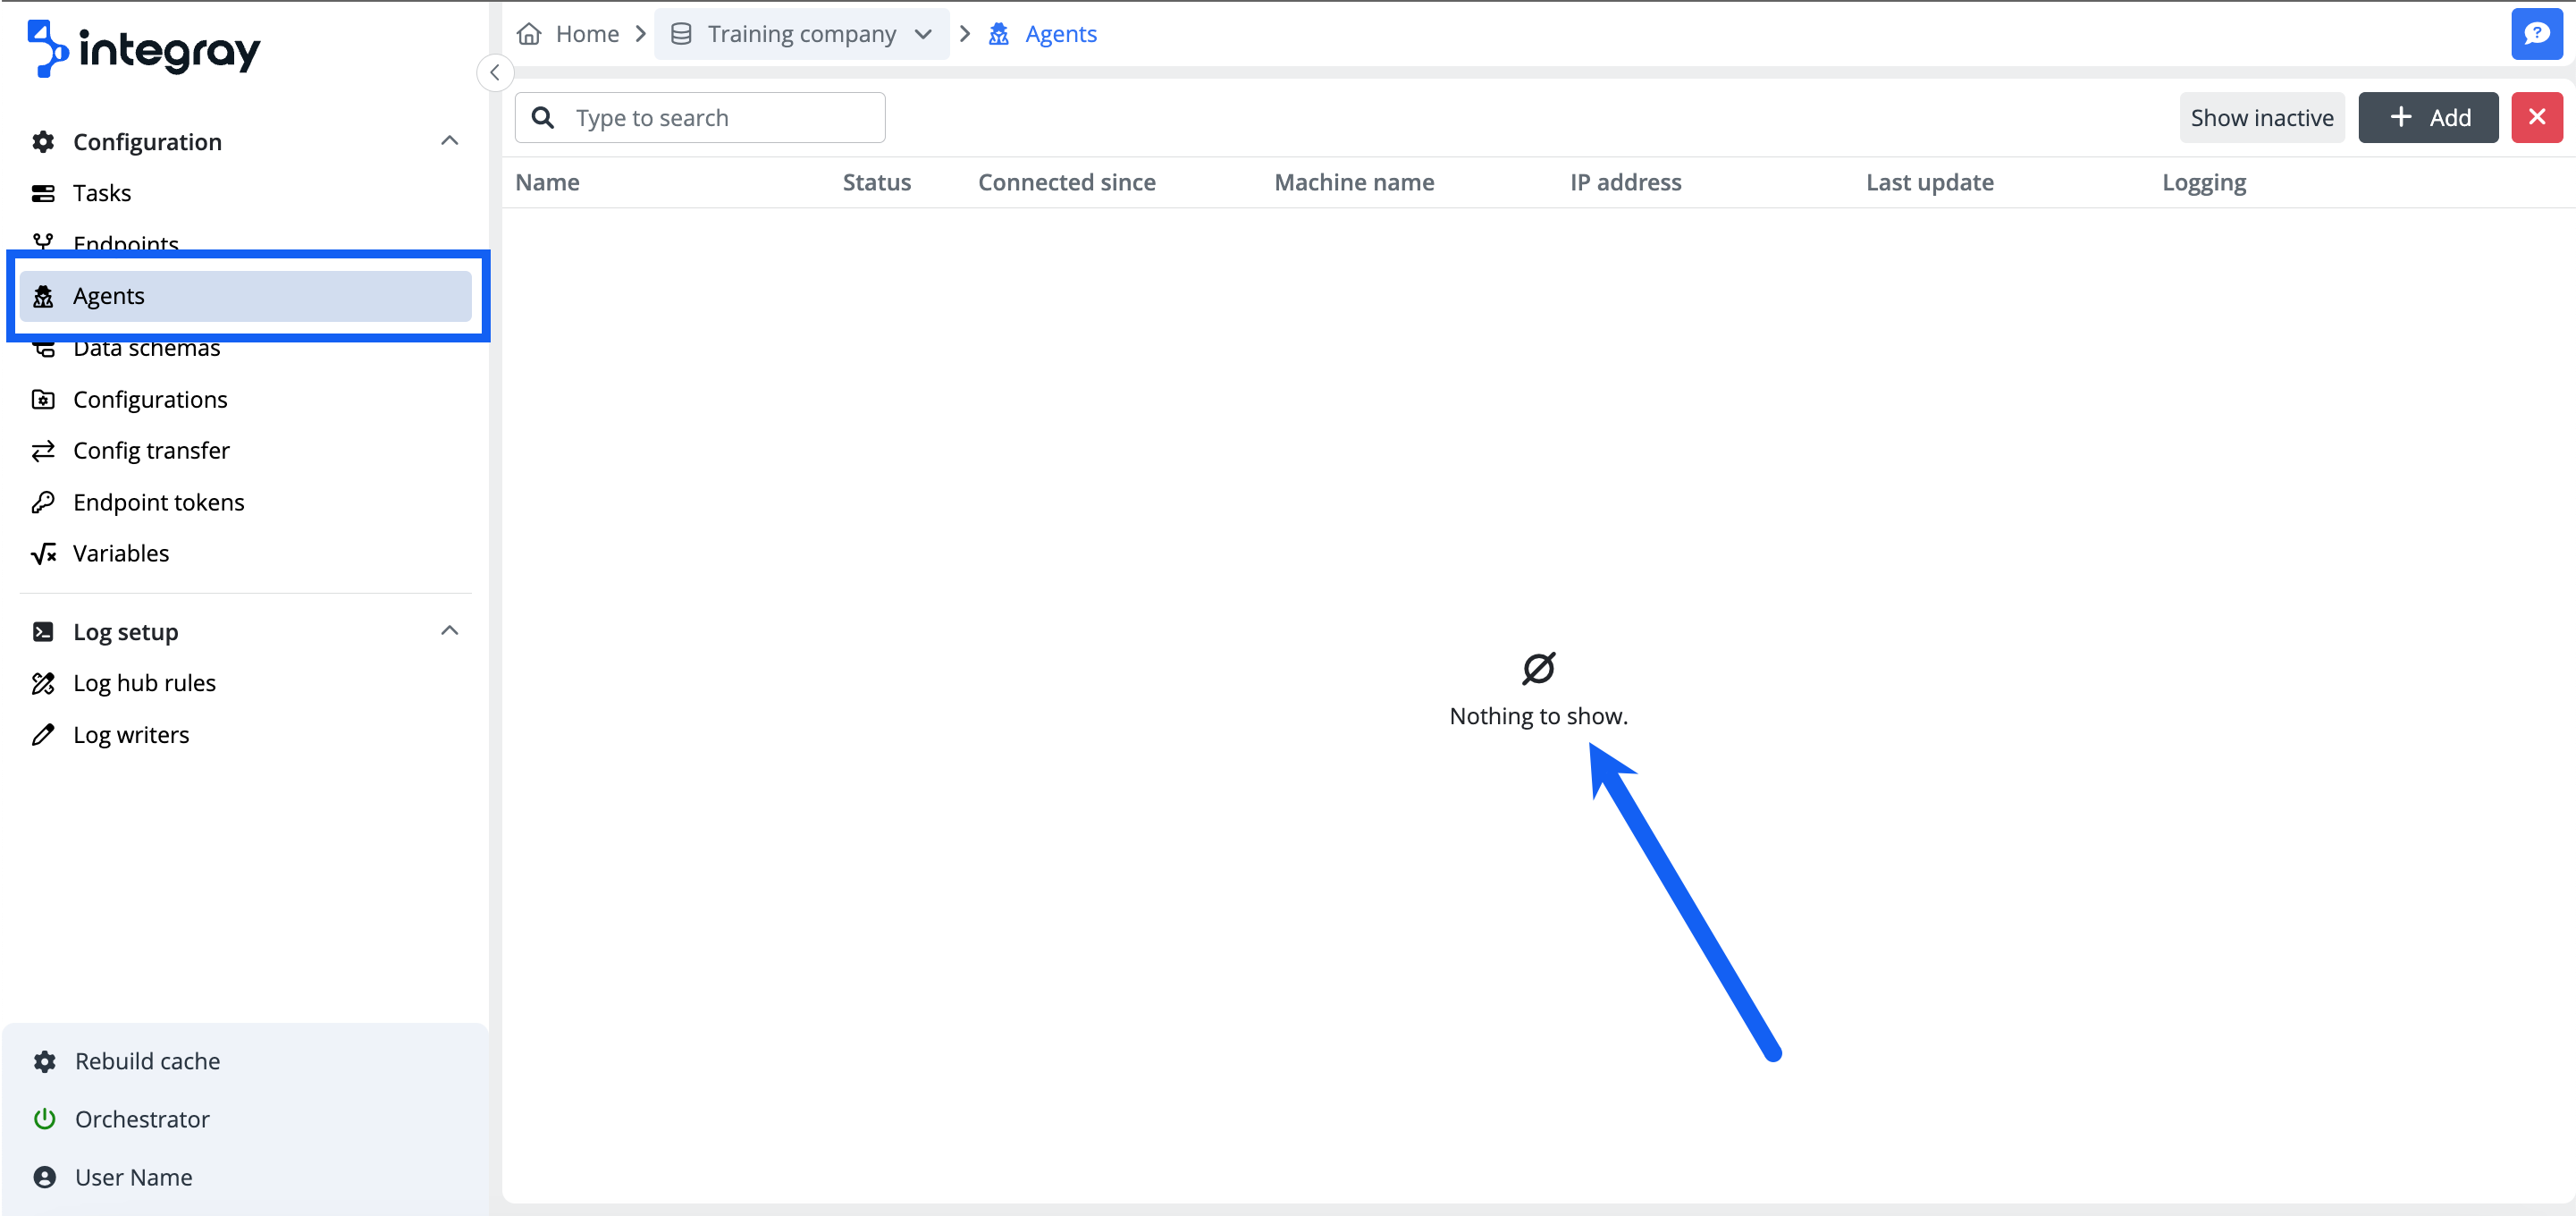
Click the +Add button to open the Agent settings modal window to configure the agent's general settings and the file & console log levels.
General
Fill in the agent name. You will recognize the agent under this name in the agent list, in the agent selection combo boxes as well as the zip file will be named using the filled name.

File & console log
Set required levels of logging information related to the agent log. The standard recommended settings are info, warning, and error. You can also set the other levels following your needs. Read below brief descriptions of individual log levels.
| Level | Description |
|---|---|
| Trace | In-depth details, decision sections, cycles, etc are logged here. Log usage for debugging by developers. |
| Debug | Technical details, partial steps, or logical parts are logged here. Log usage for debugging by developers and admins. Fewer details compared to Trace. |
| Info | Information providing detail of the Agents' activities are logged here. Useful and comprehensive information for the end user. |
| Warning | Warnings on minor or occurrences of repairable errors are logged here. Warnings do not fail the process and tasks can continue further. |
| Error | Major unrepairable errors are logged here. The tasks and the process does fail and is unable to continue. |
| Fatal | Serious system issues, and init failures are logged here. Not recommended to select. |
Log levels
The definition of log levels is following the most common classification, nevertheless when using 3rd party connectors, logs may be classified to levels differently and messages may be displayed under different levels compared to their own connectors.

Save the agent settings before leaving the modal window to keep the configuration.
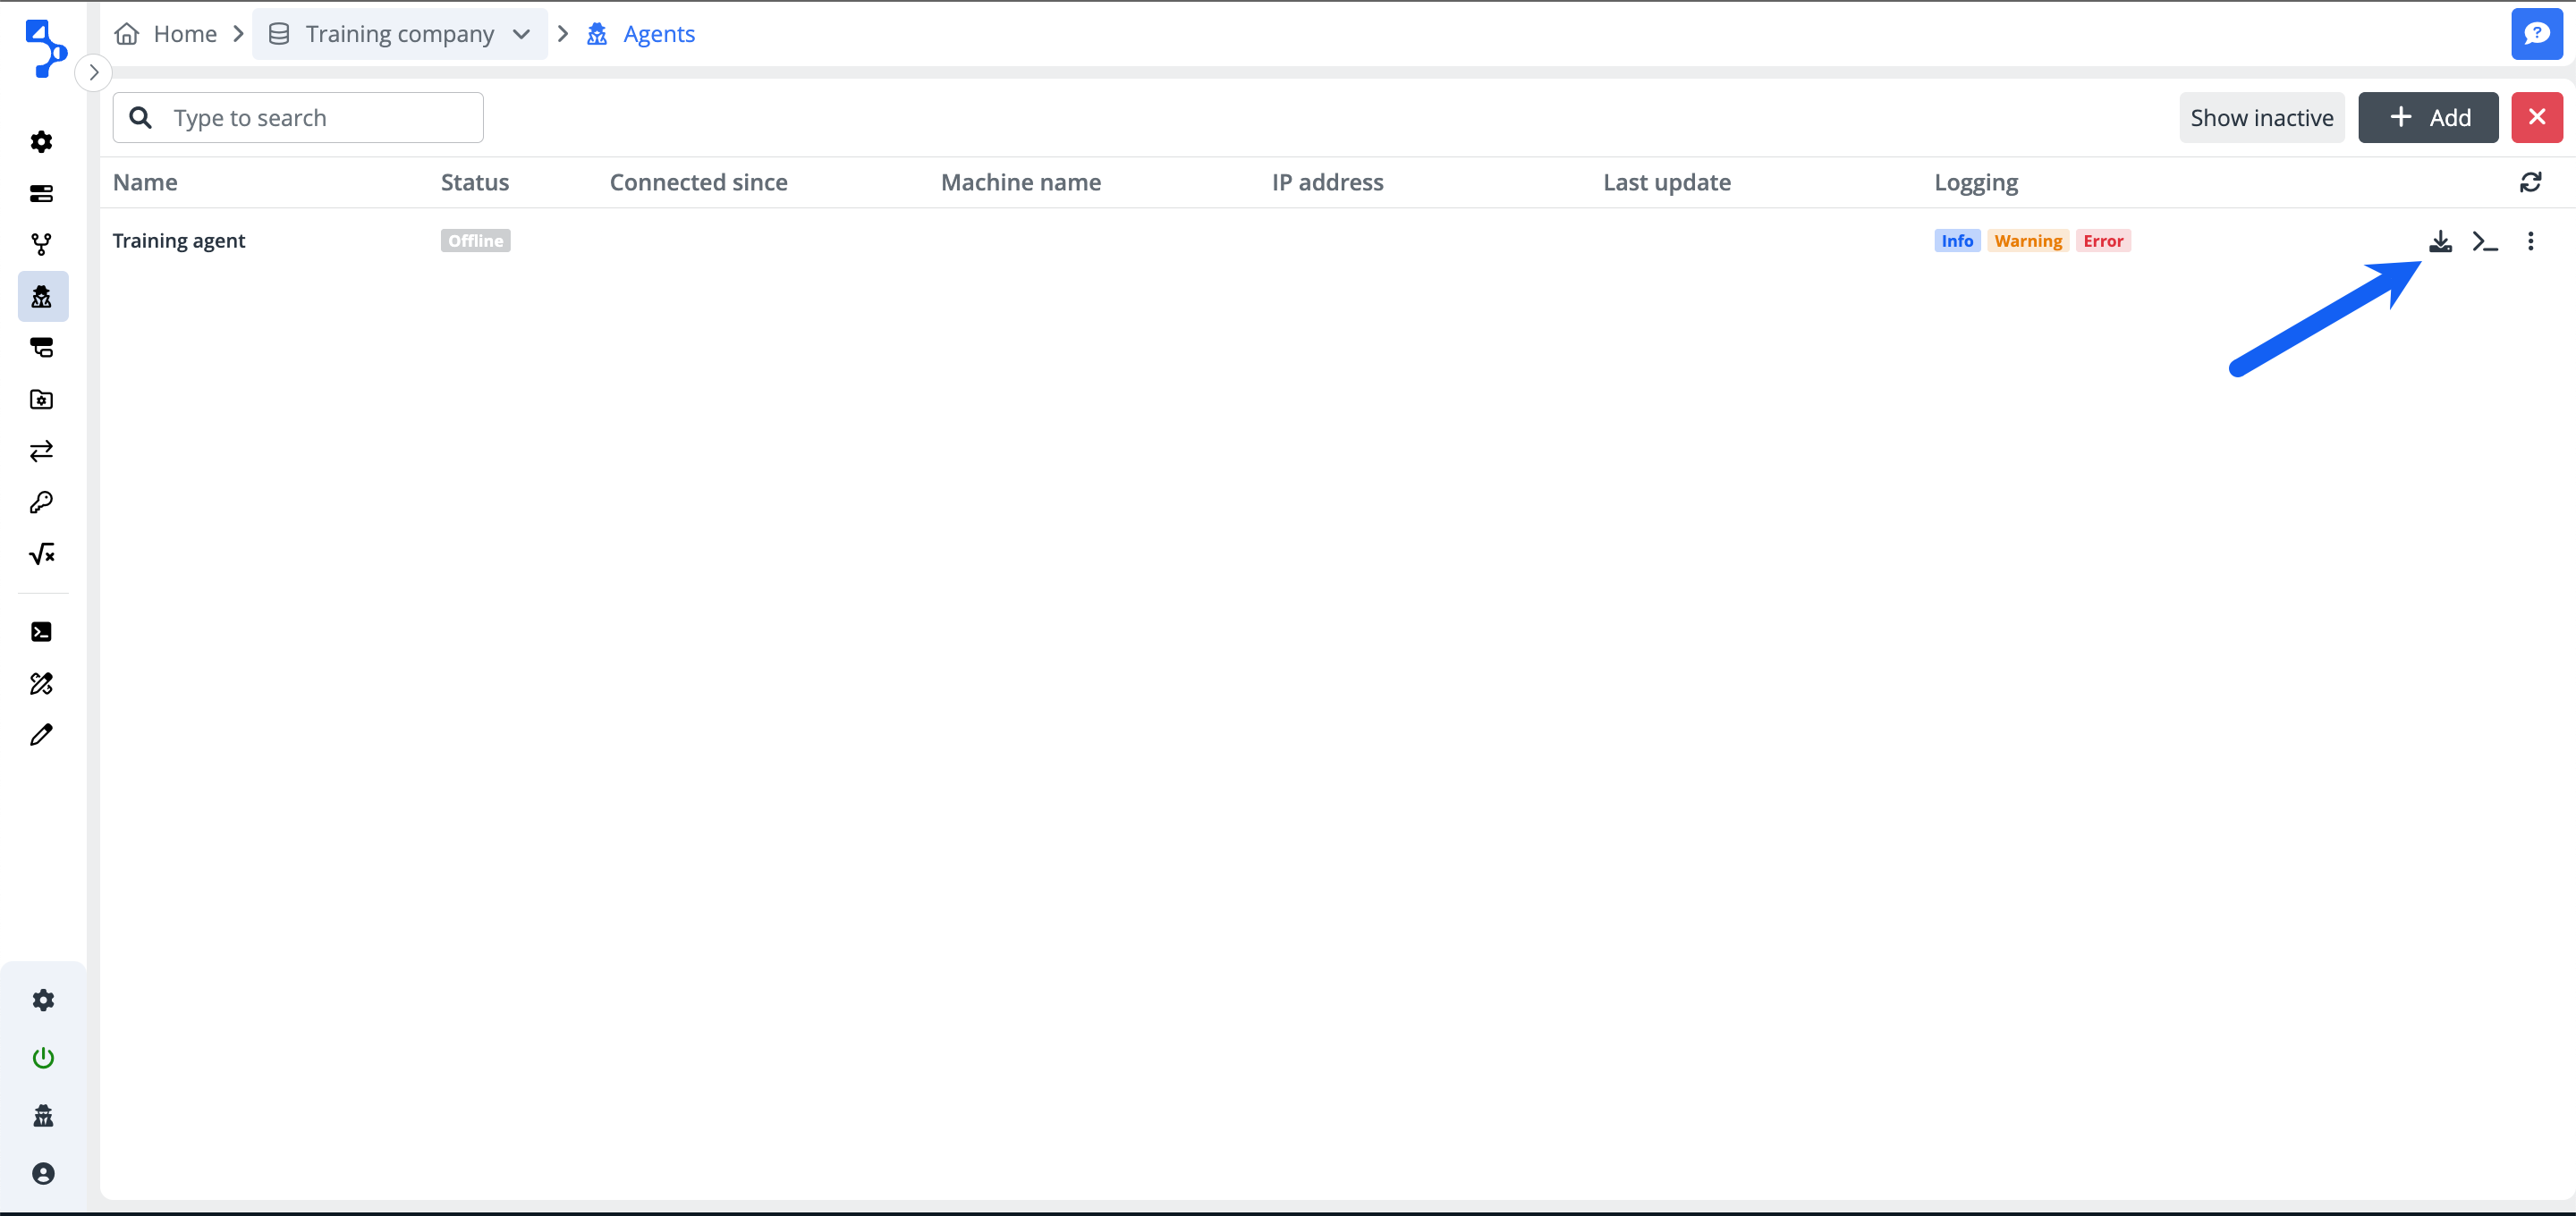
Your new agent will be displayed in the list of available agents with the grey status badge offline. This means, you have created agent related record and as a next step you need to download and launch it.

Download and install the agent
Download the agent by clicking the download icon of the right side of the agent record in the agent list. The system displays a blue info toaster "Retrieving a file..." at the bottom of the screen. You will find a zip file saved to your download folder when the procedure is completed. The name of the zip file will look as follows: DataExchange.Agent.DataExchange.Agent.Training agent.
Unzip the file to any folder on the machine/environment, where the agent will have access to the required resources.
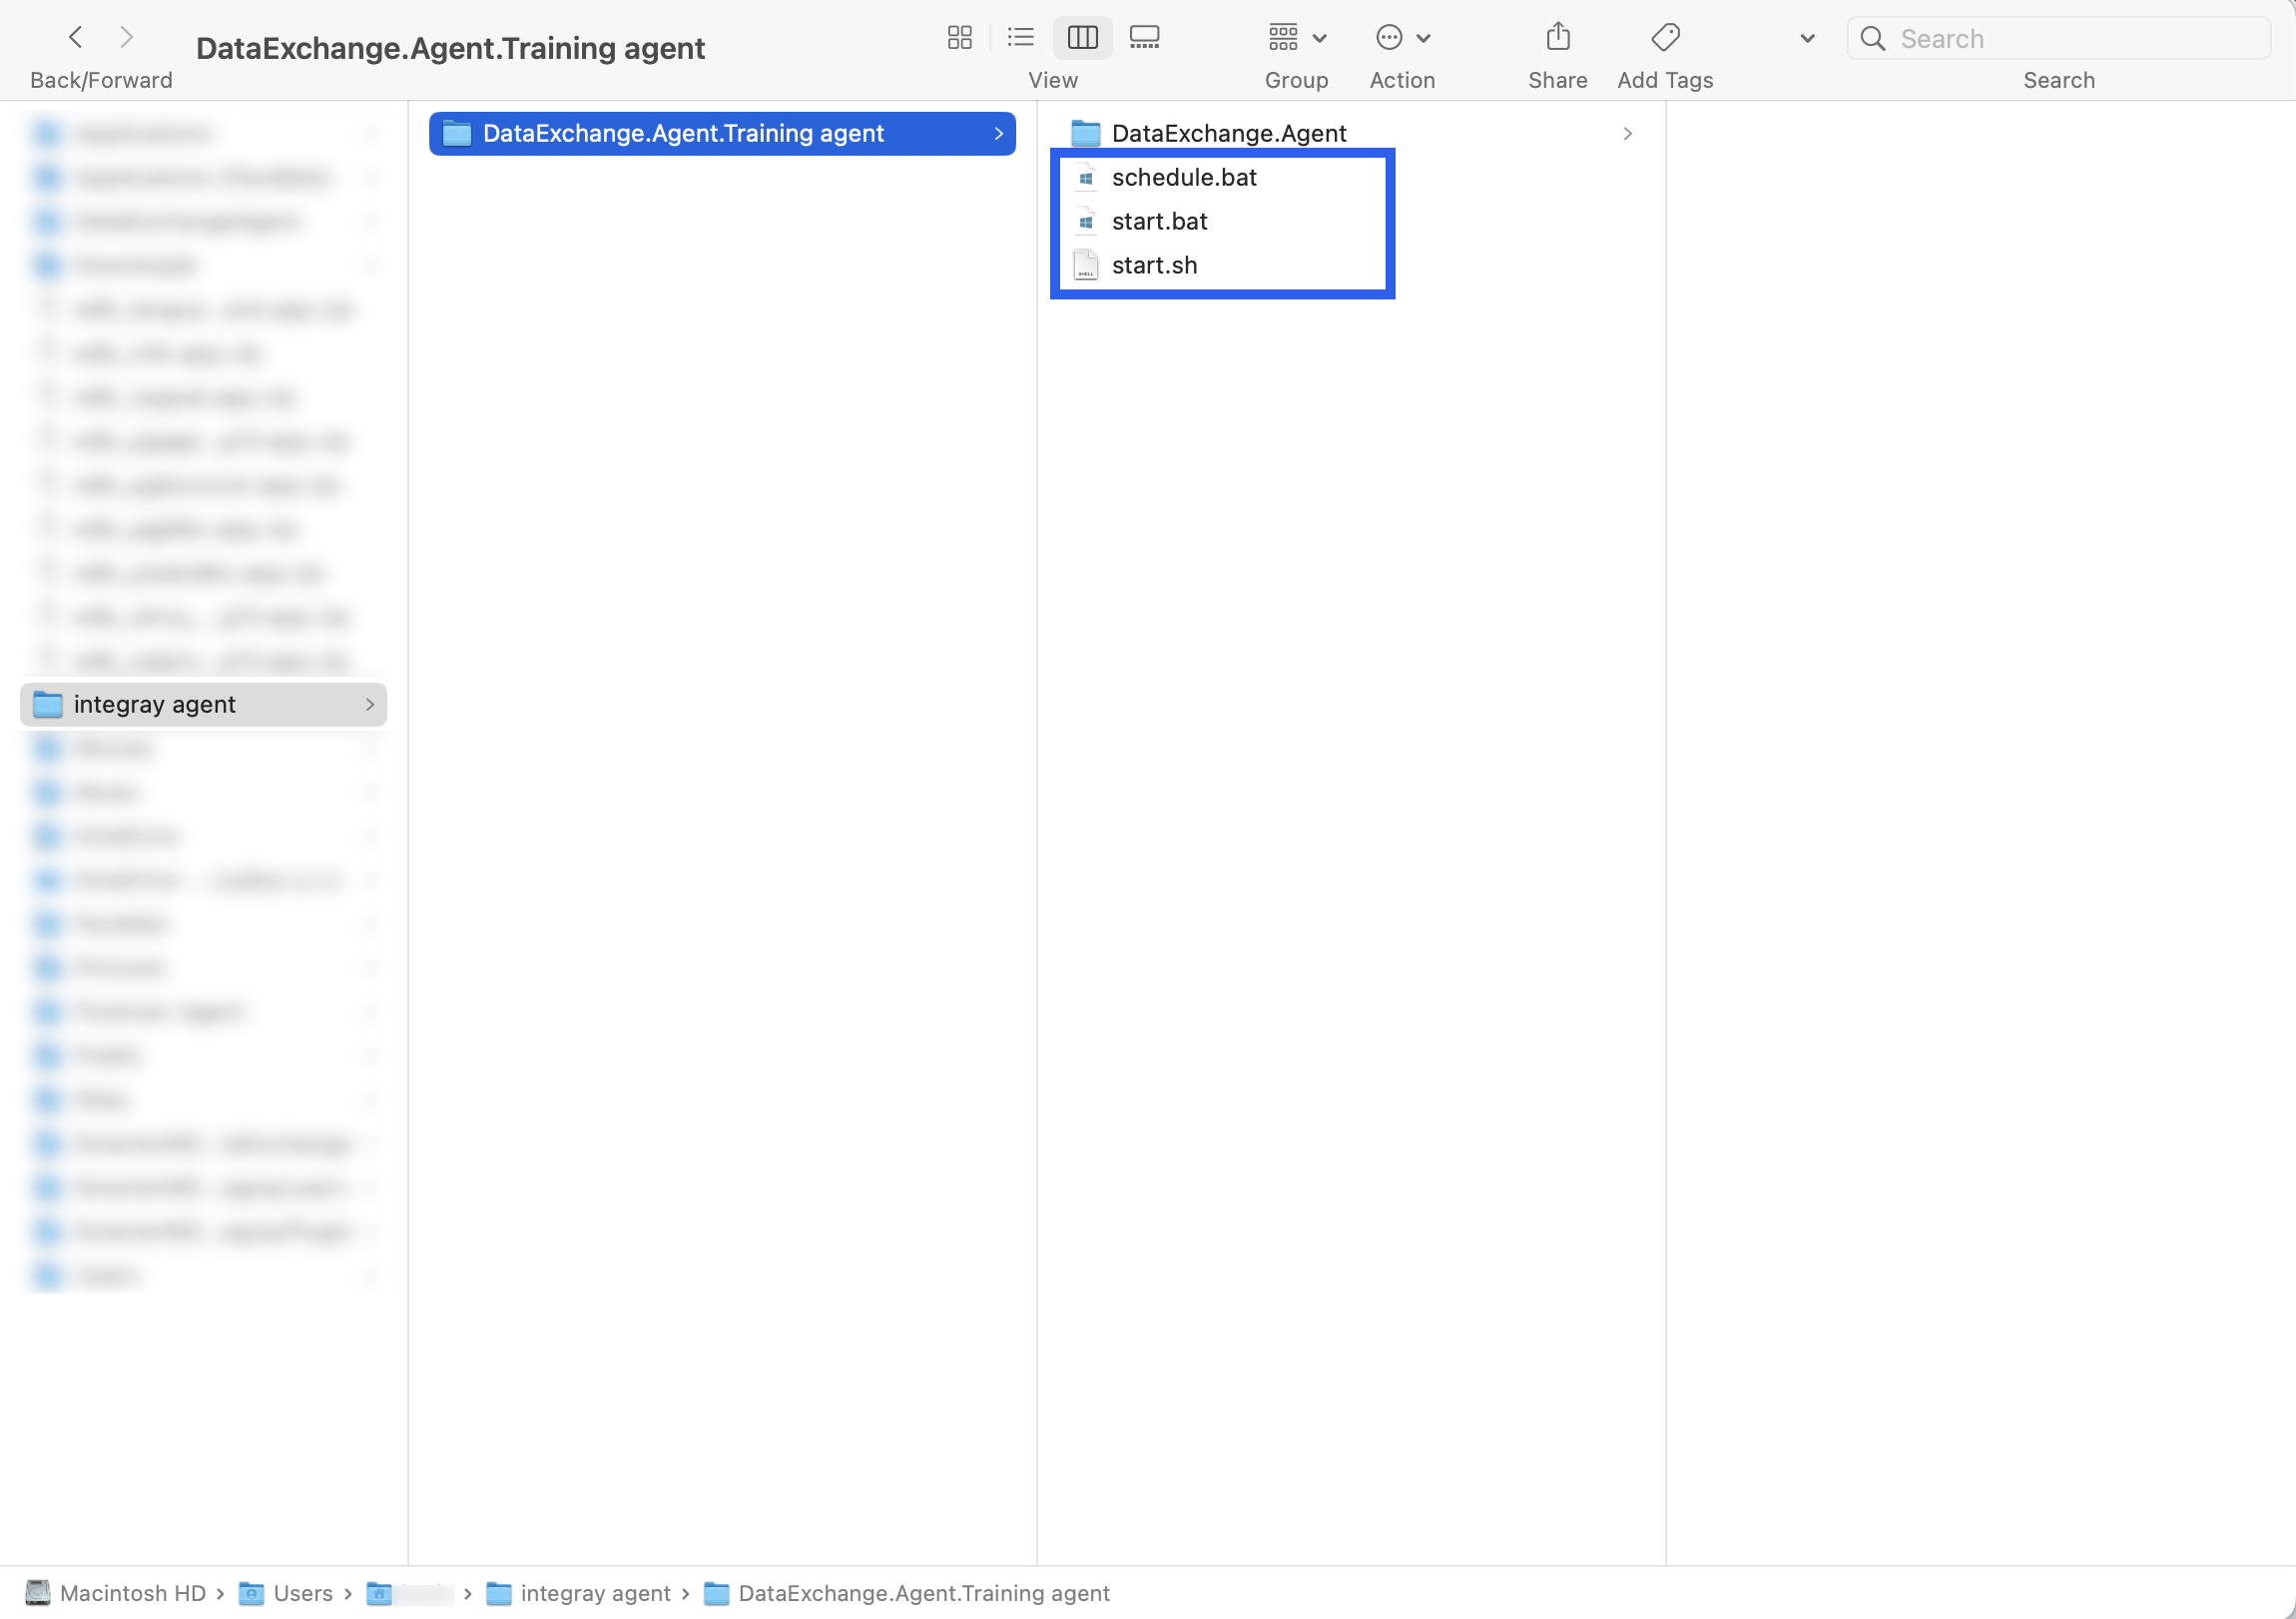
Launch the downloaded and unzipped agent on your machine/environment. There are launchers available dependent on your operating system.
For Windows use start.bat and for MacOS and Linux operating systemes use start.sh. Additionally, for Windows, you can use schedule.bat to create a scheduler to launch your agent.
On MacOS the start.sh file can't be run by double click and to launch the agent properly, open the Terminal and navigate to the folder where the start.sh file is located. Launch the agent with the command: sh start.sh
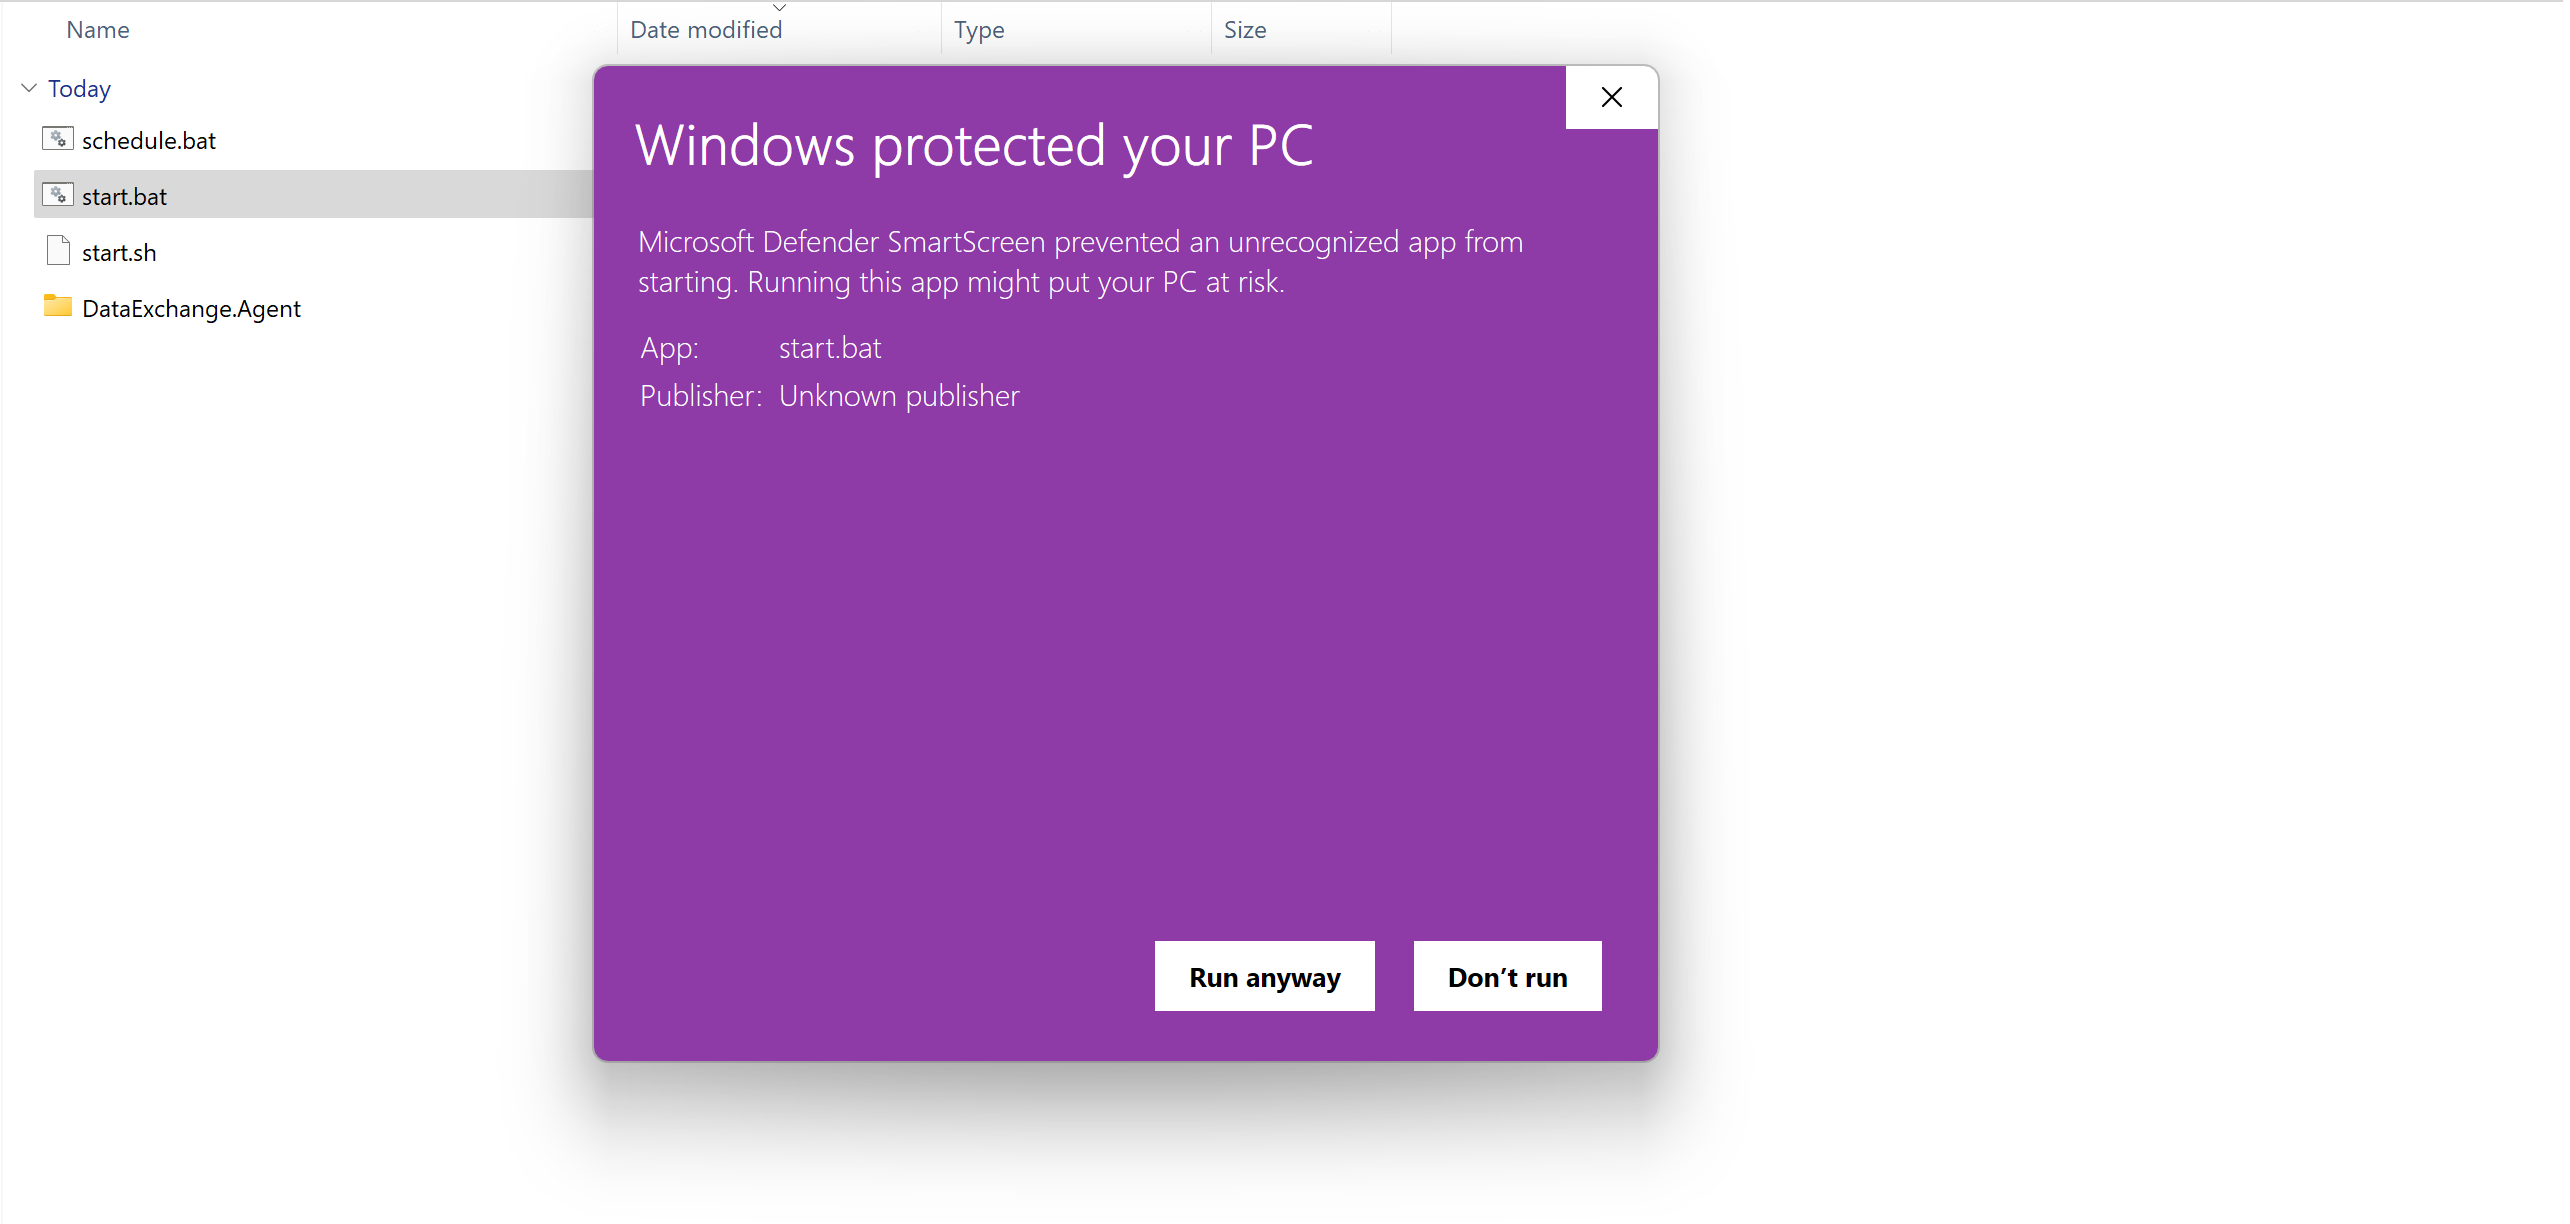
On Windows double-click the start.bat file to run the agent or run the scheduler. After clicking the file, a modal window titled "Windows protected your PC" may appear. To proceed, first click More info and then confirm by clicking Run anyway.
Info
Important: .NET 6 is required to launch the agents. In case you don't have .NET installed on your machine, a message will notify you including the location where you can download it. Download .NET 6 here.
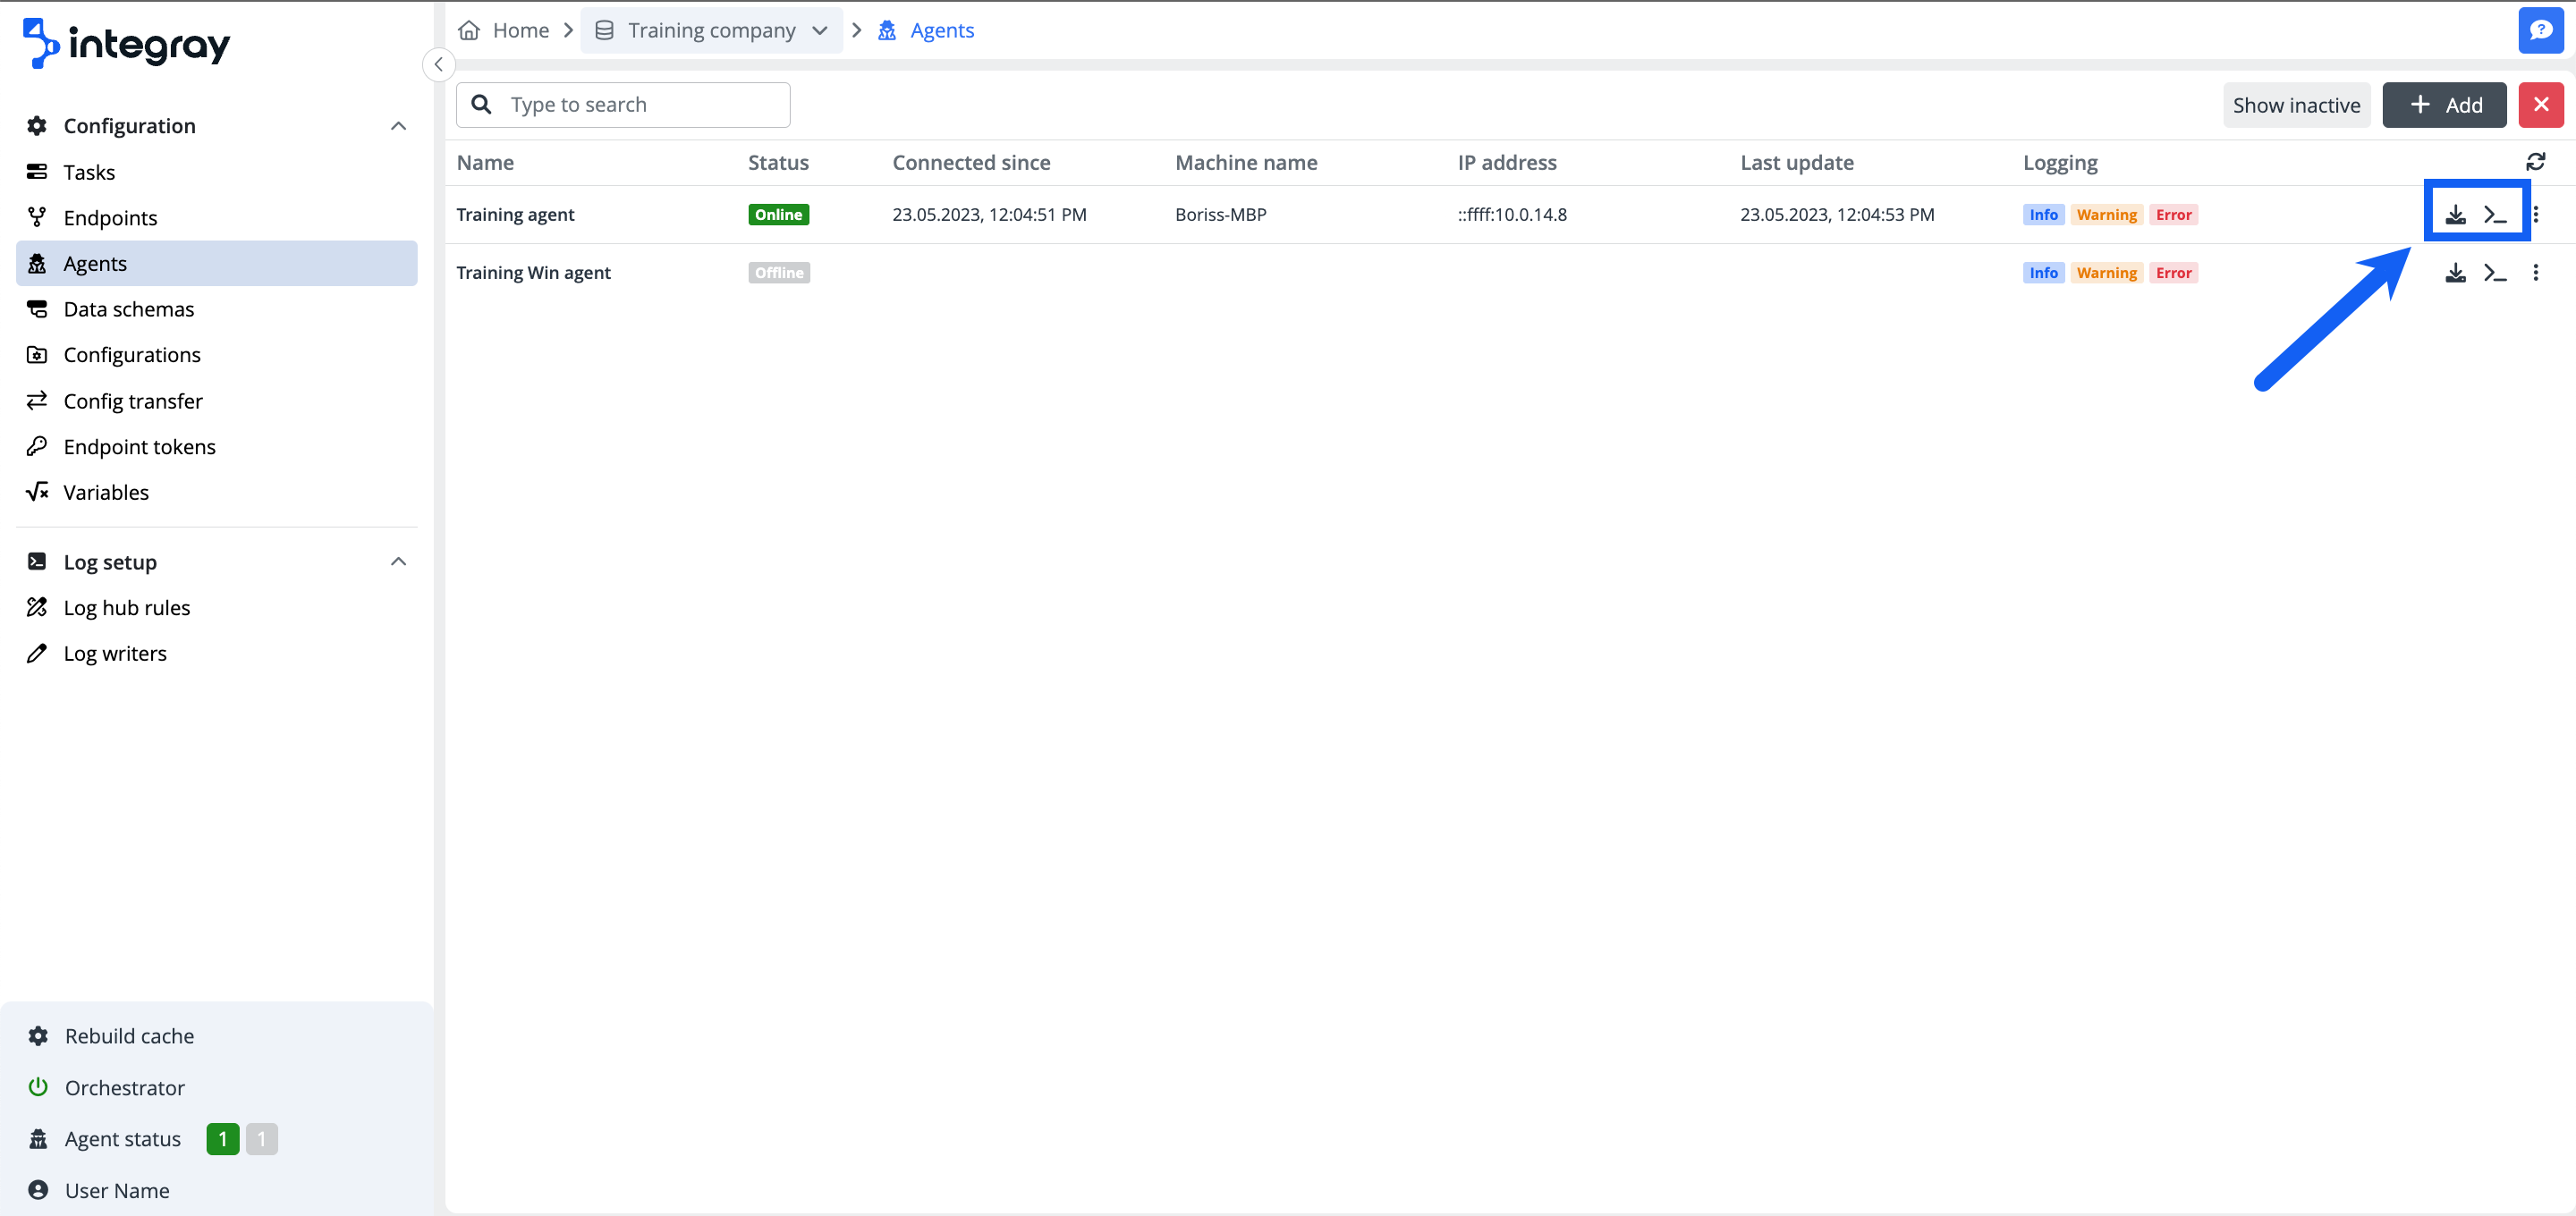
All installed and running agents will be displayed in the list of available agents with the green status badge online.
Agent list
You will find all information about the agents in the agent list. The default view is set to show the active agents, but you can switch between the active and inactive agent view using the button Show inactive/Show active.

The information available on the agent list contains:
-
Name - Agent's name.
-
Status - Information on the agent's status: Online / Offline. You also can will find information about agent status in the footer navigation items - Agent status where you see the number of online and offline agents at first sight and when you click on the color boxes with the counts, you will get detailed information about online and offline agents.
-
Connected since - The date of the last start of the agent.
-
Machine name - The name of the machine the agent is installed and running on.
-
IP address - The source IP address of the agent machine.
-
Last update - The date of the last update of the agent.
-
Logging - The agent log levels set for the agent.

Controls located on the right end of the agent list line give you additional actions to manage and maintain the agents.
-
Download - Downloads a new agent .zip file to update or replace the existing one.
-
Agent log - Navigates directly to the agent log of the respective agent.
Context menu (ellipsis):

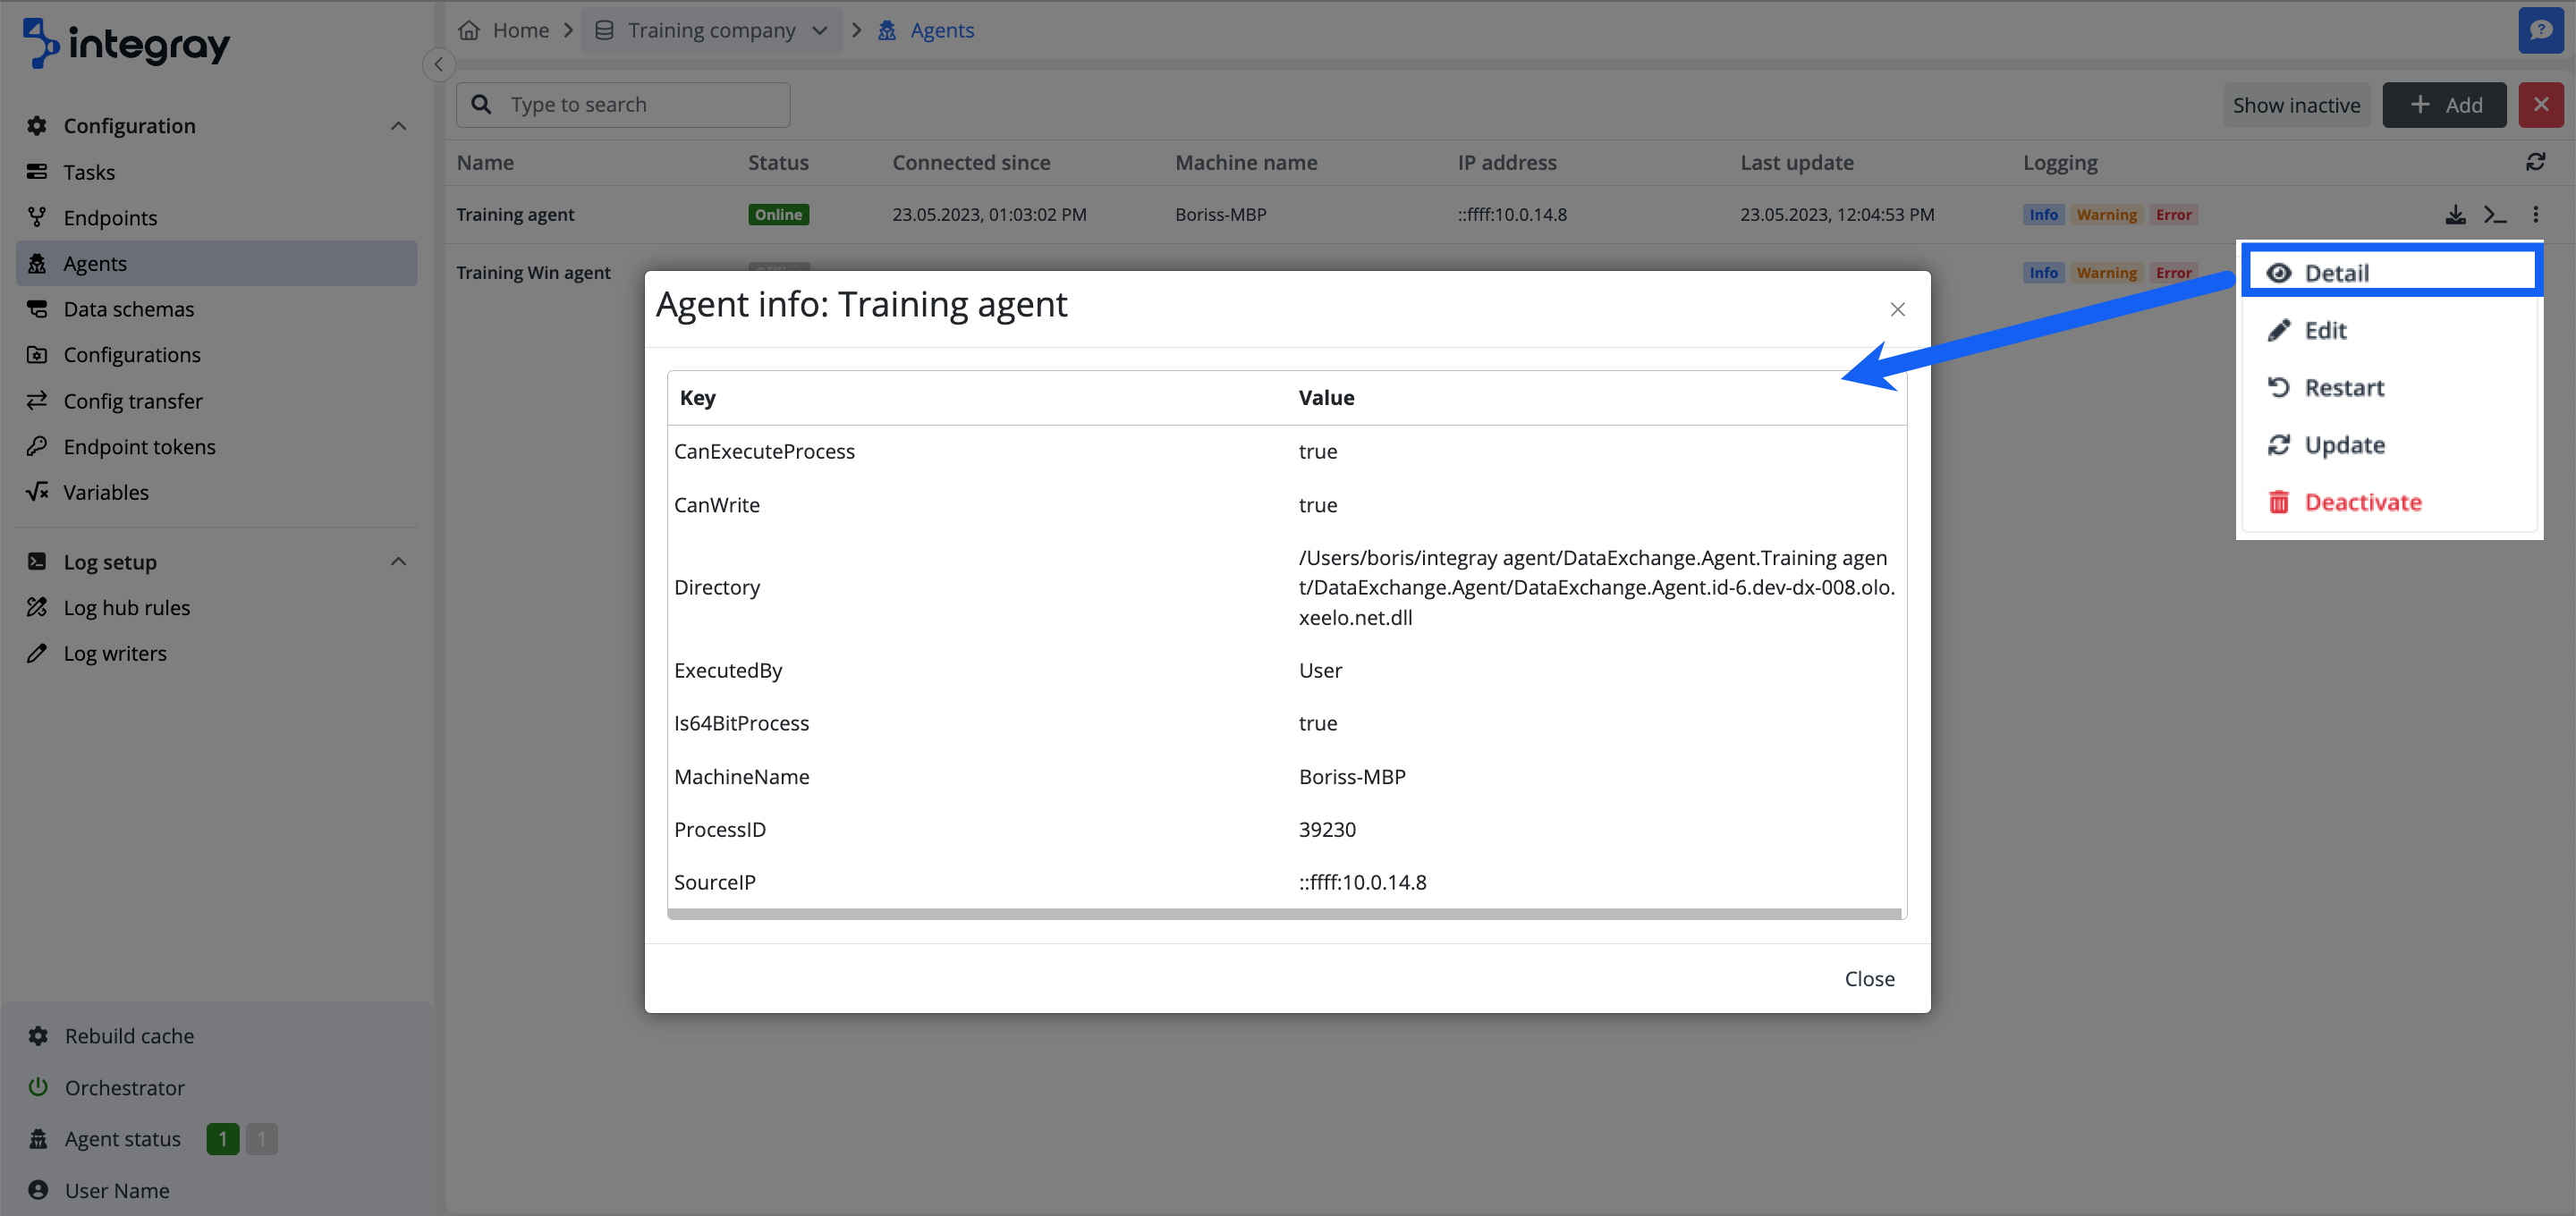
-
Detail - Provides Agent information:
Can execute process,Can write,Directory,Executed by,Is 64 bit process,Machine name,Process ID,Source IP. -
Edit - This provides the option to edit the Agent settings.
-
Restart - This restarts the agent and cancels all tasks executed by the agent.
-
Update - This updates the agent and cancels all tasks executed by the agent.
-
Deactivate - This deactivates the selected agent. You can reactivate the agent later if required.
Warning
The system won't allow deactivation of the agent which is either configured on an active task step of an active task or is currently online.
In the case of configuration on an active step, you will get an error message toast when attempting to deactivate the agent.
In the case of the online status, the option Deactivate won't be even offered as an option in the context menu.
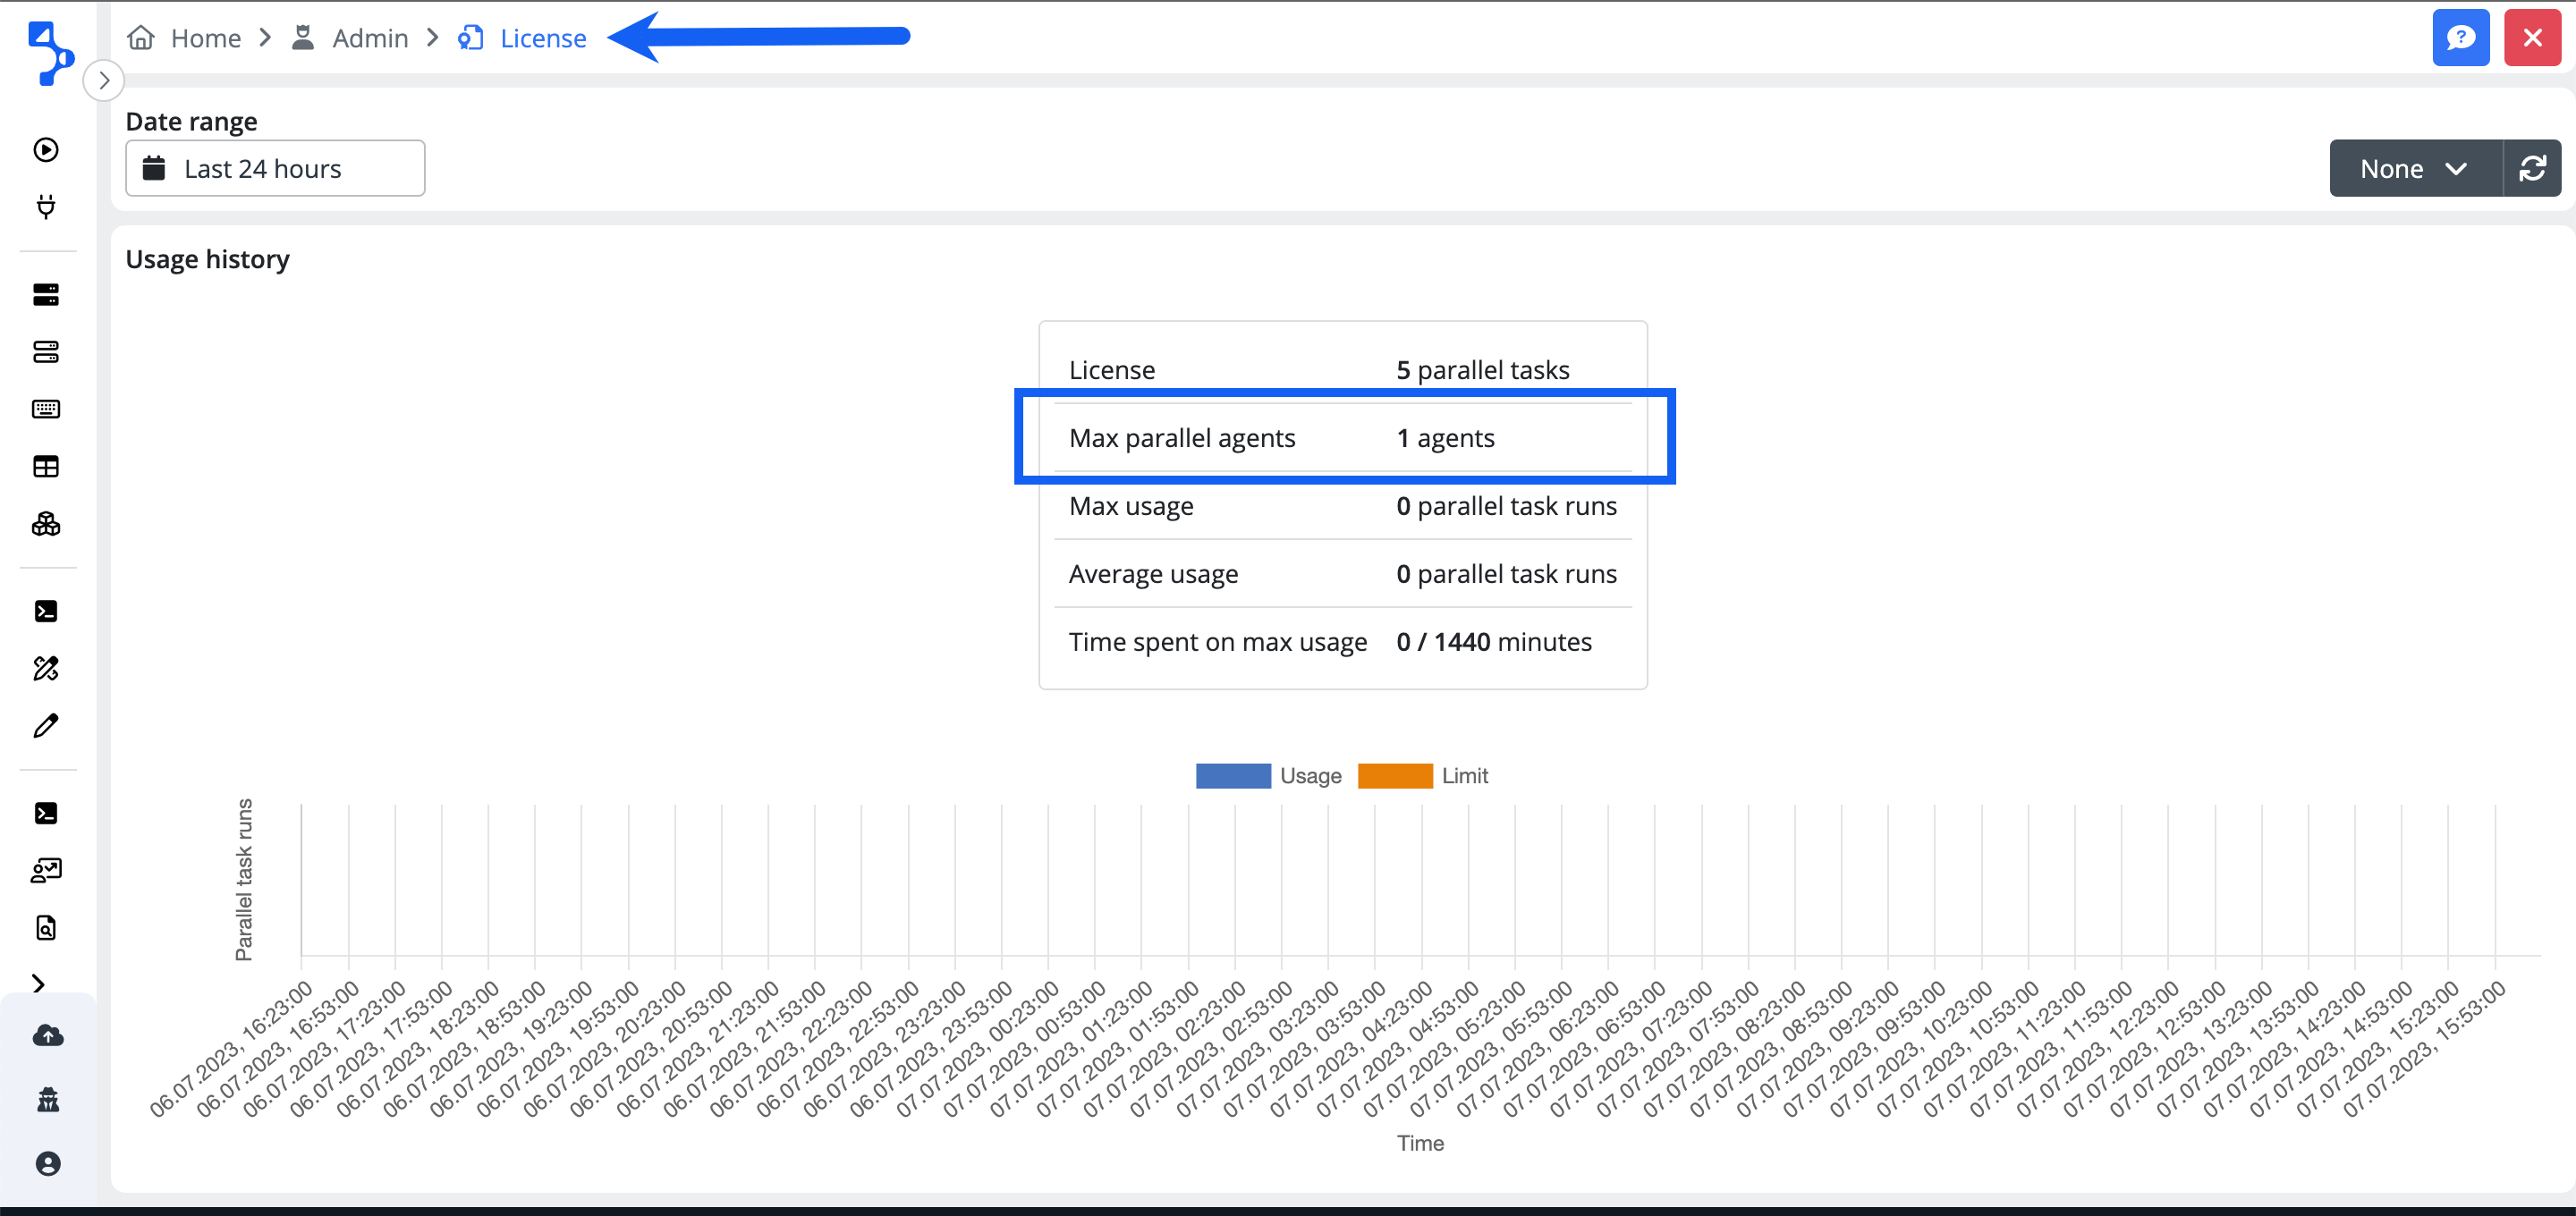
Agent license restrictions
Every platform installation has defined the exact number of remote agents, which are allowed to be installed in parallel. The number of agents is determined by the purchased license.
| Type | # of online agents |
|---|---|
| Trial | 1 |
| Standard | 3 |
| Premium | Unlimited |
| Enterprise | Unlimited |
Note, that the platform is in control of the number of agents and will not allow to install more agents than linked to purchased license. In case of attepmt to install an additional agent, the platform will display an error message notifying you that the maximum parallel number of licensed agents has been reached. The error message will also be included in the log as well as it will be displayed in the agent log as well as in the console e.g. Terminal for Mac, Command line for Windows.
WARNING: Disconnected. Server requested shutdown - Max parallel agents 1 reached.!
You can check the number of max allowed parallel online agents in the role of Administrator in the Administration > Licenses.