Companies
The Company is a frame organizing related tasks, endpoints, agents, data schemas, configurations, and variables under the same umbrella. Enter the configuration tools from here or a add new Company when required. The users usually define Companies with a purpose they represent.
The company can be created either by a standard user with assigned role of Basic or as an Administrator. There are slight differences related to the fact that the user (with the Bacic role) creating a company will own the created company and will be able to manage and maintain it. The user, however, will only be able to manage and maintain the companies in his/her ownership.
The Administrator, on the other hand, can create new, view, and maintain the entire set of companies using his/her access to Administration > Companies. The Administrator's view of the Create new company differs from the User's by an additional field: Owner - where the owner can be assigned and/or modified by the Administrator.
Create a new company
Create a new company as a standard user with the Basic role
As a standard user, you can create the company in two different ways:
-
from Home screen > Content navigation menu > Companies > + Create new button, or
-
from Home screen > Company overview panel > Comapnies > + plus button.

Standard user with the Basic role does not have access to Administration.
The standard user can create new companies from the Home screen and can also edit owned companies, but is not able to access the administration section to edit other companies.
Create a new company as an Administrator
In case you are authorized as an Administrator, you can manage and maintain all the companies in the platform. To add a new company you go from the Footer navigation item > Menu item > Admin > Companies > and click + Add button.
Company list
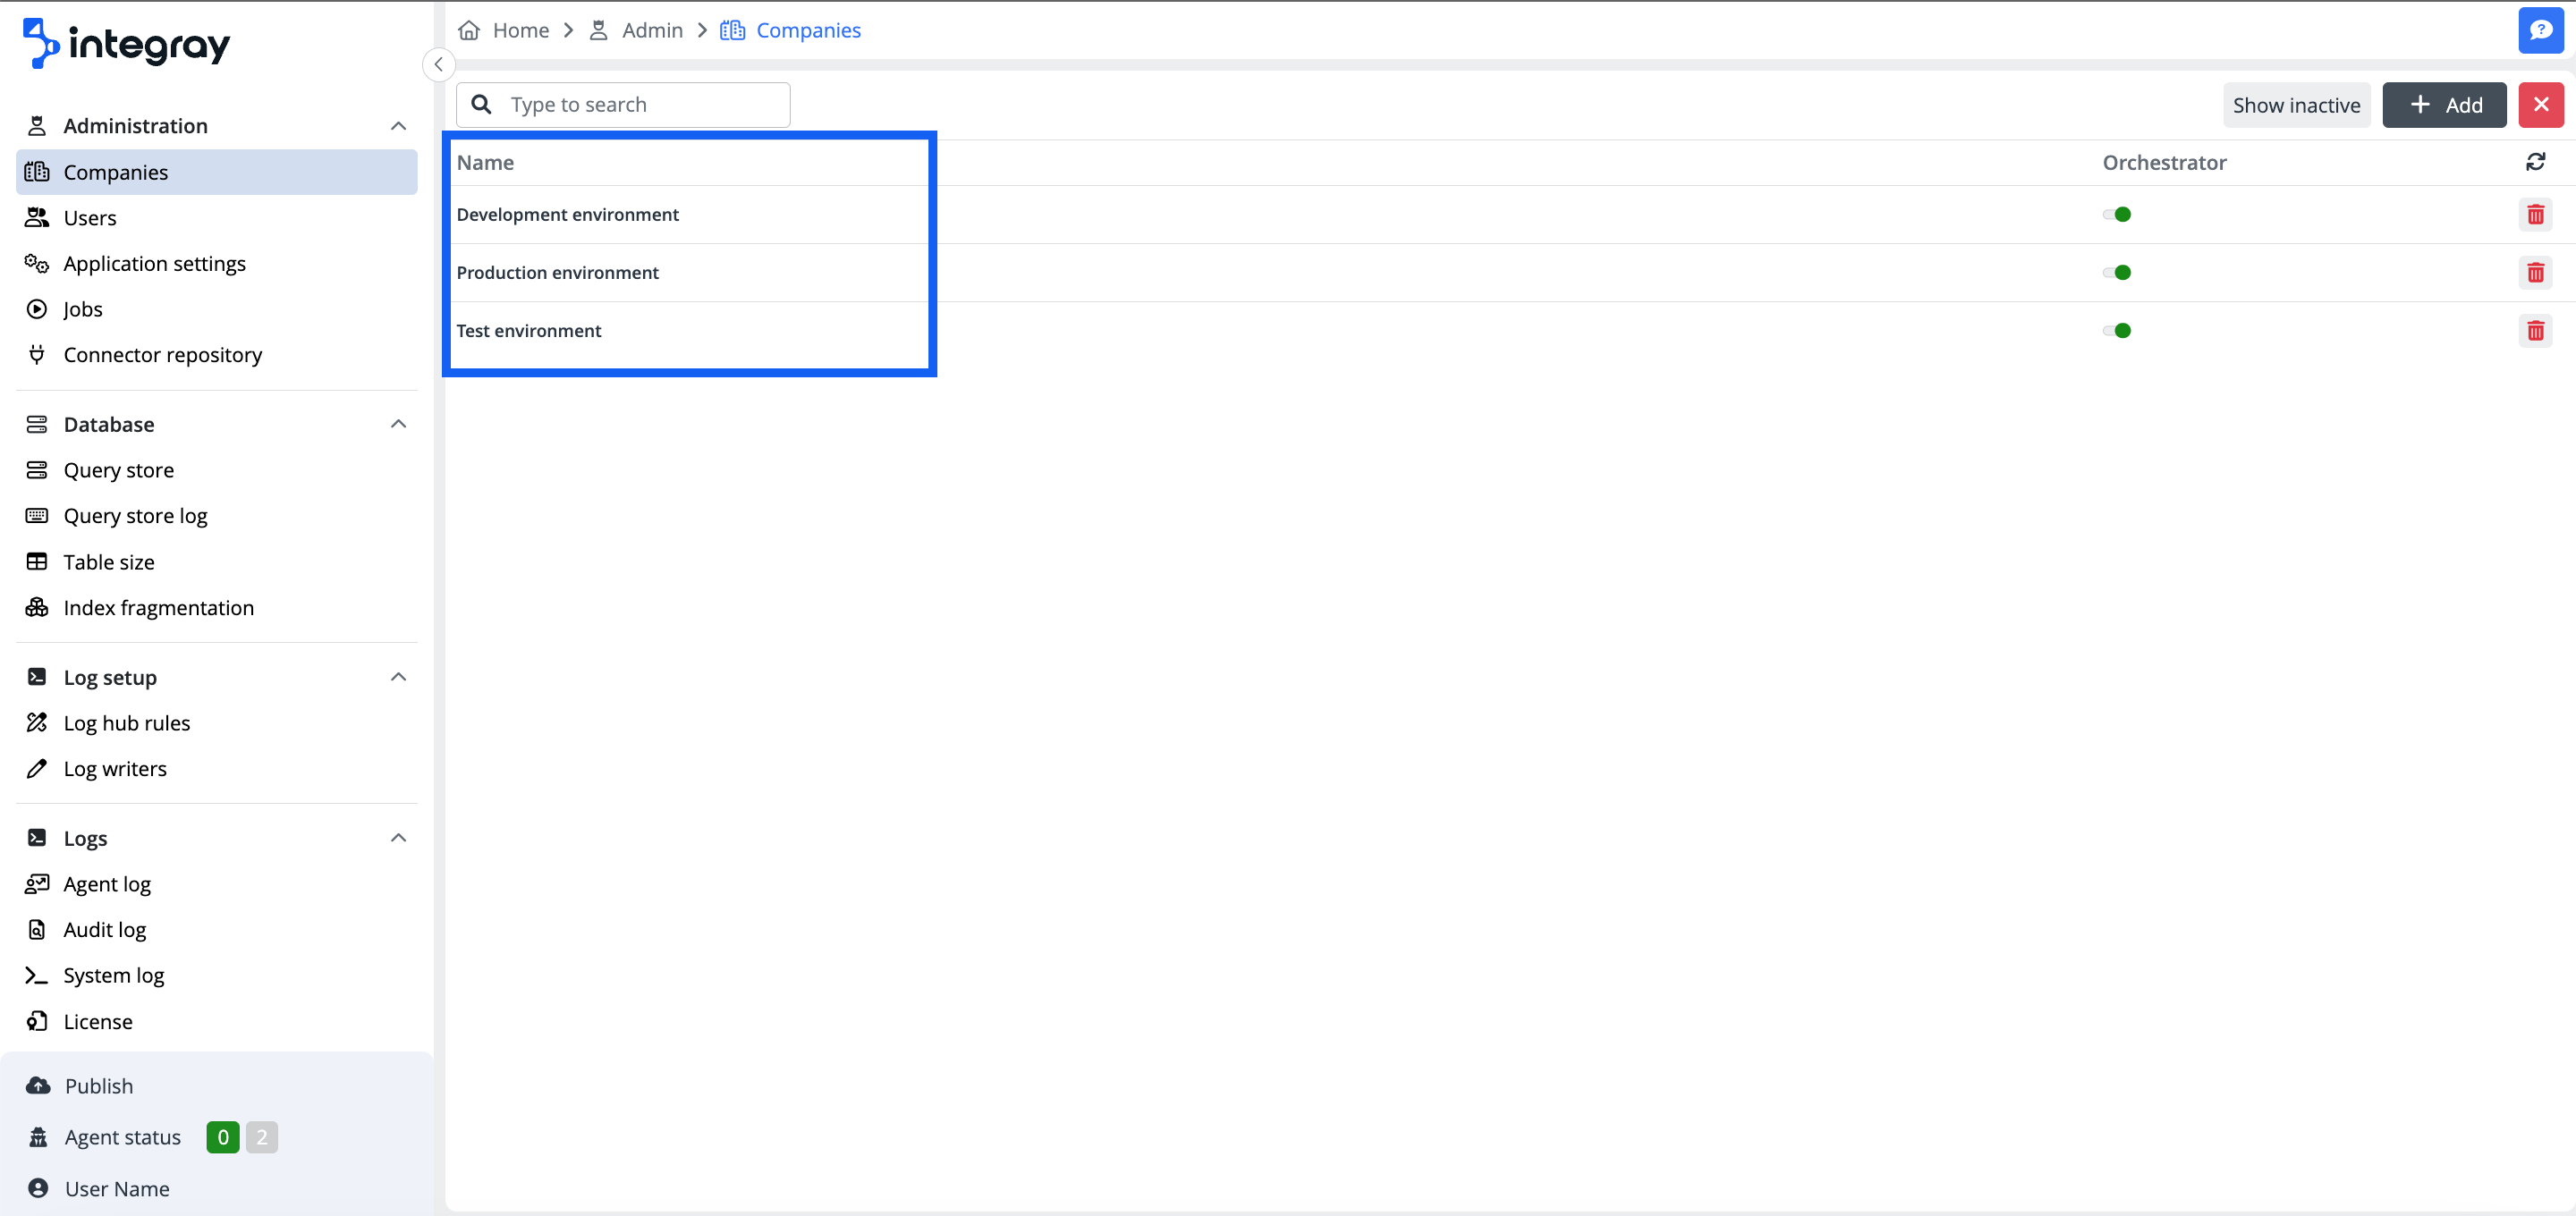
As Administrator, when you navigate from Footer navigation item > Menu item > Administrator > and select Companies, you will land in the Company list.
The company list displays the names of all active companies available on the platform. In the case of an extensive company list, you can use the search field to facilitate finding the required company. Besides the company name, every company record displayed on in the list contains three additional controls:
-
Orchestrator - A switch to turn on or turn off the orchestrator for the selected company.
-
Publish – A button to reload the cache for the specific company.
-
Deactivate/Re-activate buttons - Two buttons - red trash bit and grey recycle arrows sign enabling deactivation and reactivation of the selected company. When you click the buttons to deactivate or reactivate the selected company, a small confirmation dialog window pops up on the screen to confirm that you want to perform the action.
In addition to these controls, the grid also displays other key information related to each company.
-
Type - Selected company type, used for better organization of companies.
-
Tags - Used for easier sorting of companies.
-
Last Publish - Displays the date and time of the last successful publish for the selected company.
-
Published Tasks - Shows the number of successfully published tasks out of the total number of publishable tasks.
-
Published Endpoints - Indicates the number of successfully published endpoints out of the total number of publishable endpoints.
-
Task Run Limit - Specified maximum number of task runs that can execute in parallel within that company.
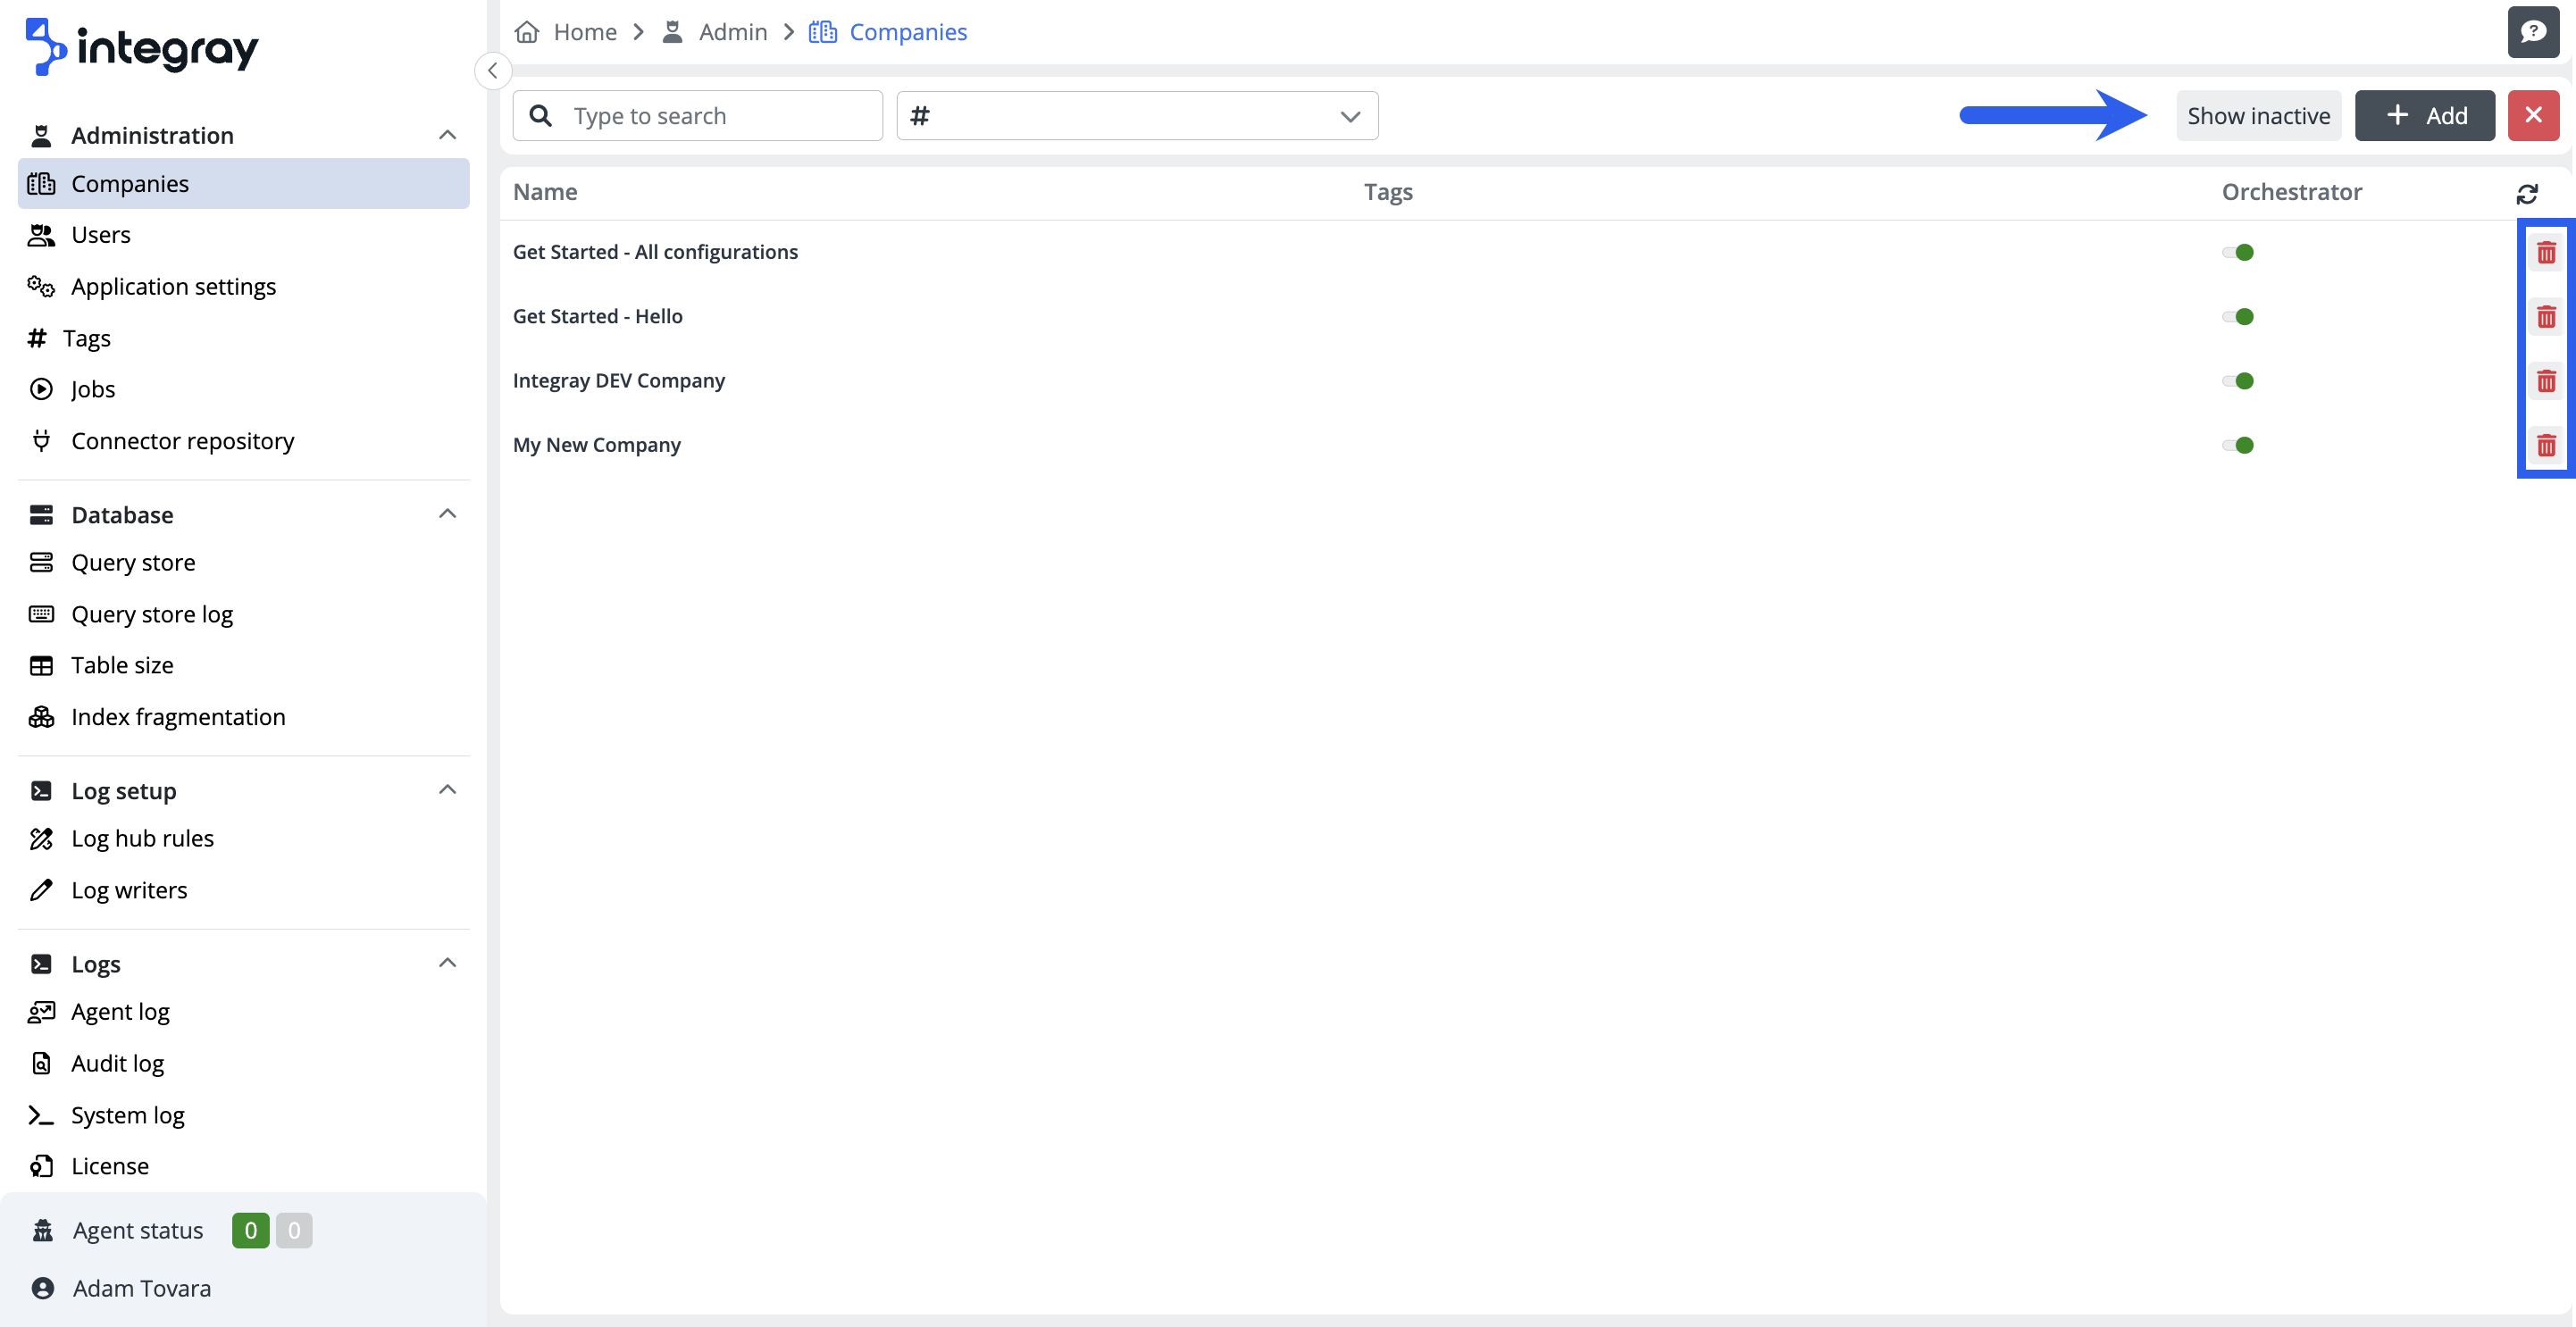
The header of the Company list, besides the search field and Add button, contains the Show active (inactive) button, switching view between the active companies list and inactive companies list, and a Publish all button that enables a bulk cache reload for all companies currently listed.
Steps to create your first company:
Click the blue plus button on the Home screen -> Company overview panel or select + Create new option on the left Content navigation menu. You will open a modal window named Company consisting of 6 sections on the left side under the label Company detail:
-
General,
-
Data retention
-
Task step behavior
-
Remote control
-
Config transfer
-
Remote config transfer - source
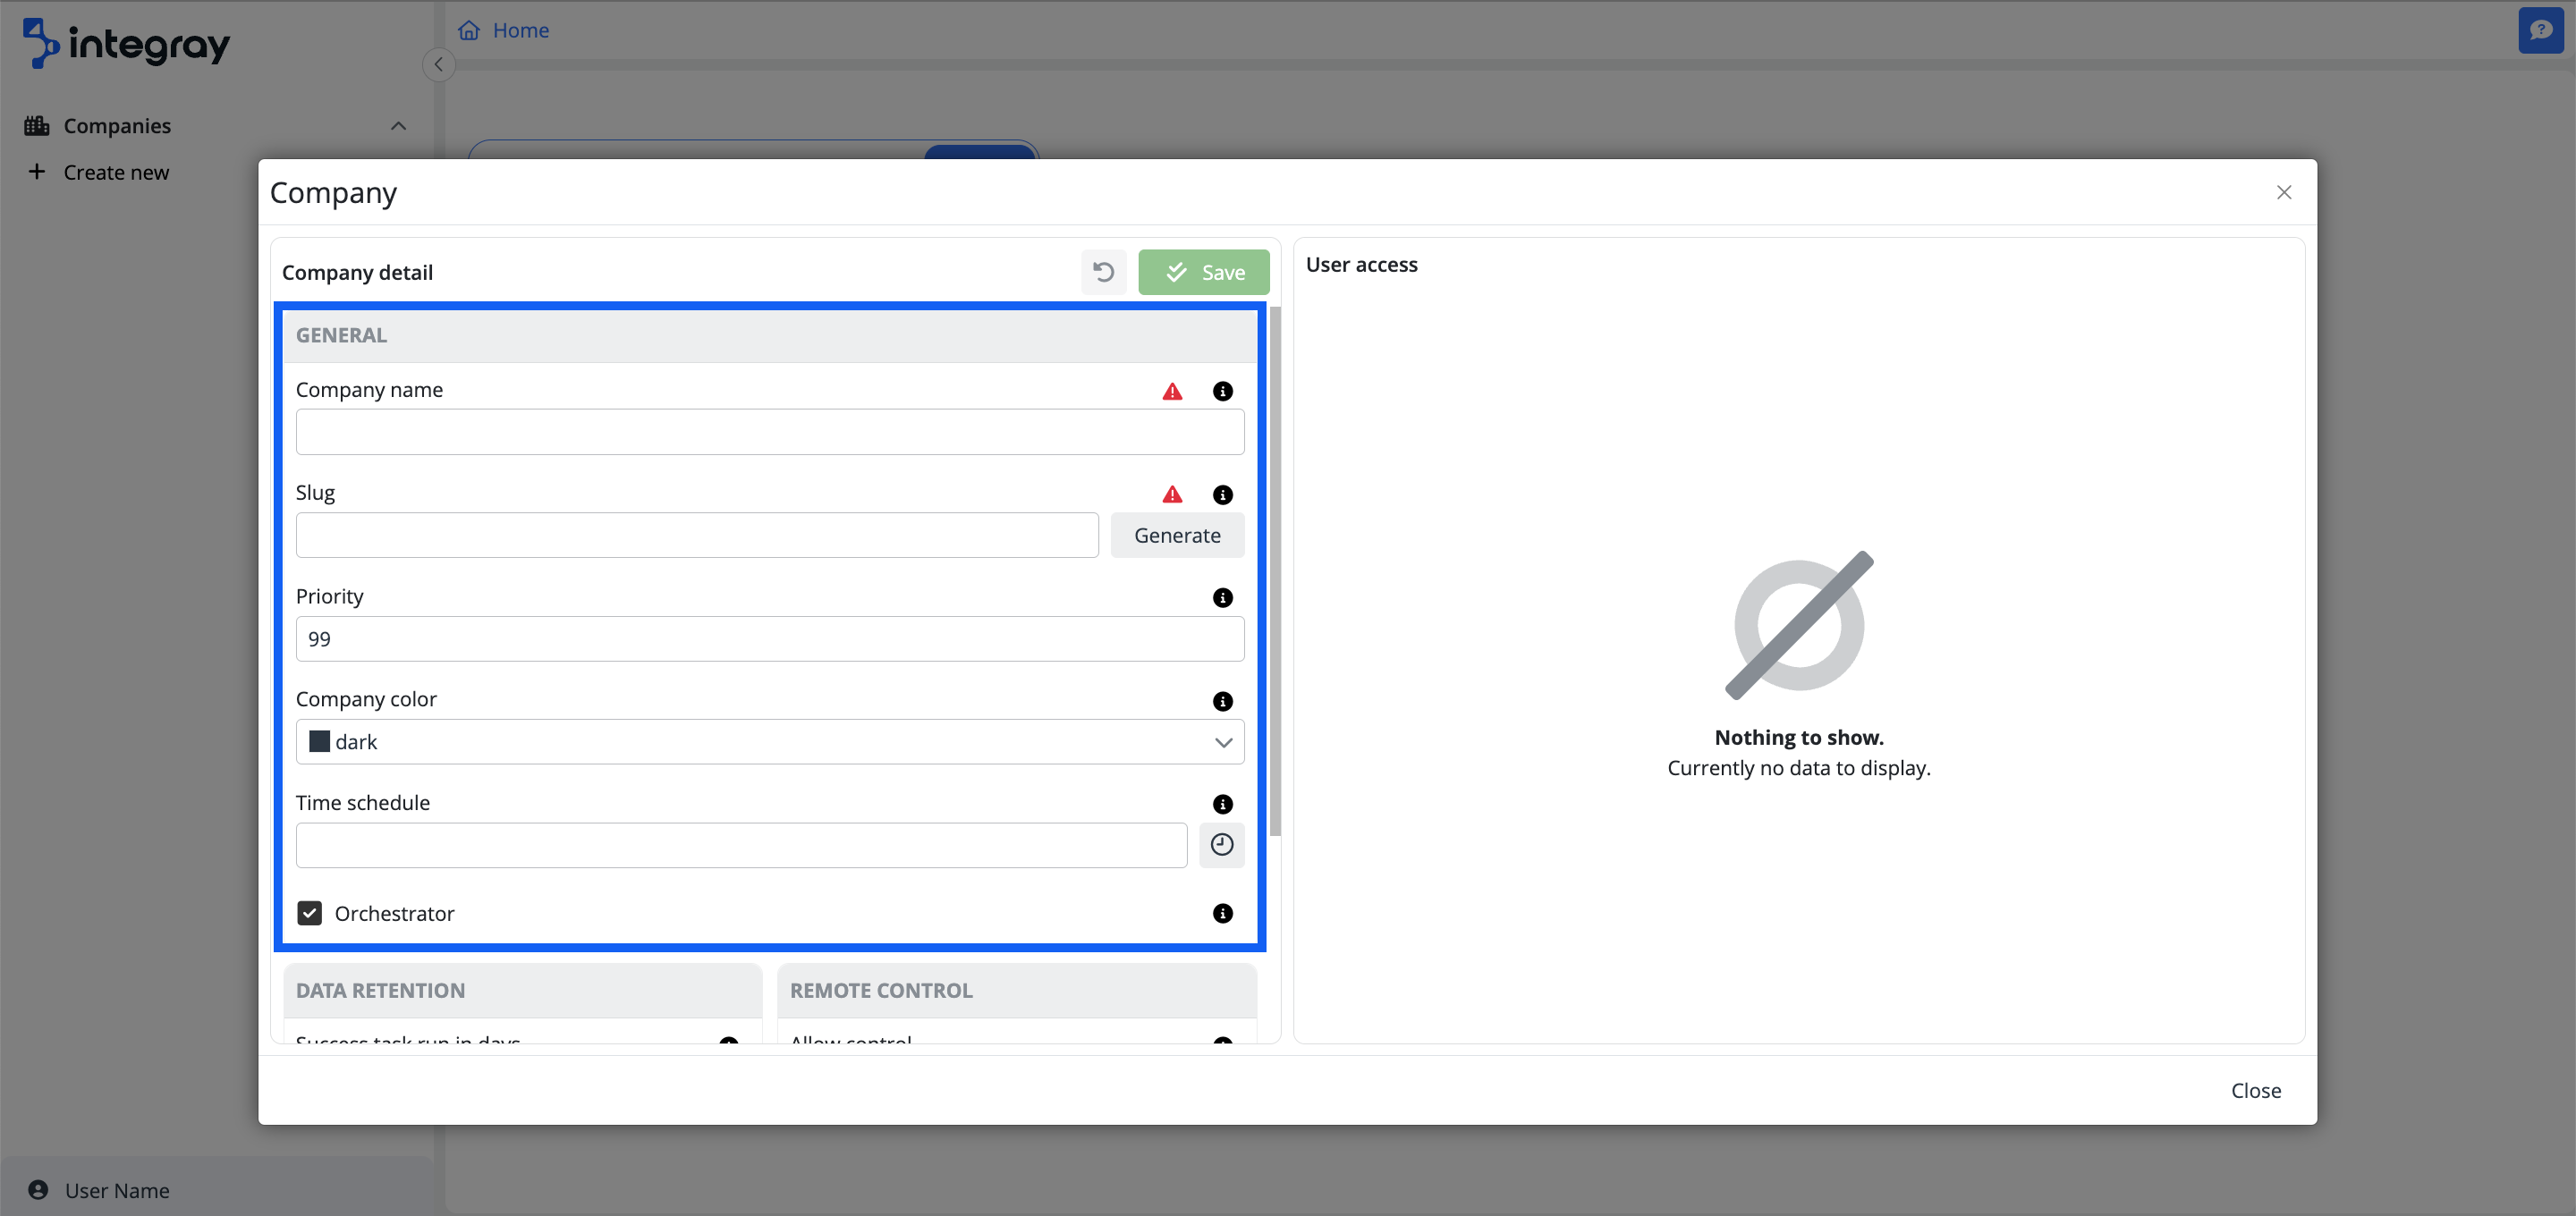
Another section in the right part of the form called User access, where you can assign users with the required roles. This section becomes available after saving the form. To save the form, you need to fill in all mandatory fields (marked with a red exclamation point symbol).
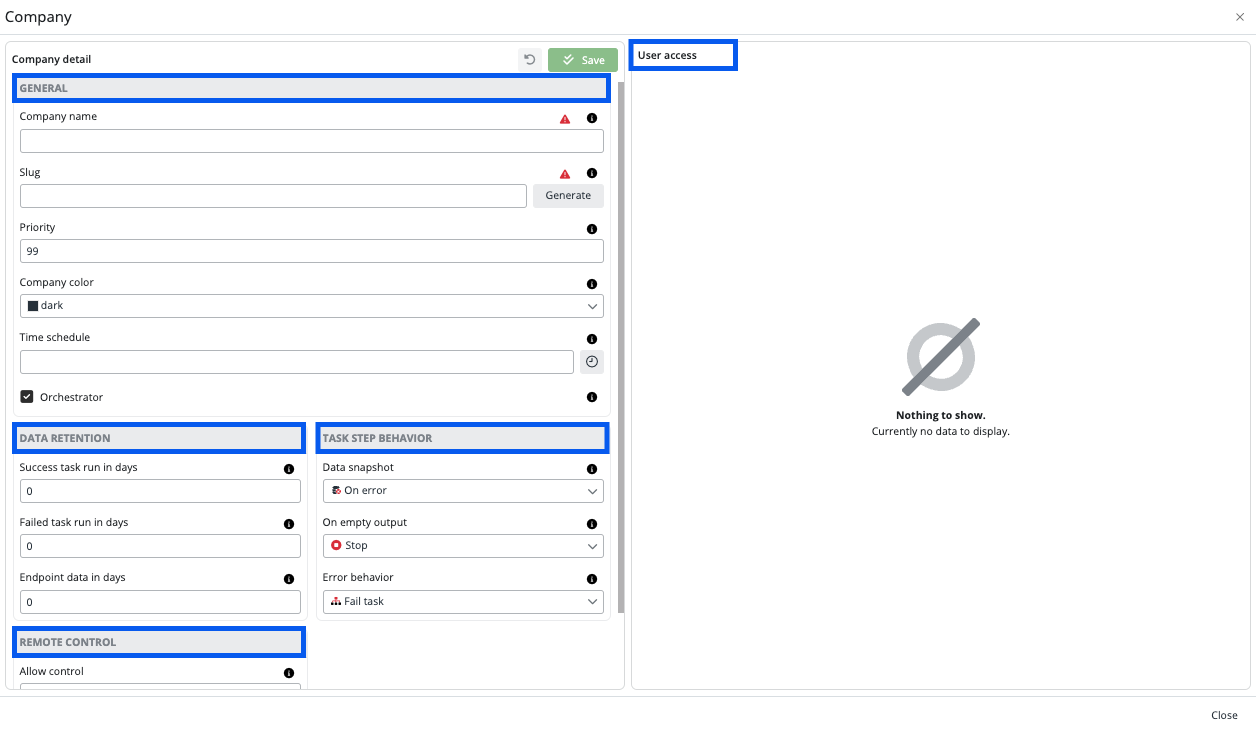
General
In the section general fill the mandatory fields as minimum requirements to proceed with the setup of the company details configuration.
Company name
User-defined name of the company. Practical tip: use names describing the purpose of the bundled integrations.
Naming a company
The name of the company can express the utilization purpose. E.g. you can differentiate between environments using differently named companies -> Company 1: Development environment, Company 2: Testing environment and Company 3: Production environment. This is a practical way to organize your platform.
Slug
The company slug is the middle part of the URL under which the endpoint is available: https://<server_url>/api/endpoint/<company_slug>/<endpoint_group_slug>/<endpoint_slug> This is a string that conforms to the URL rules but is descriptive and still understandable to the user. You can either create your own slug or have it safely generated from the company name. The slug should contain only the characters a-z, the digits 0-9, and the symbol -. Spaces, underscores, special characters, and accented characters are not allowed. Slug is a mandatory field and must be filled in before saving.
To simplify the creation of the slug, click the Generate button.
The slug based on the company name will be generated, e.g. Company name: First company, the Slug: first-company.
Company slug is mandatory and must be unique!
You will not be able to create a new company without populating the slug field and you must ensure that the slug value is unique. Two companies can't have the same slug value. However, they can have the same company name.
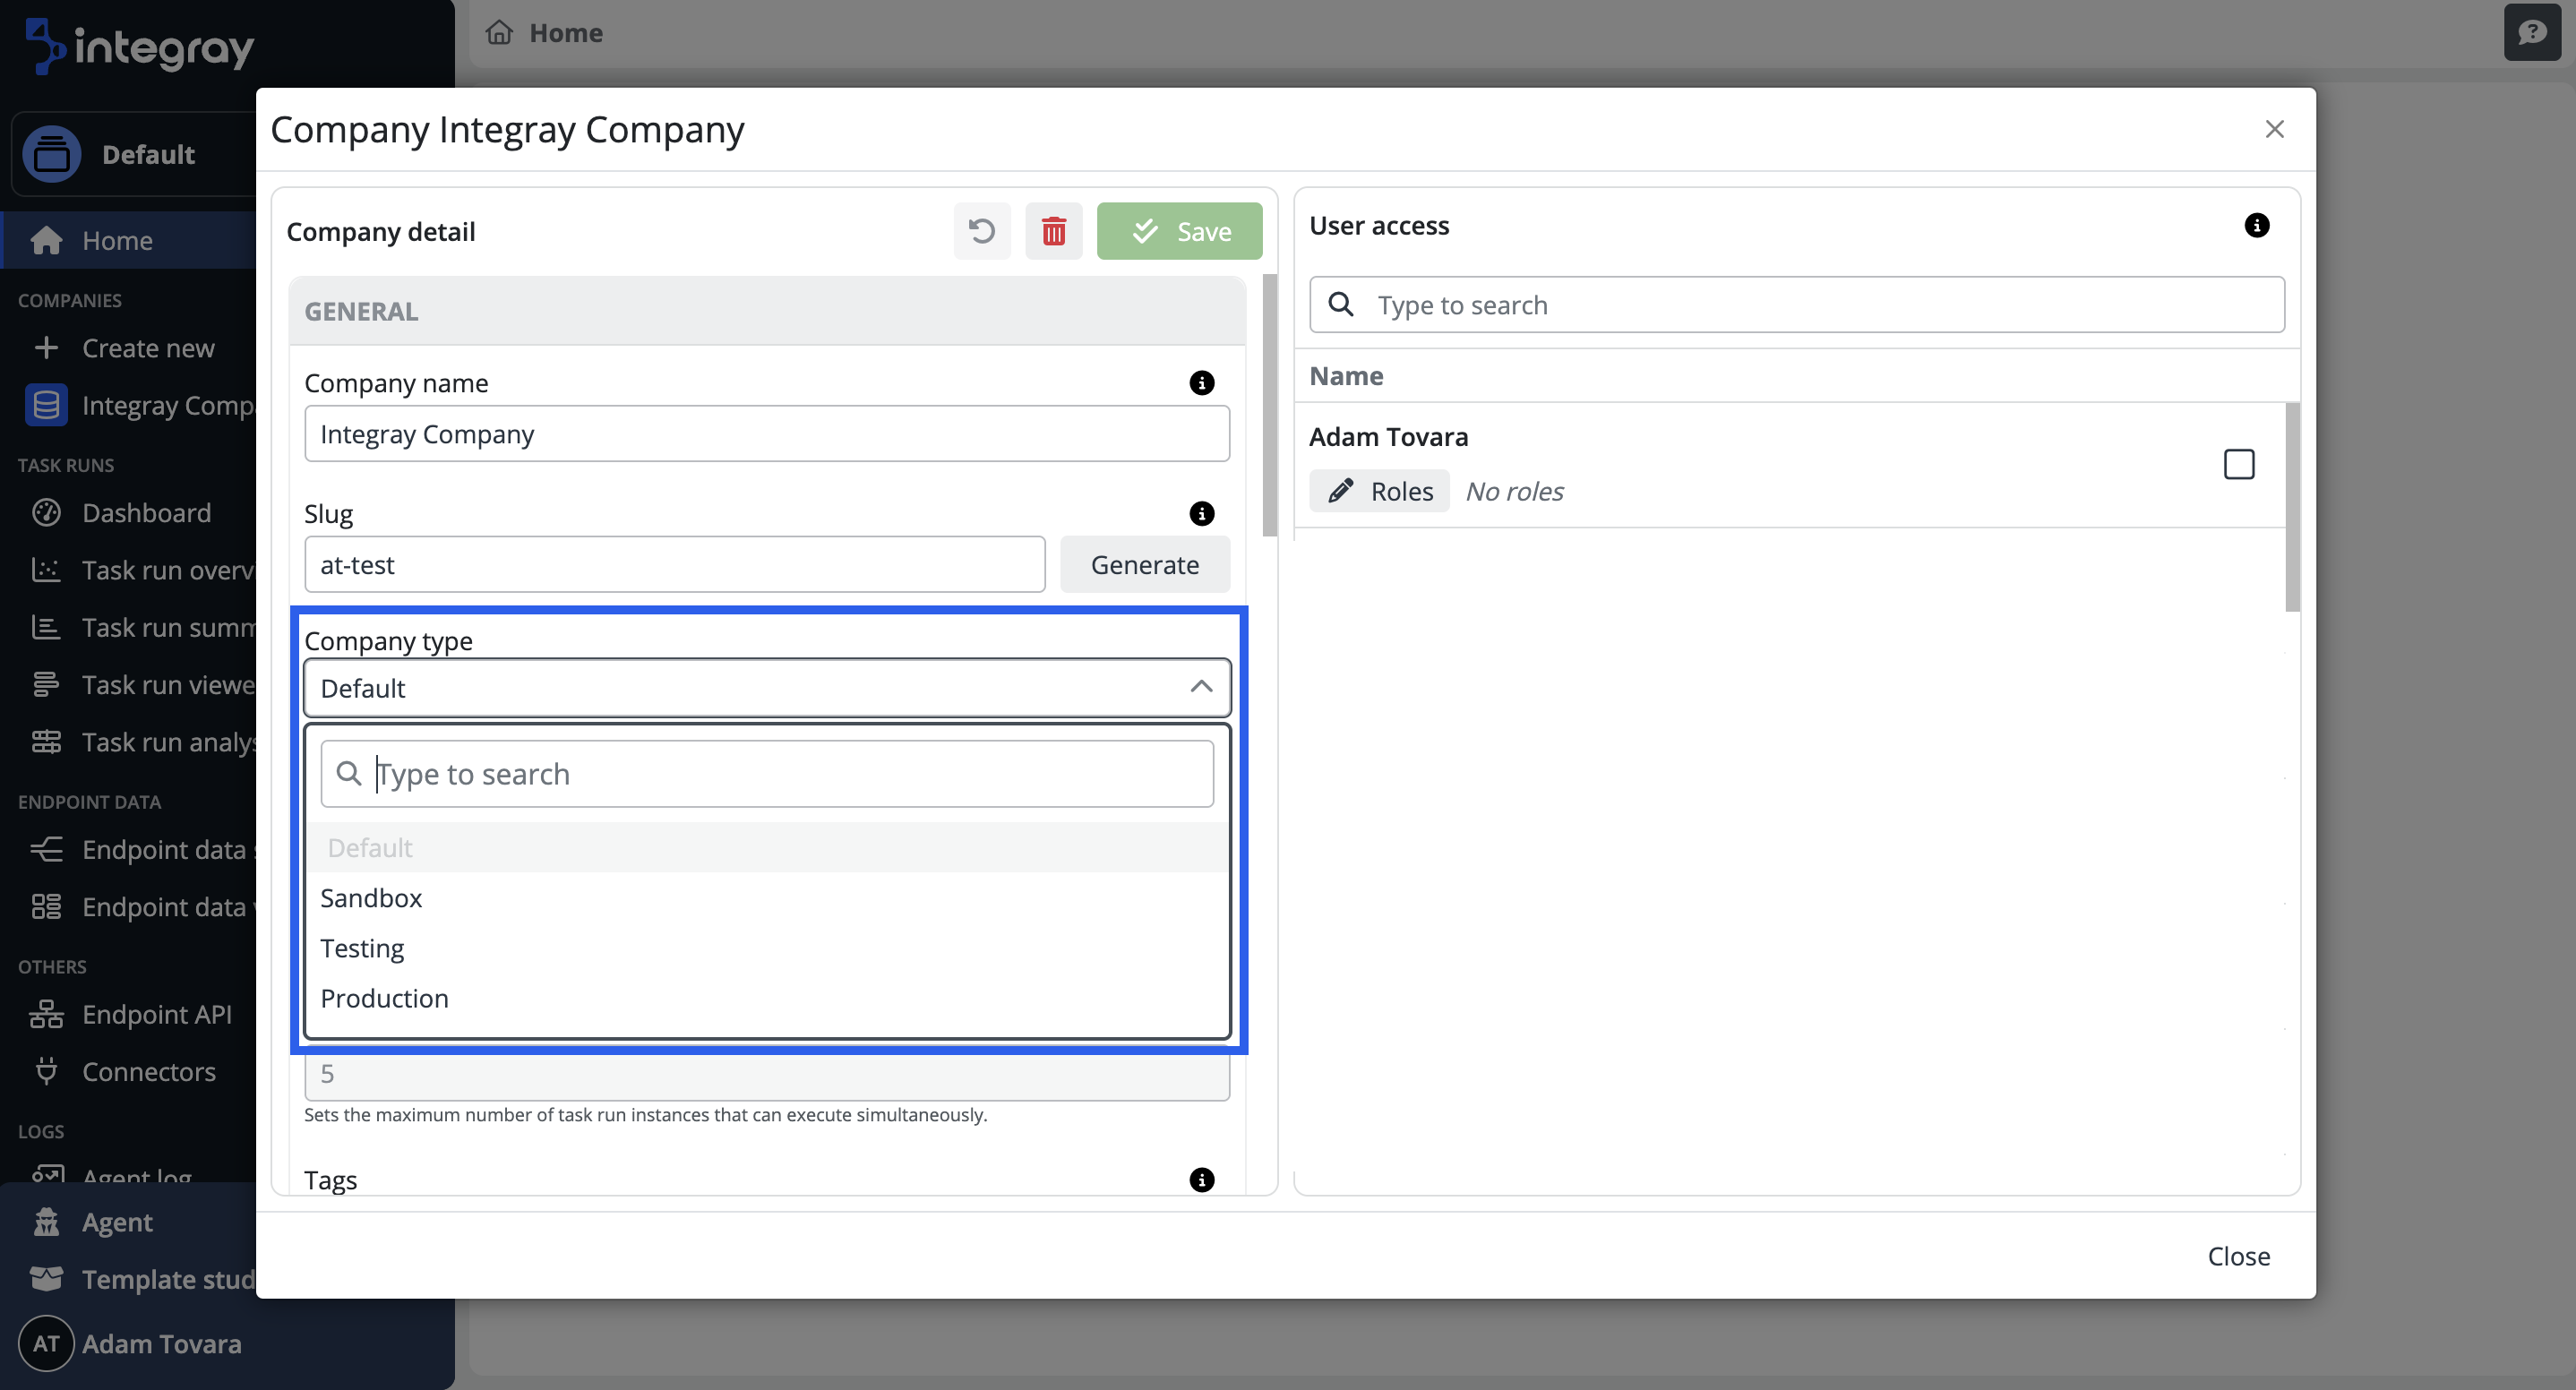
Company type
Company type is a classification that helps improve clarity and organization of different companies within the system. When creating a new company, you can define its type to better manage its purpose and usage. This classification enhances visibility and structure within the system by distinguishing different types of companies.
Availability to set company type
The option to select the company type is available only to users with a Premium license. The company type is automatically set to Default for users without a Premium license and cannot be changed. For details about available plans, see Pricing.
The company type plays a crucial role in determining the appropriate level of access and control based on the environment. User rights should be set accordingly. In Development, you can edit, while others have view-only access. In Production, only special administrators should have access—either as viewers or with log access—while editing remains restricted to prevent disruptions. A clear sorting method is crucial to managing roles and access levels effectively. This distinction ensures that different company types are assigned the proper access to maintain smooth operations.
The available company types are: Default, Sandbox, Testing, Production.
- Default - a non-categorized option, suitable for small solutions where categorization is not necessary.
- Sandbox - designed for development, experimentation and learning without any risk of affecting the system.
- Testing - this is where all developed integrations can be stored for testing and transfer to production.
- Production - the live version that should be running. You should be fully aware of what you are publishing, as changes may impact operations.
Once a company is created, its type can be changed in the company settings section if permitted by your user permissions.
Permissions for modifying company type
- As an owner, you can modify the company type only in the companies you own.
- As an admin, you have the ability to modify the company type in all companies.
Owner
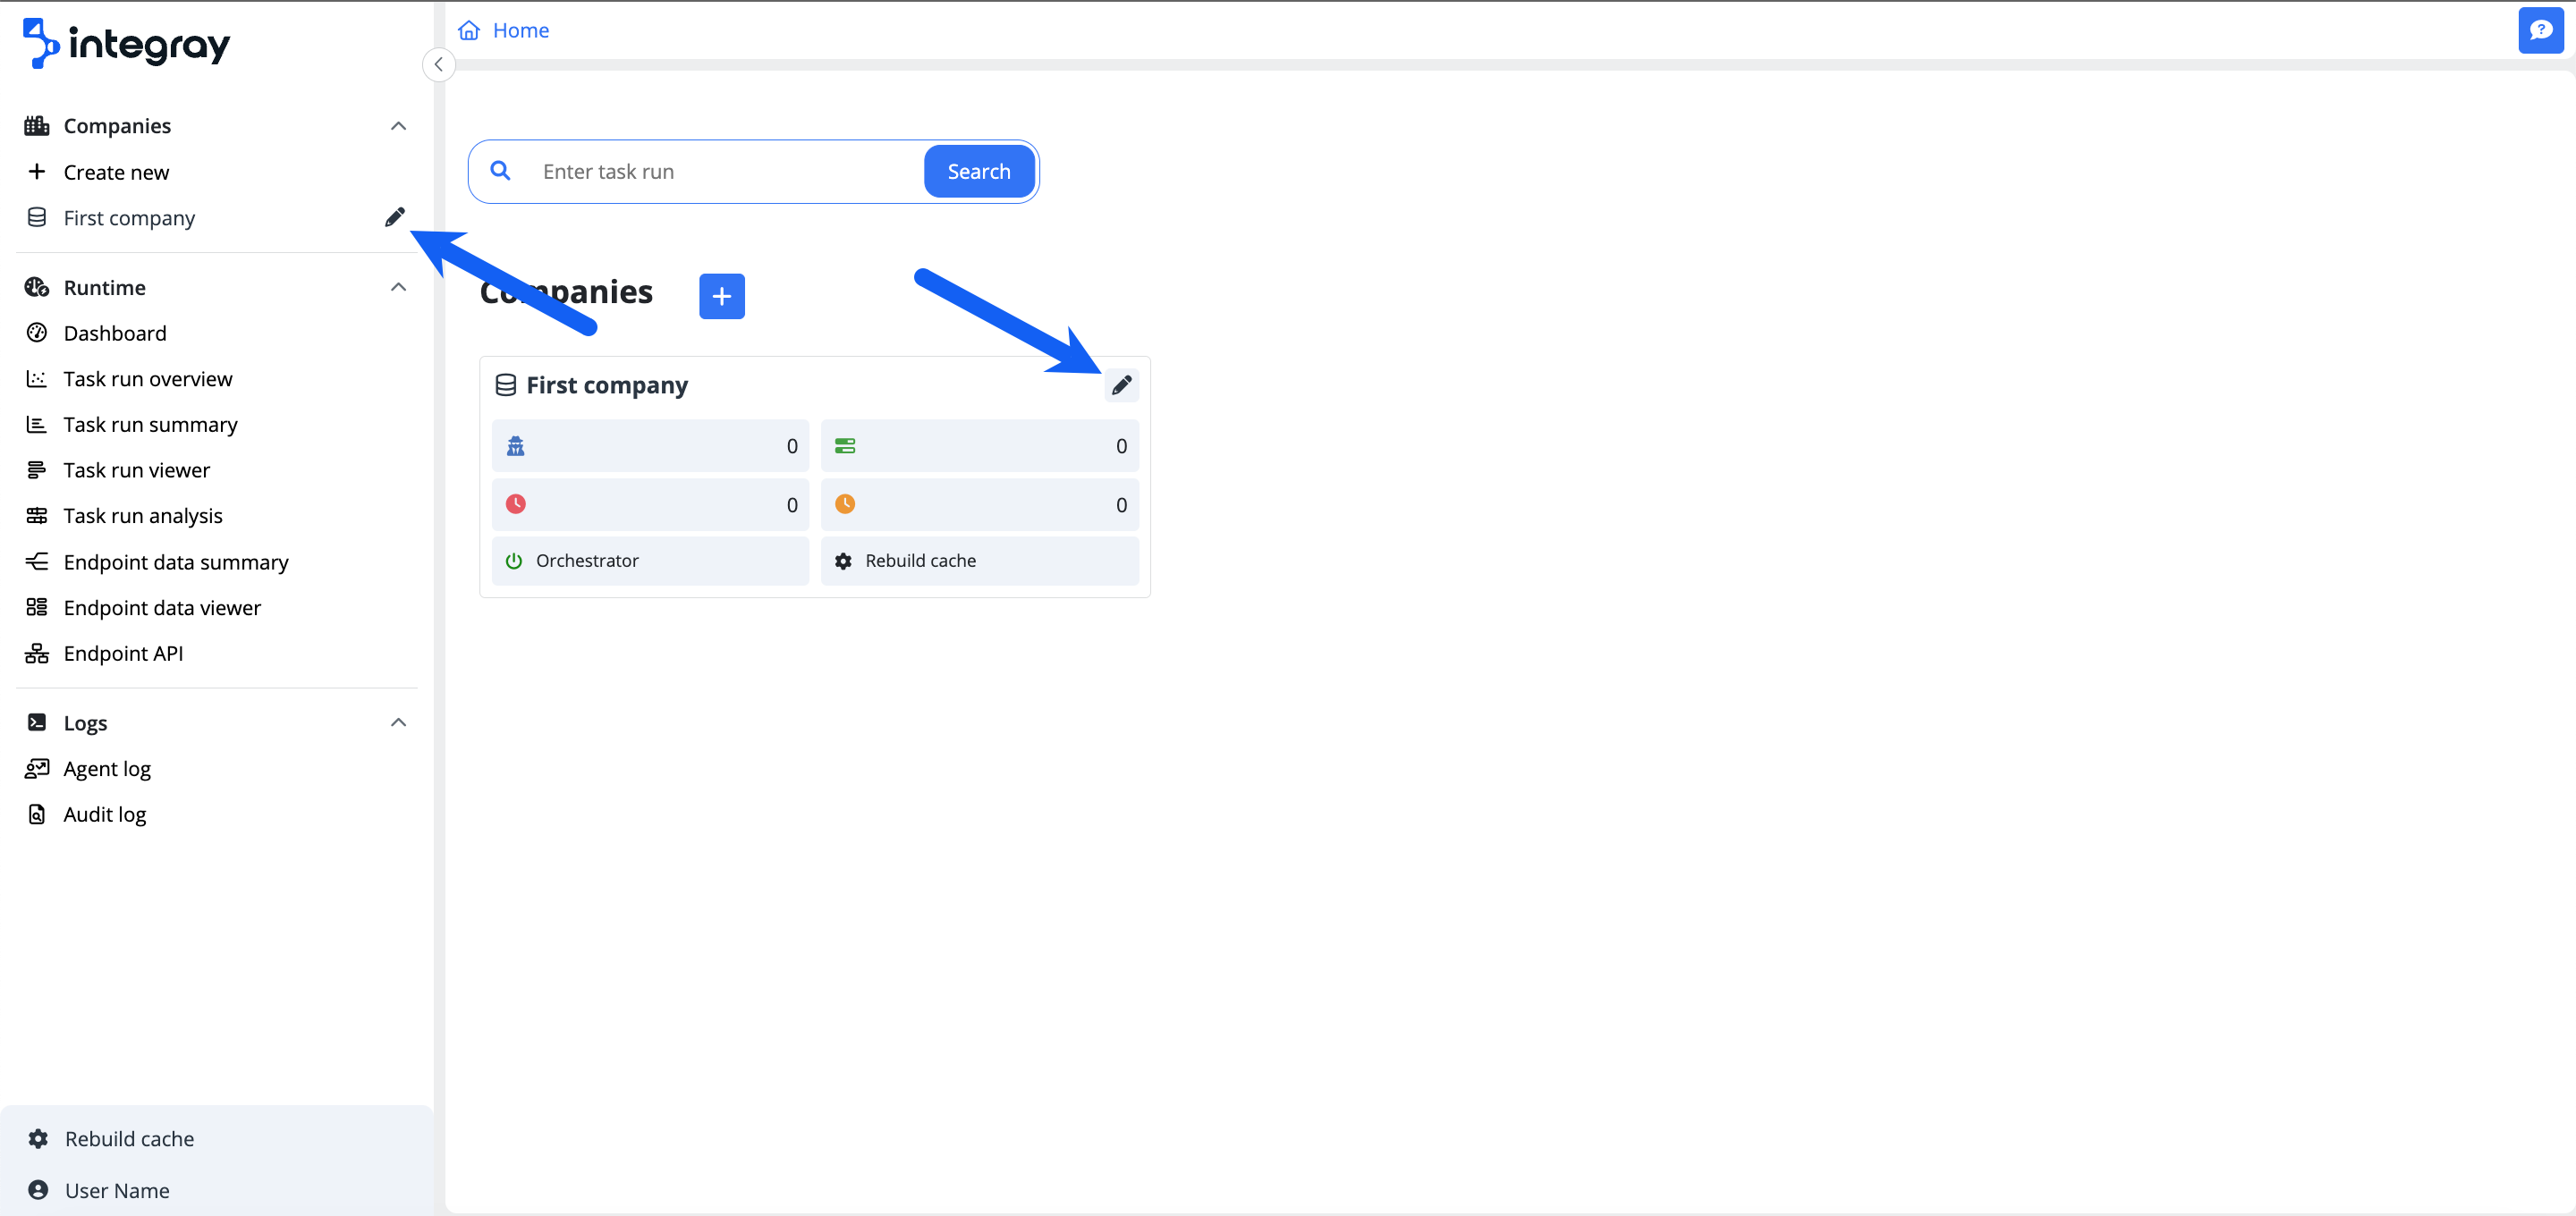
This field is displayed only if a new company is created from the Administration section. The company owner has the right to manage the settings and the configuration of the owned company. The owner can grant access to work in the company workspace to any of the platform users. The users who are assigned as the company owners will see on the Home screen > Content navigation menu > Companies or Company panel a small pencil icon on the right from the Company name. The pencil icon enables access to company maintenance.
Priority
Tasks in the platform are processed in parallel integration threads. The main integray package does include 5 threads, however, you can purchase additional threads if required. In case there are all available integration threads used, priority plays an importatnt role. The integrations are processed according to the set priority. Each Company must have a set default priority. Every integration Task configured within the Company does have the option to set its own priority, which has precedence before the Company set up. Task priority defaults from Company setup. The default value is set to 99.
Priority precedence
Priority value range: 1 - 99. Lower value has precedence.
Company color
As part of the customization options, you can select and assign specific company color from the list of 10 colors. Colors support visual diferentiation, easy navigation, enhanced organization, and a more user-friendly interface.
Company colors
Dark, blue, cyan, green, yellow, magenta, orange, teal, red, purple.
Tags
You can also assign tags to a company. Tags help categorize and organize companies efficiently. Users can either select an existing tag or create a new one by clicking into the field, typing the desired tag name, and pressing Enter.
Task run limit
When creating a new company, you can define a task run limit, which specifies the maximum number of task runs that can execute in parallel within that company. If the field is left blank or set to 0, the task run limit will default to the maximum allowed by the license.
Once the task run limit is set during company creation, it cannot be edited by standard users. Only an Administrator can modify this setting later.
If the task run limit is set to 1, an additional task run is automatically allocated to ensure that task containing an Integray Start Task Connector can be executed. If set to 2 or higher, the number of task runs available will match the set limit.
Task run limit
The task run limit provides an expected upper limit rather than a guaranteed allocation.
Time schedule
This option allows you to set up a time window when the orchestrator will process your integration tasks. If not set up, and the orchestrator is up, then integrations will run non-stop. Click the clock icon on the right of the Time schedule field to set up the run-time range.

Orchestrator status
The orchestrator manages the integration process by driving the execution of the planned integration tasks according to their priorities. If the orchestrator is disabled, no integration task for the respective company will be executed and processed.
Make sure the orchestrator is on for the company.
Data retention

Success task run in days
Successfully completed task runs (task step runs, task run logs etc.) older than the selected period (in days) are deleted from the database. This value is set globally for the whole company and can be overidden for specific endpoints.
Failed task run in days
Failed task runs (task step runs, task run logs etc.) older than the selected period (in days) are deleted from the database. This value is set globally for the whole company and can be overidden for specific endpoints.
Endpoint data in days
Endpoint data of task runs older than the selected period (in days) are deleted from the database. This value is set globally for the whole company and can be overidden by the value set for specific endpoints.
Task step behavior

This configuration part allows you to set up the defaults for the company task step behavior. You can modify here the data snapshot, no data produced, and error behavior defaults.
The platform initially defaults these values as follows:
Data snapshot
Condition, under which the data structure will be stored in the database. The data structure is accumulated sequentially, so the structure that was created by concatenating the output of the current step and all previous steps is always stored in the database.
The default value: On error.
No data produced
It prevents the execution of the next step if the current step doesn't produce any output data.
The default value: Stop.
Error behavior
Determines how the task behaves when the step fails.
The default value: Fail task.
Remote control
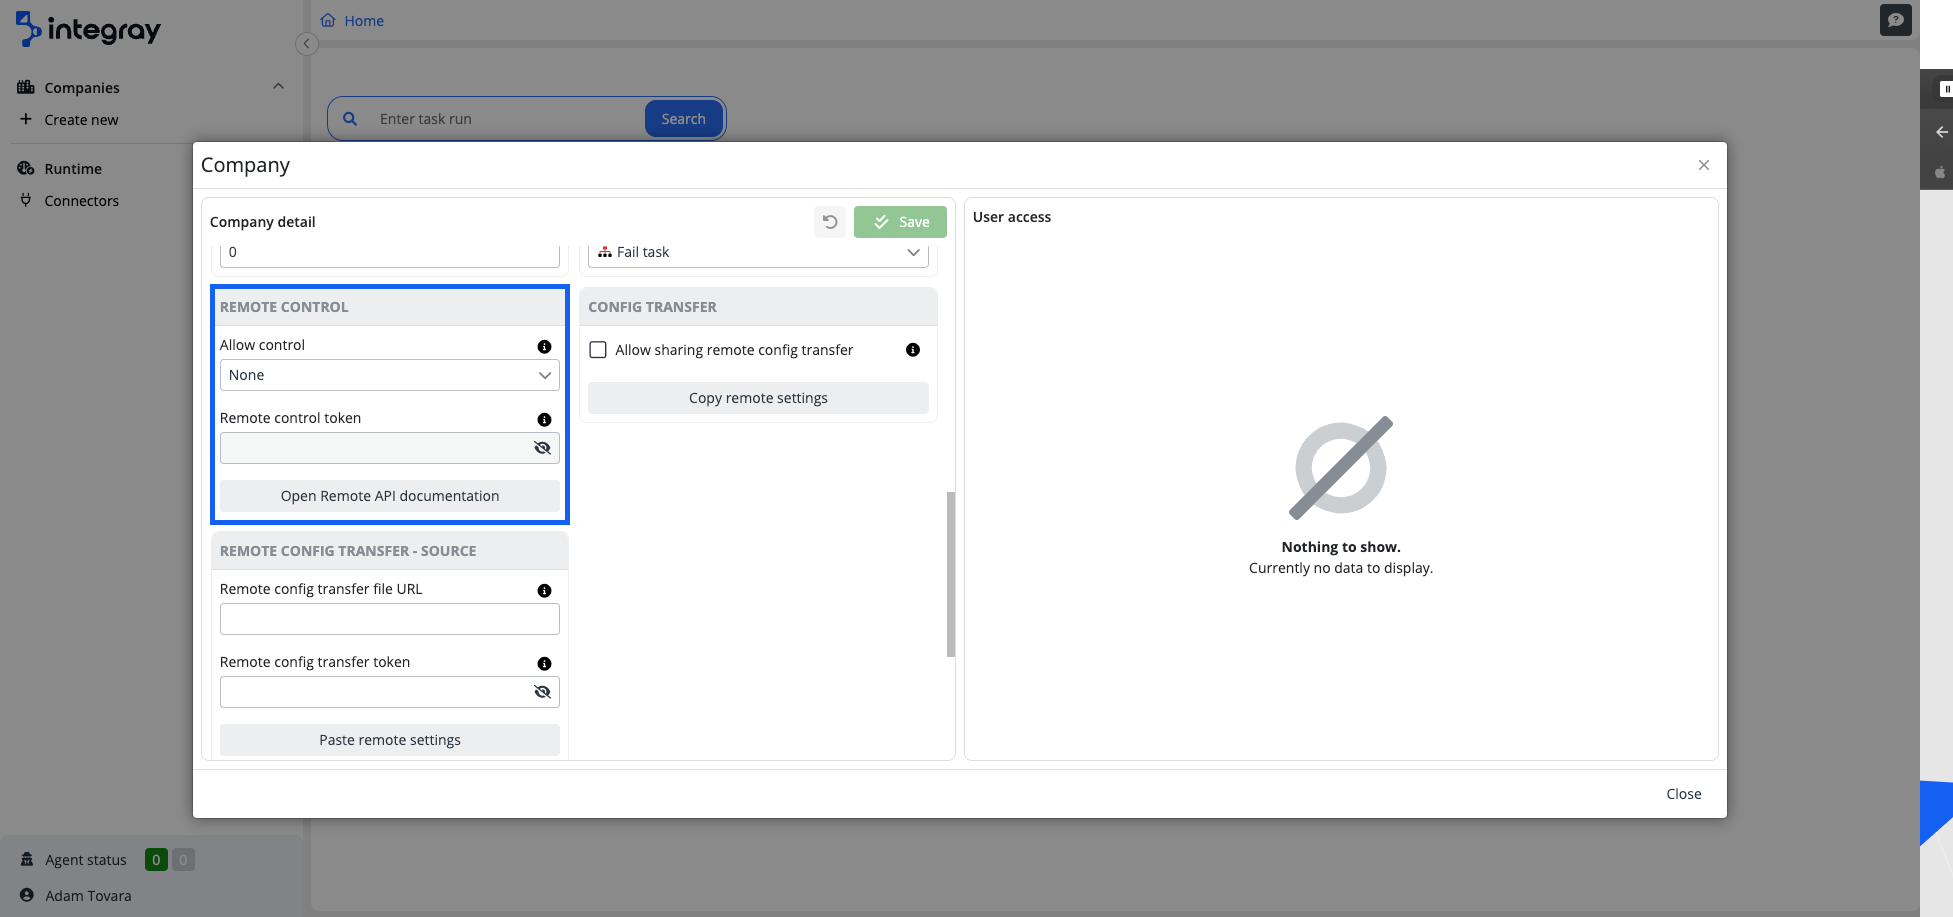
Allow control
If this option is enabled it allows you to control remotely several things in the platform. It is possible remotely to get information on:
- Agents
- Logs
- Orchestrator
- Task
- Task run status
Besides getting data, it is possible to manage specific actions like: - switching on and off of the orchestrator, - starting, killing, and cleaning tasks as wel as - managing task runs.
Remote control token
The value of the generated token to connect remotely to the platform. The token is autogenerated when the allow control is field value is set to Token.
It is important to have this feature turned on Token in the following scenarios:
-
For
Remote Control Connectors: A token is essential for authentication and securing connections when using Remote Control connectors, including the Remote Control - Logs Connector and Remote Control - Restart Task Connector. This ensures the integrity of data transmission and task execution. -
When activating
Remote Config Transfer: A token is also required for Remote Config Transfer, facilitating efficient transmission of configuration data between systems. Its presence ensures secure authentication and data integrity during transmission. See below. -
For comprehensive Remote API management, enabling the Remote control via Token is crucial for accessing and managing your company's operations through the REST API. This token ensures secure authentication and authorized access, allowing you to perform various remote management tasks.
Note
Not necessary to configure for the initial company setup.
Open Remote API documentation
Click the button to open a comprehensive guide to your company's remote management capabilities. This documentation provides detailed insights into the REST API endpoints that you can utilize. With the Remote API, you can effortlessly retrieve information about agents, monitor the status of orchestrators, manage task execution, and track the progress of task runs. Whether you need to start, stop, or modify task executions, this API provides the options to orchestrate data processing tasks efficiently.
The API endpoints are categorized to simplify navigation and usage. Each category and its respective endpoints include clear descriptions of the actions they perform, helping you understand how to use the API for remote operations effectively.

To make calls to these endpoints, it is essential to enable Remote control via Token, which can be found and activated in the Company details. This setting ensures secure and authorized access to the API's functionalities.
Config transfer

To enable Allow sharing remote config transfer, facilitating the transmission of information from the "source" company to the "target" company, it is essential to check the corresponding checkbox. This checkbox should be selected for the "source" company.
Explanation:
- Remote configuration transfer: The process of moving configuration settings or information from one company (source) to another (target).
- Source company: The company from which the configuration information is being transferred.
- Target company: The company to which the configuration information is being transferred.
The Copy remote setting button allows the URL and Token of this "source" company to be seamlessly copied to the clipboard and then pasted into the "target" company in the appropriate box.
Note
Not necessary to configure for the initial company setup.
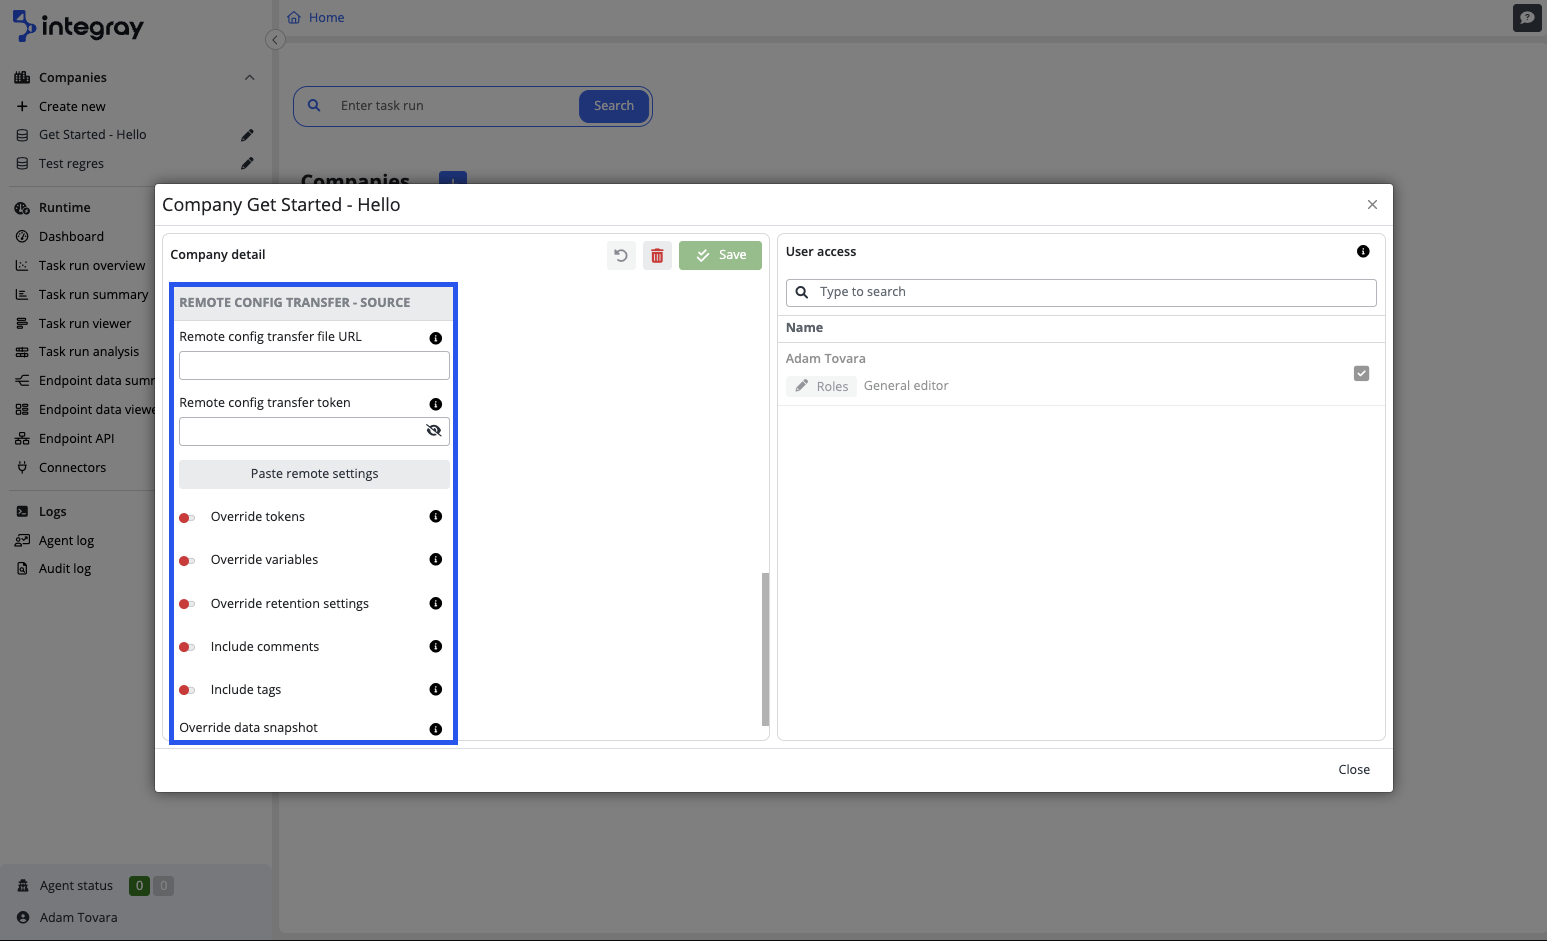
Remote config transfer - source
Section for setting up a "target" company with data from the "source" company
Remote Config Transfer File URL
At a single click on the Paste remote setting button, you insert the data copied from the "source" using the Copy remote settings option into this field.
Remote Config Transfer Token
Similarly, with just one click on the Paste remote setting button, you insert the token copied from the "source".
As with the classic Config transfer, the following options can be set for the Remote config transfer.
Override tokens
If set to false, no tokens are overwritten in the target location. In case of an update transfer, when there is already a configuration in the target company, you may have set your relevant target location tokens, which you don't want to change.
Override variables
If set to false, no variable values are overwritten. In case of an update transfer, when there is already a configuration in the target company, you may have set your relevant target location variable values, which you don't want to change.
Override retention settings
If set to false, no task and endpoint retention values are overwritten.
Override triggers
If set to false, no trigger settings are overwritten. This is useful when the destination company already has specific task triggers (such as Manual start, Scheduled CRON, or Endpoint-based execution) that you want to keep unchanged during the configuration transfer.
Override runnable settings
If set to false, the runnable status of tasks is not changed. This prevents overwriting the task execution mode (Runnable or Suspended) in the destination company, which can be critical for managing task behavior after transfer.
Include comments
If set to true, the comments on the task, task step, step configuration, and endpoint will be subject to transfer.
Include tags
If set to true, the tags on the company, task, task step and endpoint will be subject to transfer.
Data snapshot override
Select your required data snapshot behavior for the target location. The default value is set to Don't change, however, you may change it to Never, On error, or Everytime. This option is useful if you transfer the configuration from the Development environment to the Production environment and you want to switch off the data snapshots for Production as it consumes quite some memory. By setting the appropriate choice at the time of transfer, you will avoid manual resetting of individual tasks afterward.
Note
The data snapshot (as well as other elements) settings directly within the company details settings are reflected during the Remote config transfer job. When utilizing the specified URL for Remote config transfer, there is an option to modify the settings again.
Save and close
After successful completion of the configuration and setup, don't forget to save your work. If you miss saving your work, the changes made will be lost.
User access changes do not require save action!
Assigning/unassigning of the user to/from Company does not require saving. The same applies to the access rights - role settings.
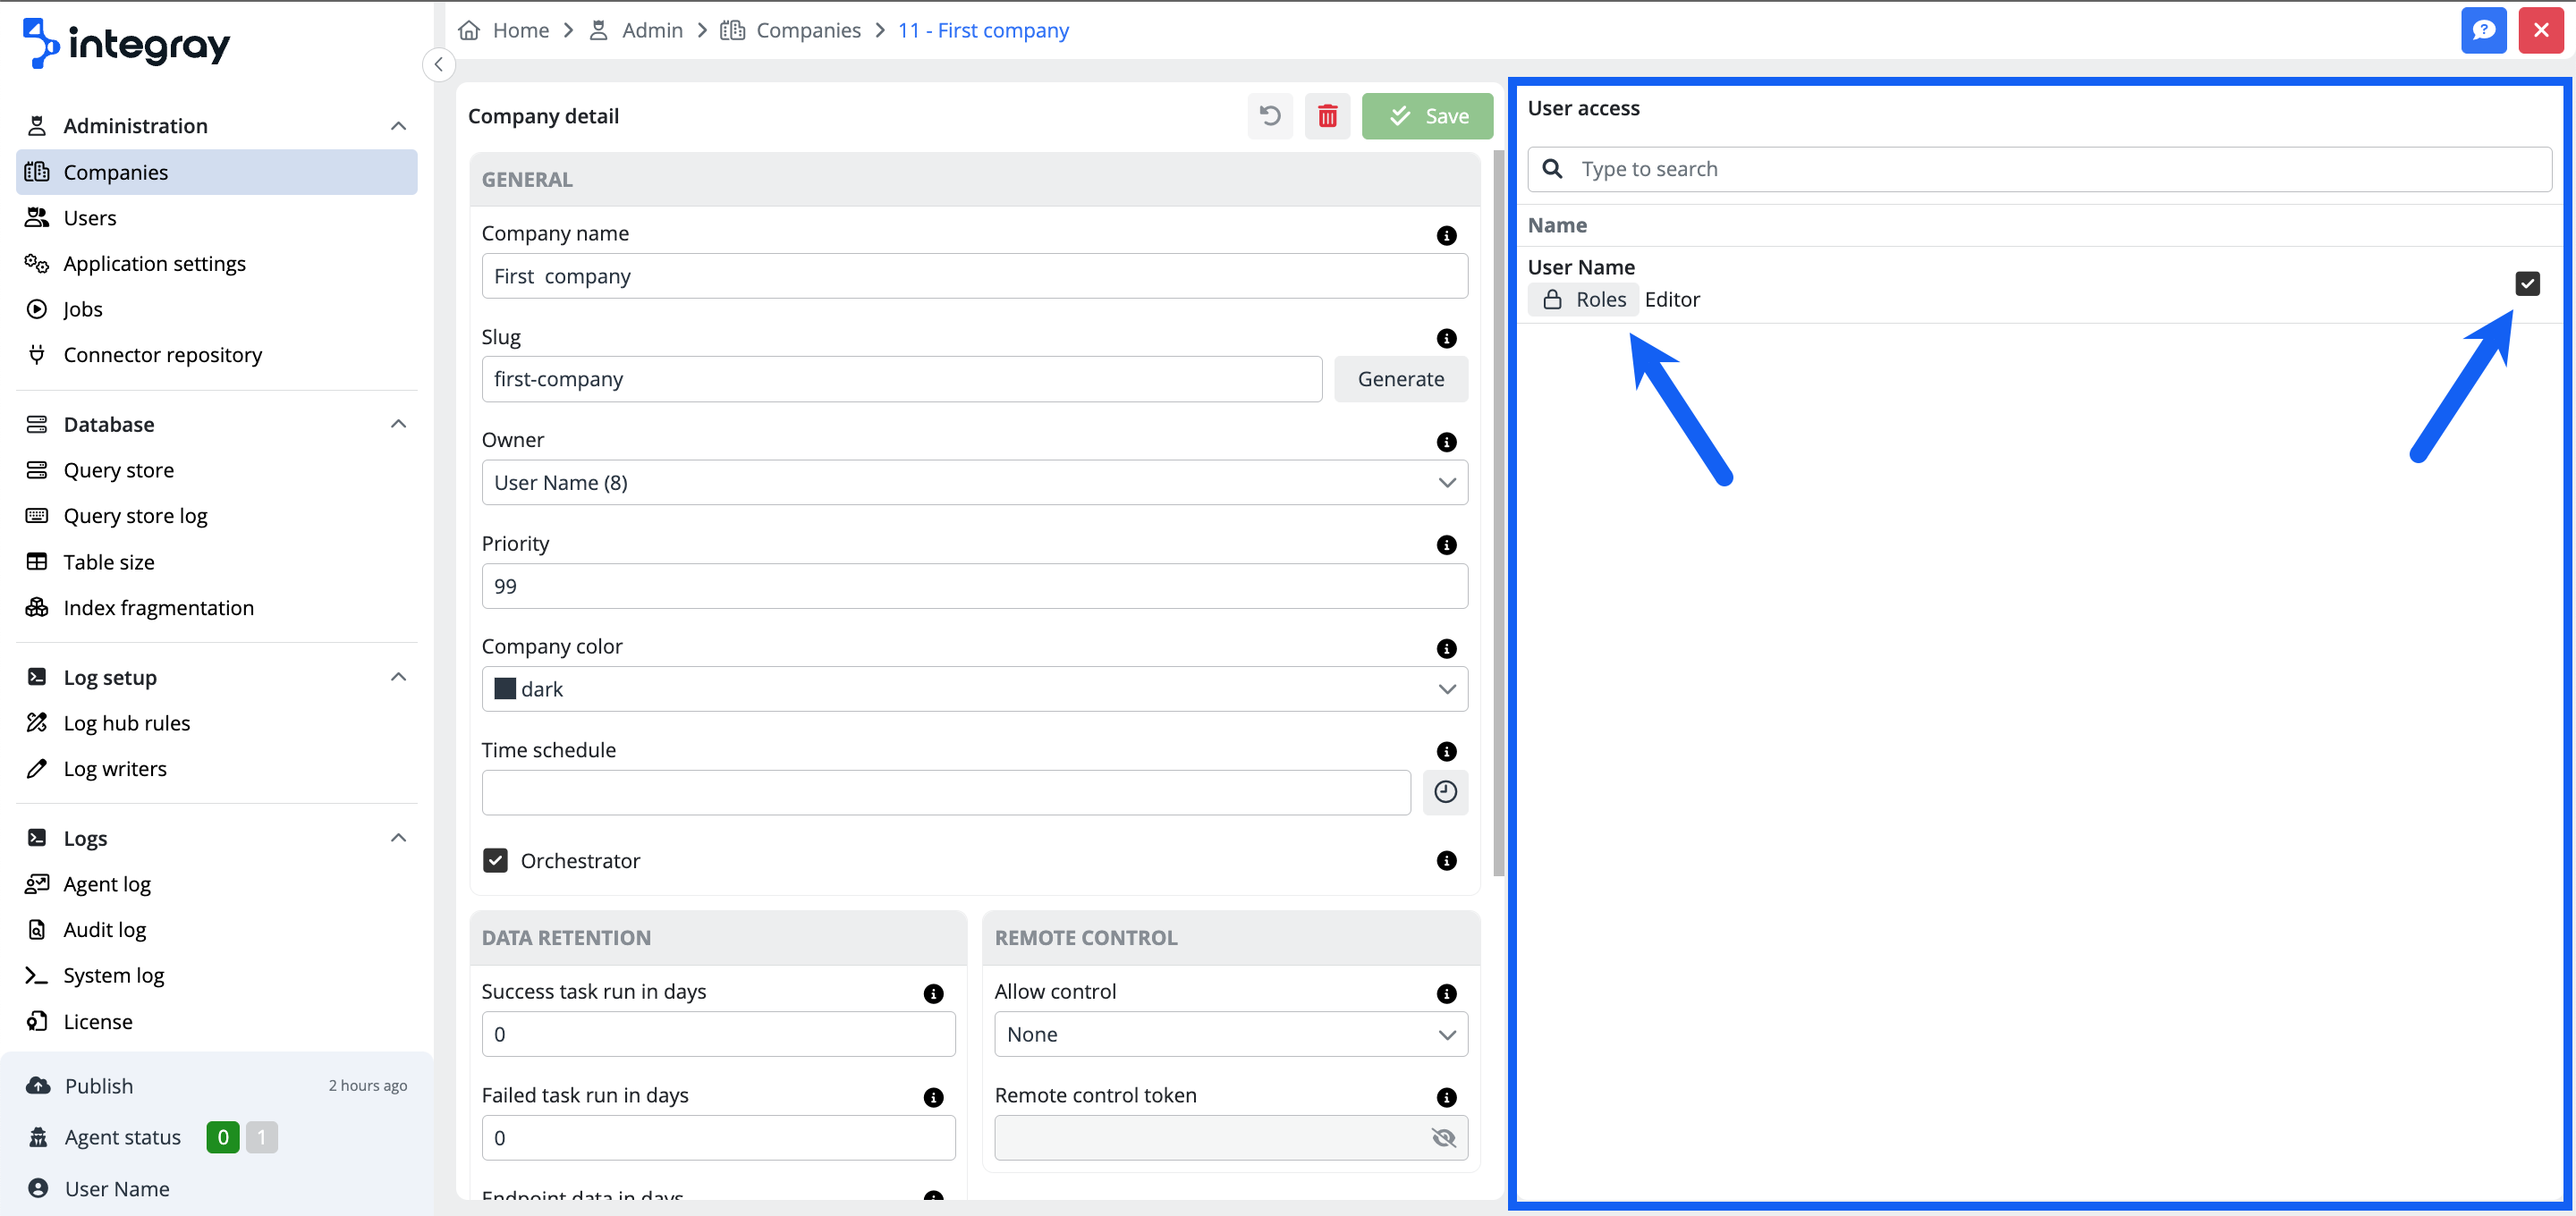
User access
User access
On the right side of the Companies form screen, you will see the list of platform registered, active users with a check box on the right side to directly assign the Company to the user or take it away from him. This way, you can manage user access rights at the Company level. The user records on the user list include the user-assigned roles. User roles can be assigned to a user directly from this Administration > Companies section by clicking on the grey badge with an icon of lock named Roles or from the section Administration > Users. Here, you can find more about the User rights.
In case you are creating the company, you will only see the list of users in the user access after saving the form.
Search
The full-text search window helps to find and select the required user from the user list.
The company is now created. Go and check that on the Home screen > Content navigation menu > Companies and Company overview panel. To edit/modify the configured company attributes for the First company use the pencil icon.
Deactivate company
Deactivating a company is an administrative function you can perform in two distinct ways, depending on the user's role and permissions within the system. This section details the steps for deactivating a company, both as a company owner and as an Administrator.
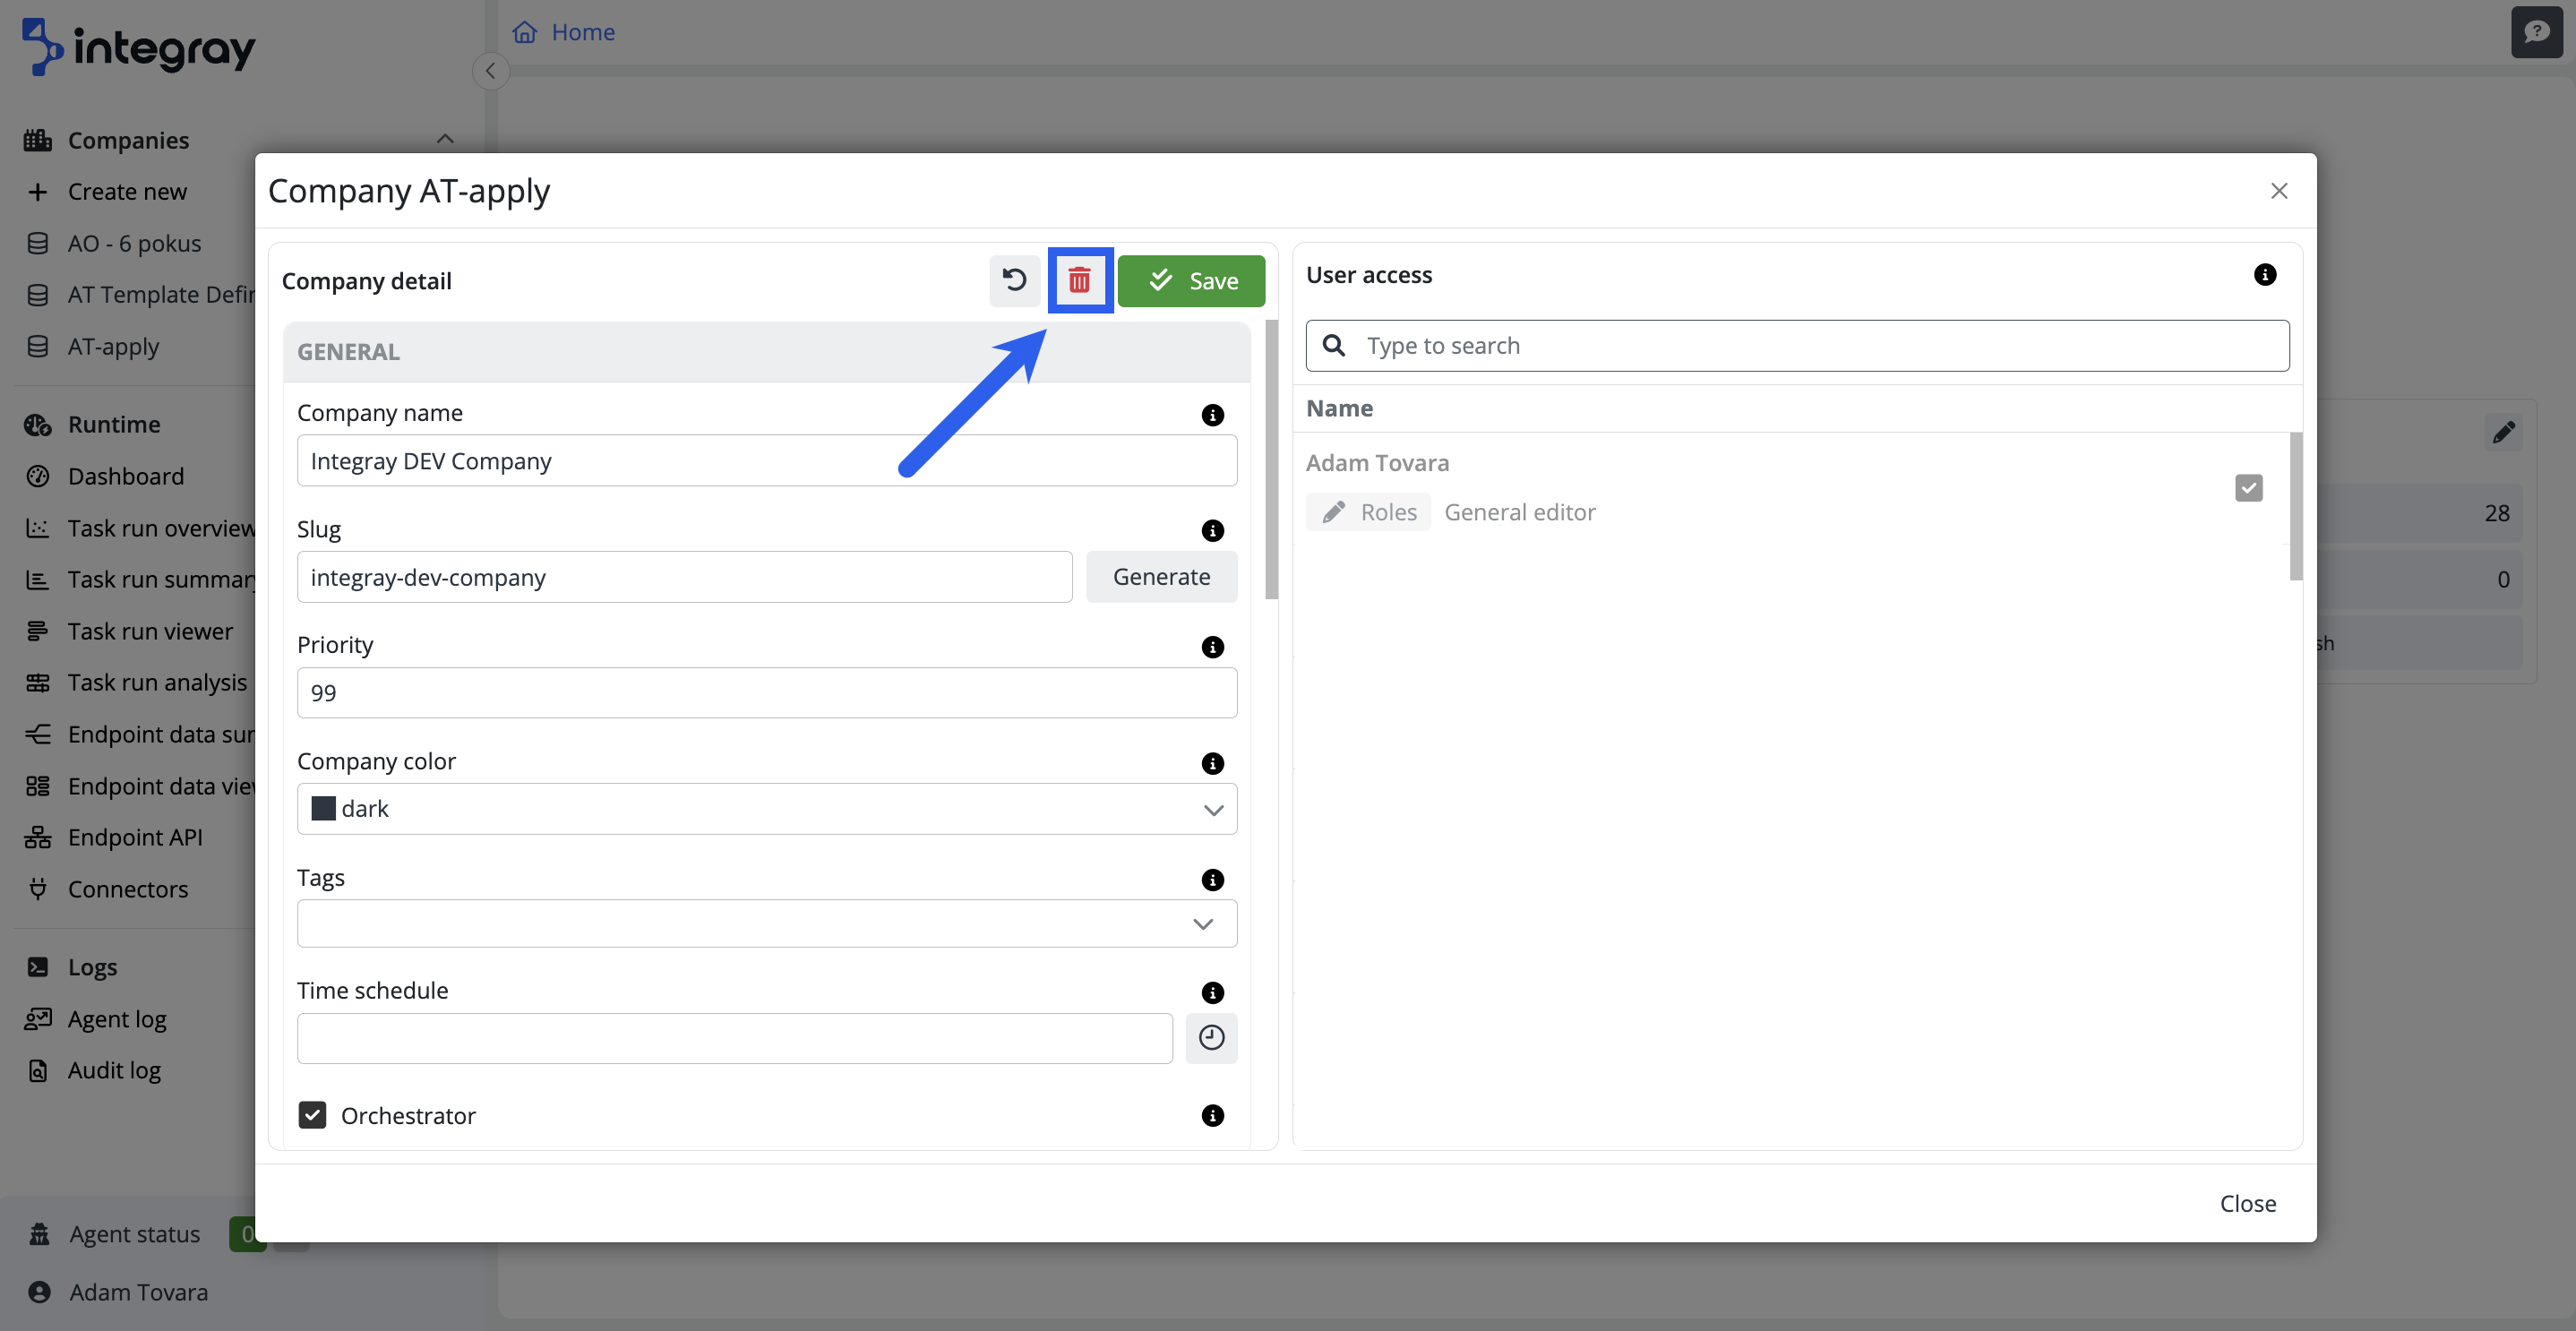
Deactivation by a company owner
Navigate to the home screen and open the company detail view by clicking the pencil icon associated with the company you intend to deactivate. Locate the trash bin icon at the top section of the company details page and click this icon to begin the deactivation process. A confirmation dialog will appear, prompting you to verify the deactivation. Confirm your action to proceed with the deactivation.
Deactivation by an administrator
Navigate to the company list in the Administration section to view the list of all companies. Here, each row represents a different company. Identify the company you wish to deactivate. Click the trash bin icon located in the corresponding row. This action will open a confirmation dialog prompting you to verify the deactivation. Confirm your action to proceed, and the system will then process the deactivation.
Note
- Company owners can only deactivate companies they own.
- Administrators can deactivate any company within the system.
After deactivating a company, it is automatically moved to the Inactive companies view. To display a list of all deactivated companies, click the Show inactive button. In this list, each deactivated company has a reactivation button at the end of its row. Clicking this button will reactivate the company and reappear in the list of active companies.