

Template apply
This part section guides you through applying a template to your project. Here, you'll find straightforward instructions designed to facilitate the seamless integration of templates into your projects, ensuring an effortless application experience.
If you're inclined towards a thorough, step-by-step format, proceed with the guide below, supplemented by descriptive visuals, to better understand each phase. On the other hand, if you prefer a more dynamic, audiovisual learning format, consider our instructional video, which complements this manual and presents an alternative approach to comprehension.
Template list
Navigating to the Templates section via the content navigation menu brings you to a Template list displaying all the templates you have applied. An empty list indicates no template application yet.
A search field is available at the top of the Template list to help you quickly and efficiently find specific templates. The filter option next to the search field lets you categorize templates by their status: Applied, Needs configuration, or Stopped, enhancing your template management efficiency.
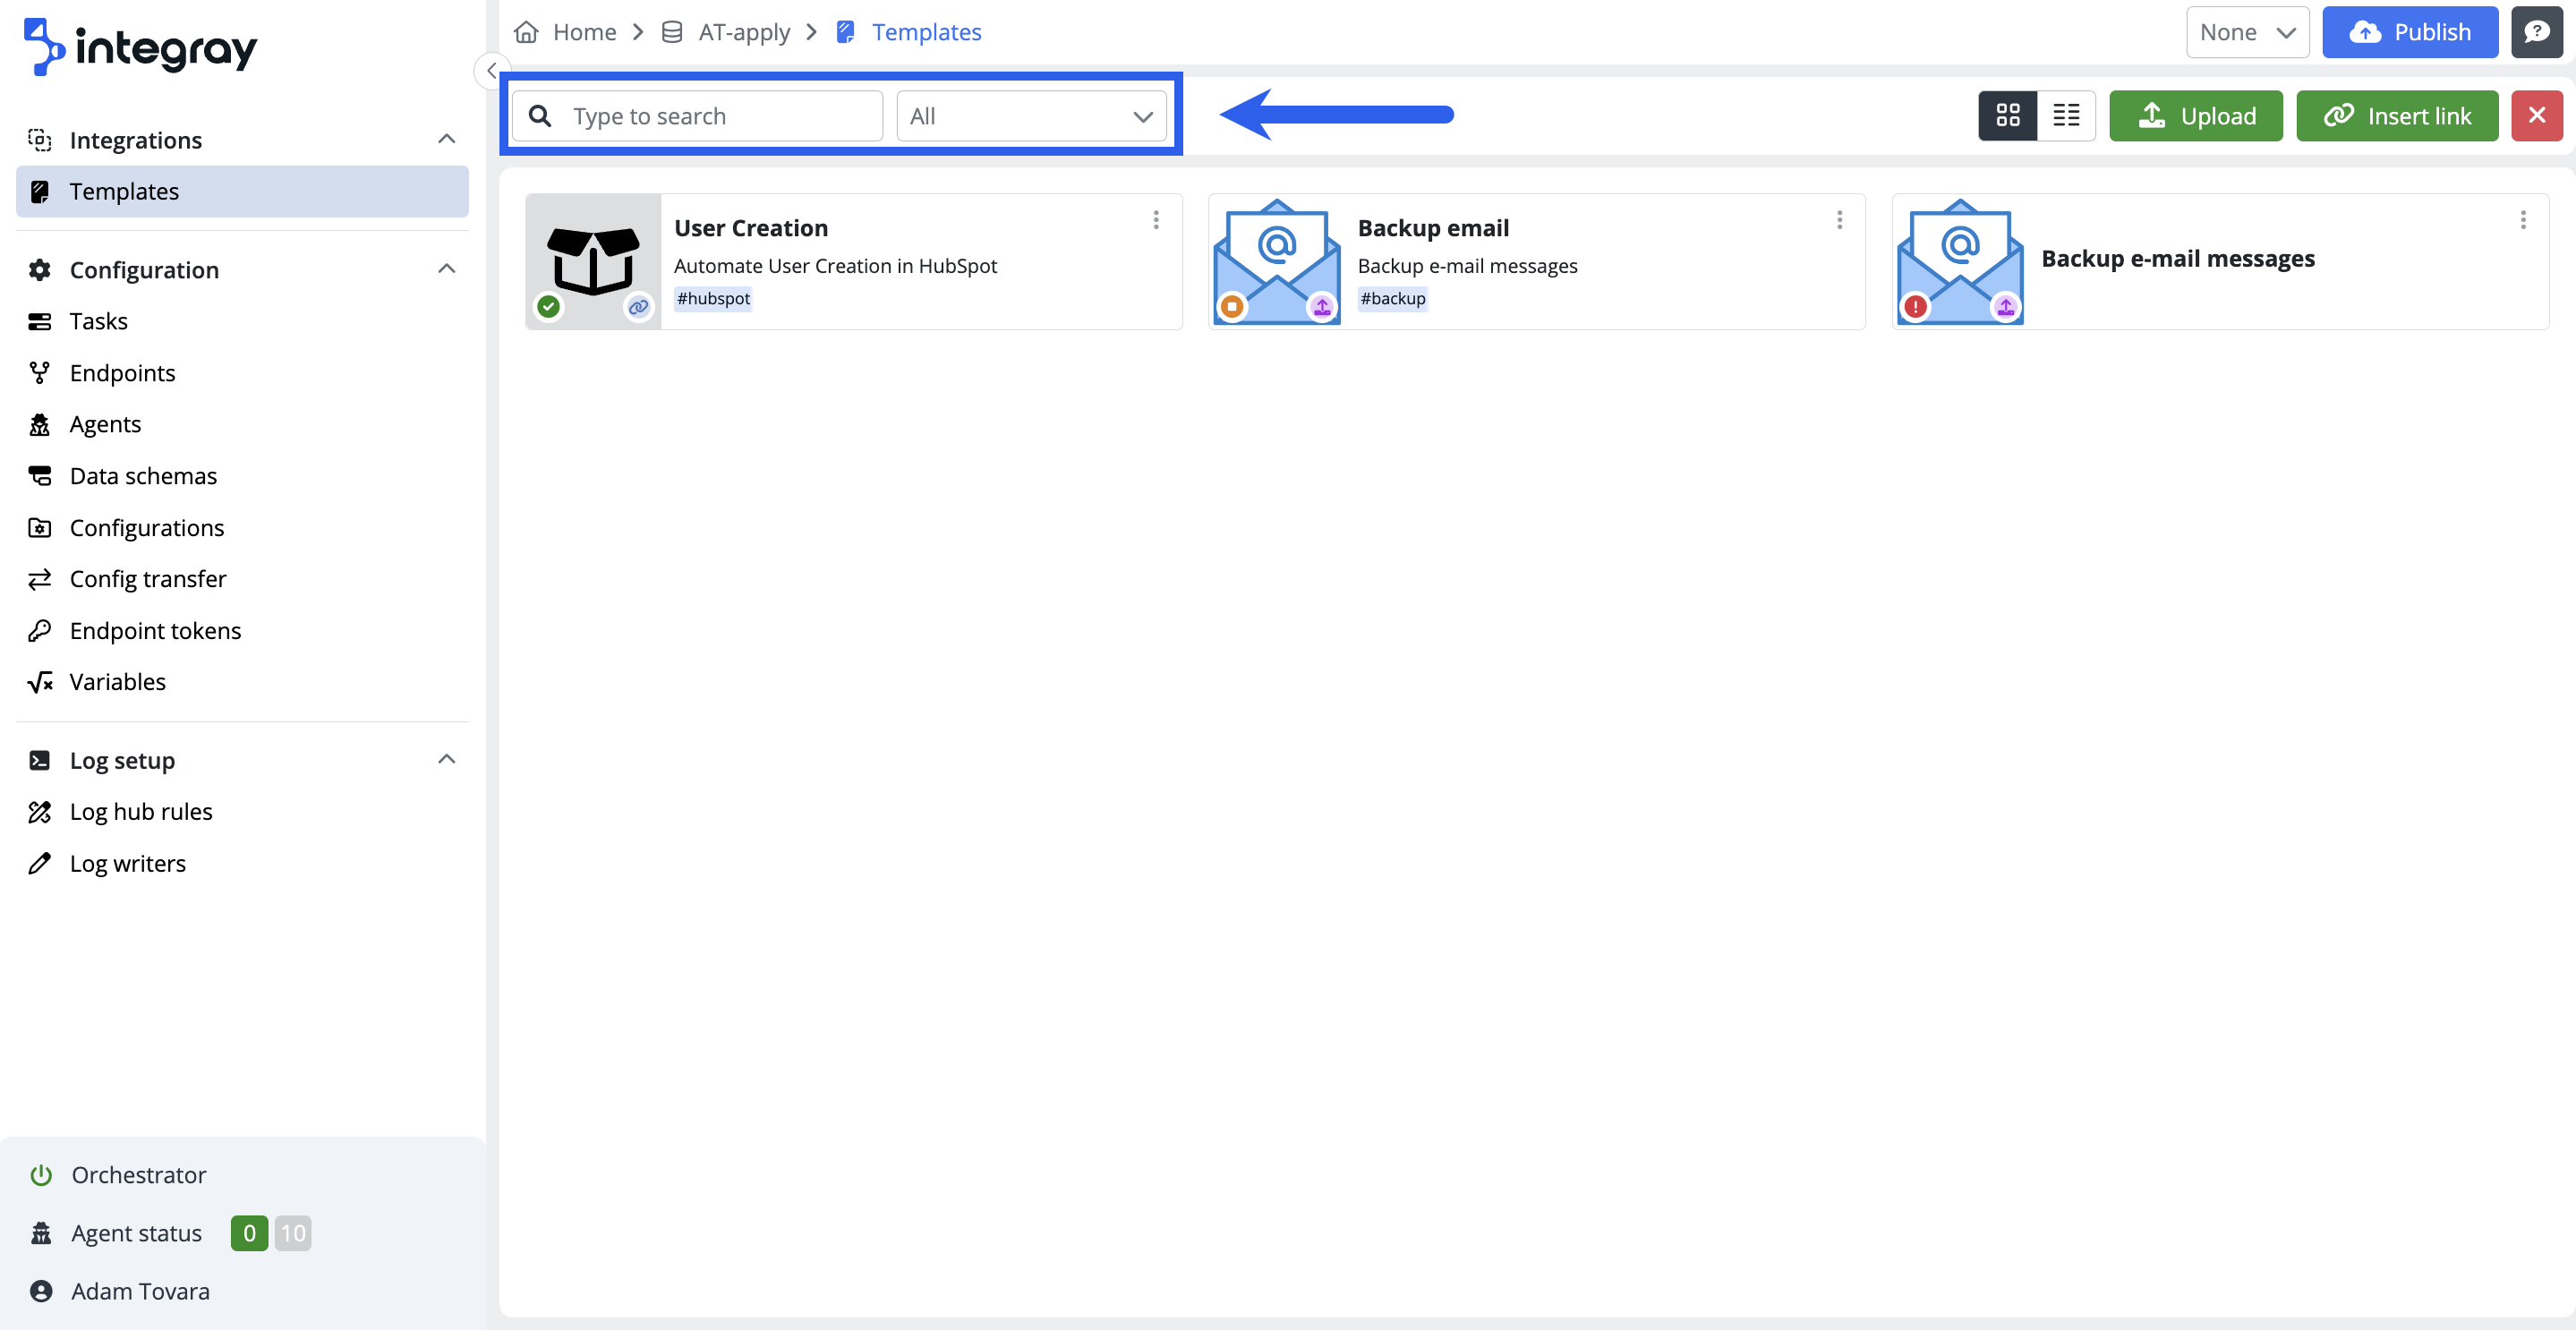
On the right side, two buttons are available for adjusting the display of the Template list. Whether you prefer the card view with fewer template details or the table view with more information, these options cater to your viewing preference.

In the Card view, you can see:
-
Logo: A visual representation or icon associated with the template, making it easier to quickly identify at a glance.
-
Custom name: Displays the custom name you've assigned to the template, allowing for easier identification.
-
Template name: The official name of the template, as initially defined, is shown here.
-
Tags: Displays a list of tags you've assigned to each template.
-
Status indicator: This visual indicator displays the template's current status, such as "Applied," "Stopped," or "Needs configuration".
-
Source indicator: Shows whether the template was applied via "Upload" or "Link."
At the end of the row, a button with a three-dot symbol offers the option to remove the template.
The Table view, on the other hand, displays:
-
Custom name: Displays a custom name you've assigned to the template for easier identification and organization. Right below the Custom name, you'll see a list of tags you've assigned to each template.
-
Template name: Here, you'll find the official name of the template as initially defined.
-
Status: Informs you about the current state of the template. You can see whether the template is "Applied", "Stopped" or "Needs configuration".
-
Description: Provides a brief overview of the template, giving you insights into its purpose and functionality.
-
Last update: In this column, you'll see when the template was last updated.
-
Source: This column shows whether the template was applied via a "Link" or "Upload."
A button for removing the template is also located at the end of the row in this view.

Additionally, on the right side of the screen, two buttons are available for uploading the template:
- The Upload button is used for upload the template via a JSON file.
- The Insert link button is used to upload the template via a link.
Applying a template by uploading a file
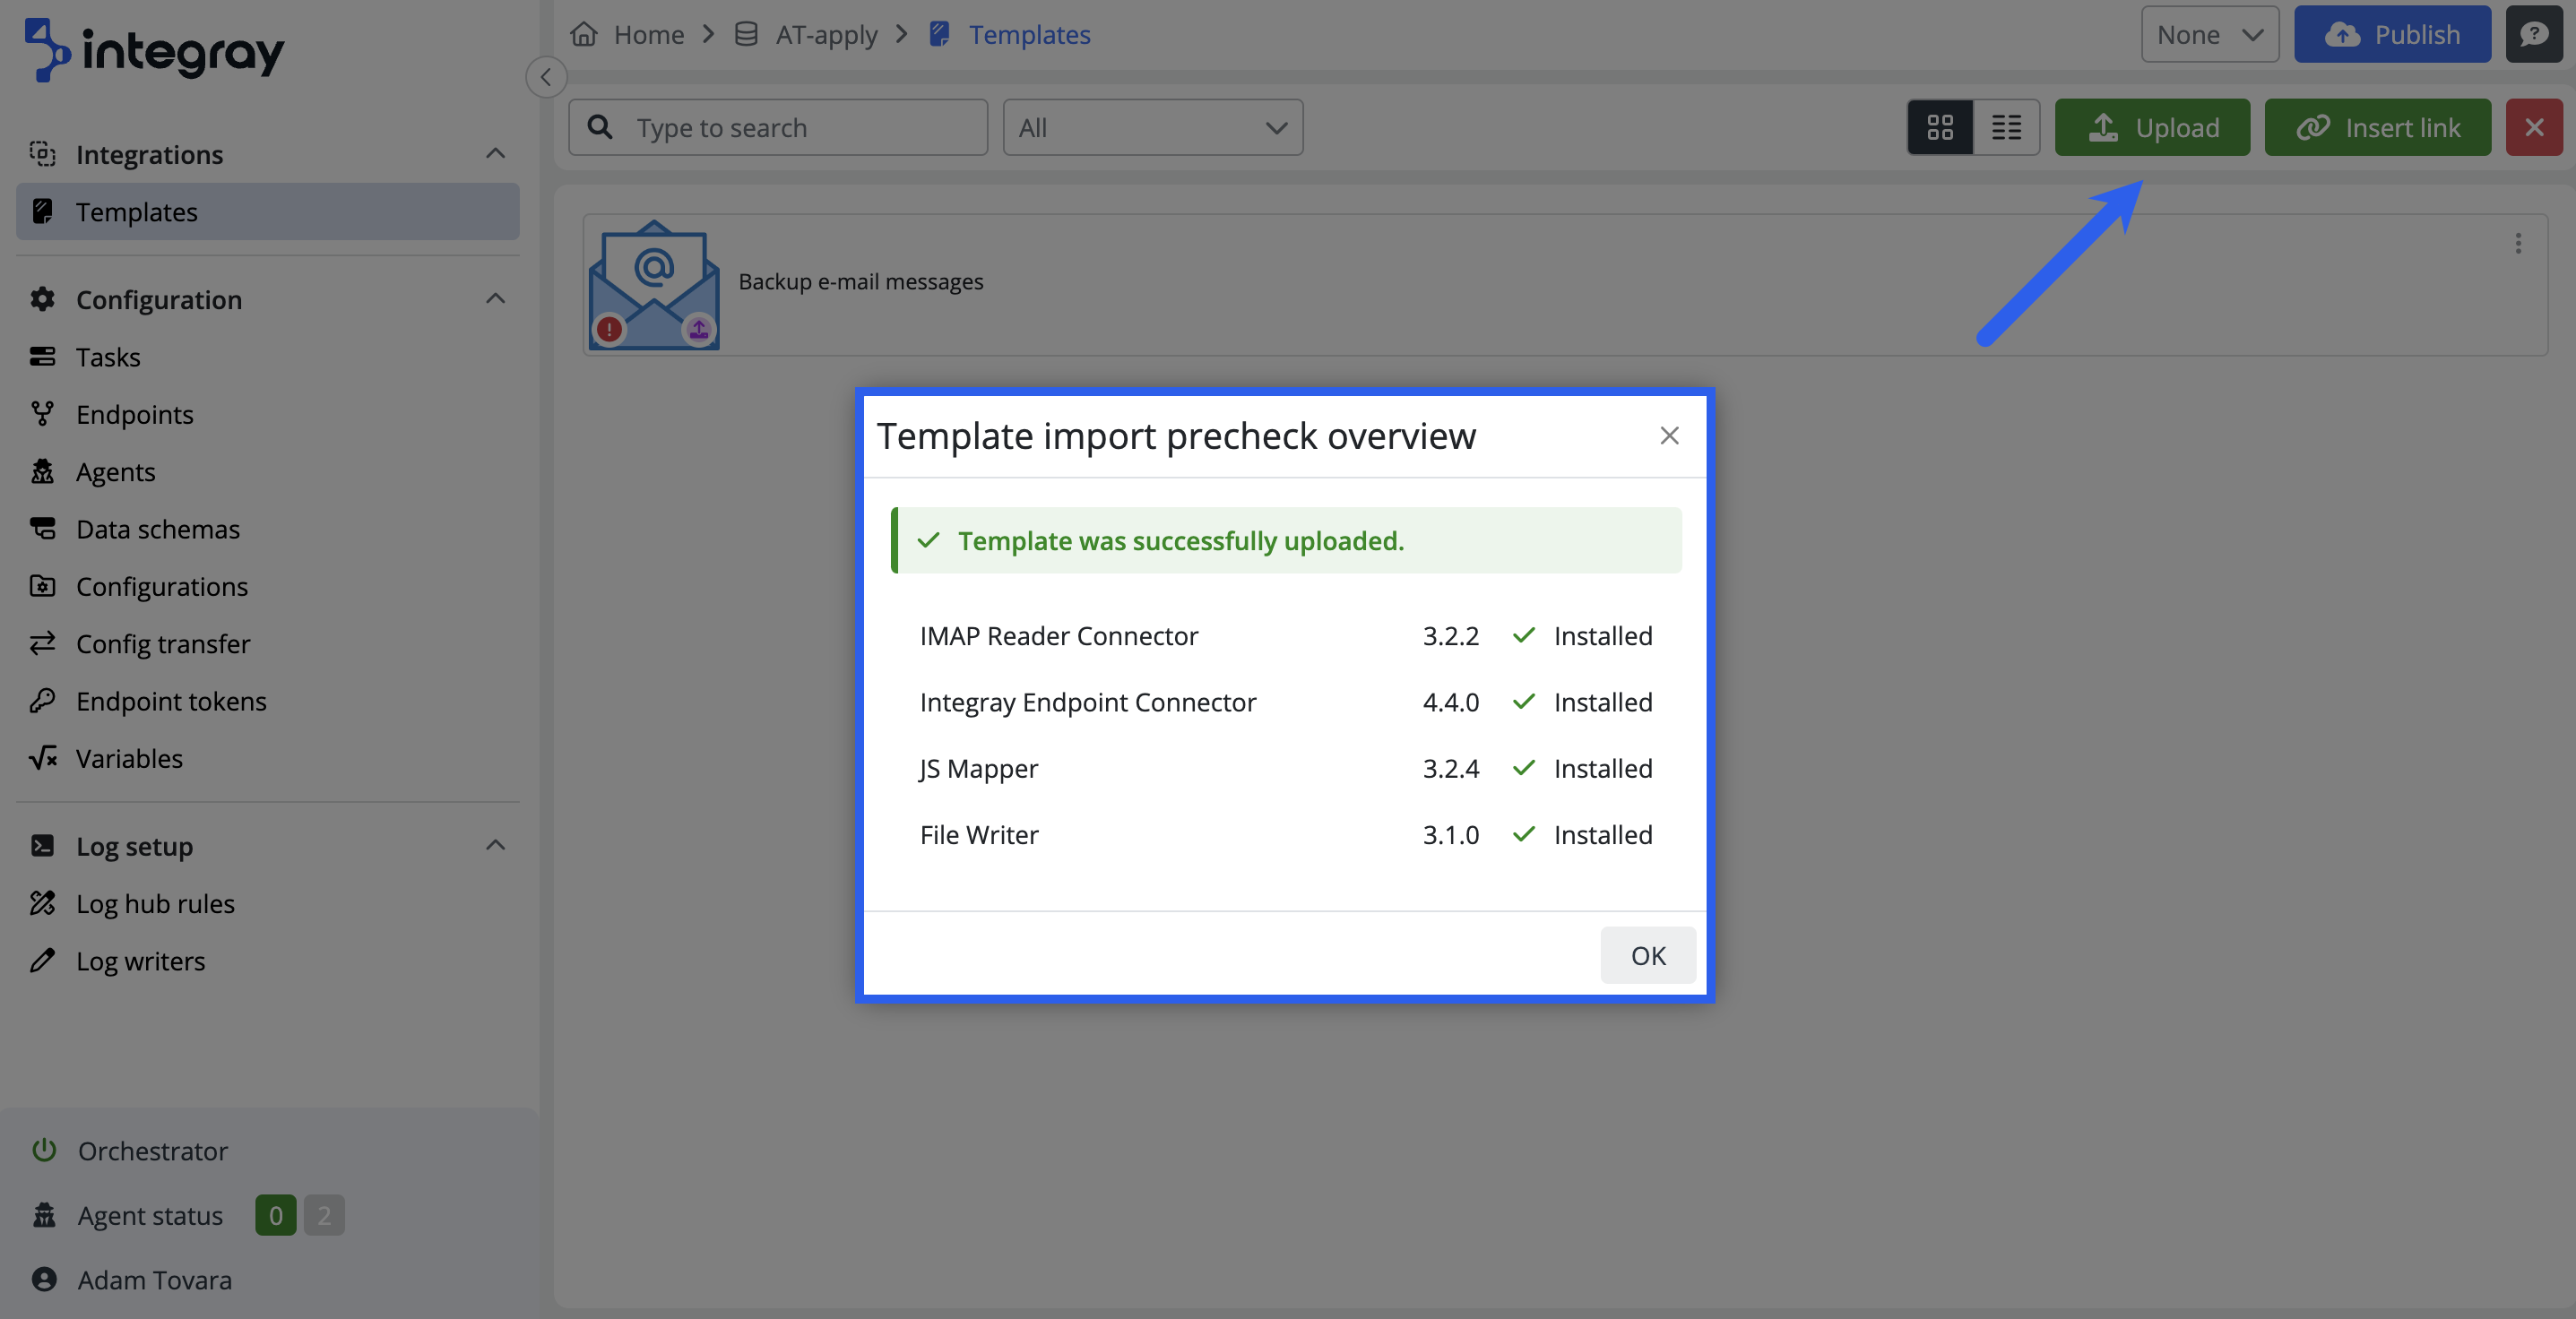
If you have a template in a JSON file, click the Upload button in the top right corner to upload it.
After you upload the file, the template will appear in the Template list. Following the upload, a modal window titled Template import precheck overview opens. This window displays a list of the connectors used by the template and checks if all required connectors, along with their required versions, are installed in your environment. To close this modal window, click the OK button.
At this point, a new window appears on the right side of the user interface. Here, you'll see the template's name, a brief description, version number, the date the template was downloaded, and its current status. Additionally, this window provides a detailed description of the template, a list of all the connectors used, and a change log detailing modifications made to the template across its versions.
To further customize your experience, you can assign a Custom template name. This name will appear in the template list and also when selecting templates in Tasks or Endpoints, maintaining visibility of the original template name as well. Additionally, you can create a new tag for the template or choose from an existing selection of Tags. Once applied, these tags will be displayed with the Tasks and Endpoints added to your company using this specific template.

Now, using the button with three dots, you can choose whether you want to configure the template through Basic config which is set as the default, or Advanced config. In addition to these two options, buttons for Reupload template and Remove template are available here.

-
Basic config provides a simplified, user-friendly interface with pre-set options and minimal input fields. This mode is designed for users who prefer a straightforward approach or are new to template configurations, focusing on essential settings.
-
Advanced config offers a more comprehensive set of options, allowing for detailed template customization. It's suited for experienced users or those with specific requirements beyond the basics.
Tip
You can apply a single template multiple times with different configurations.
Basic config
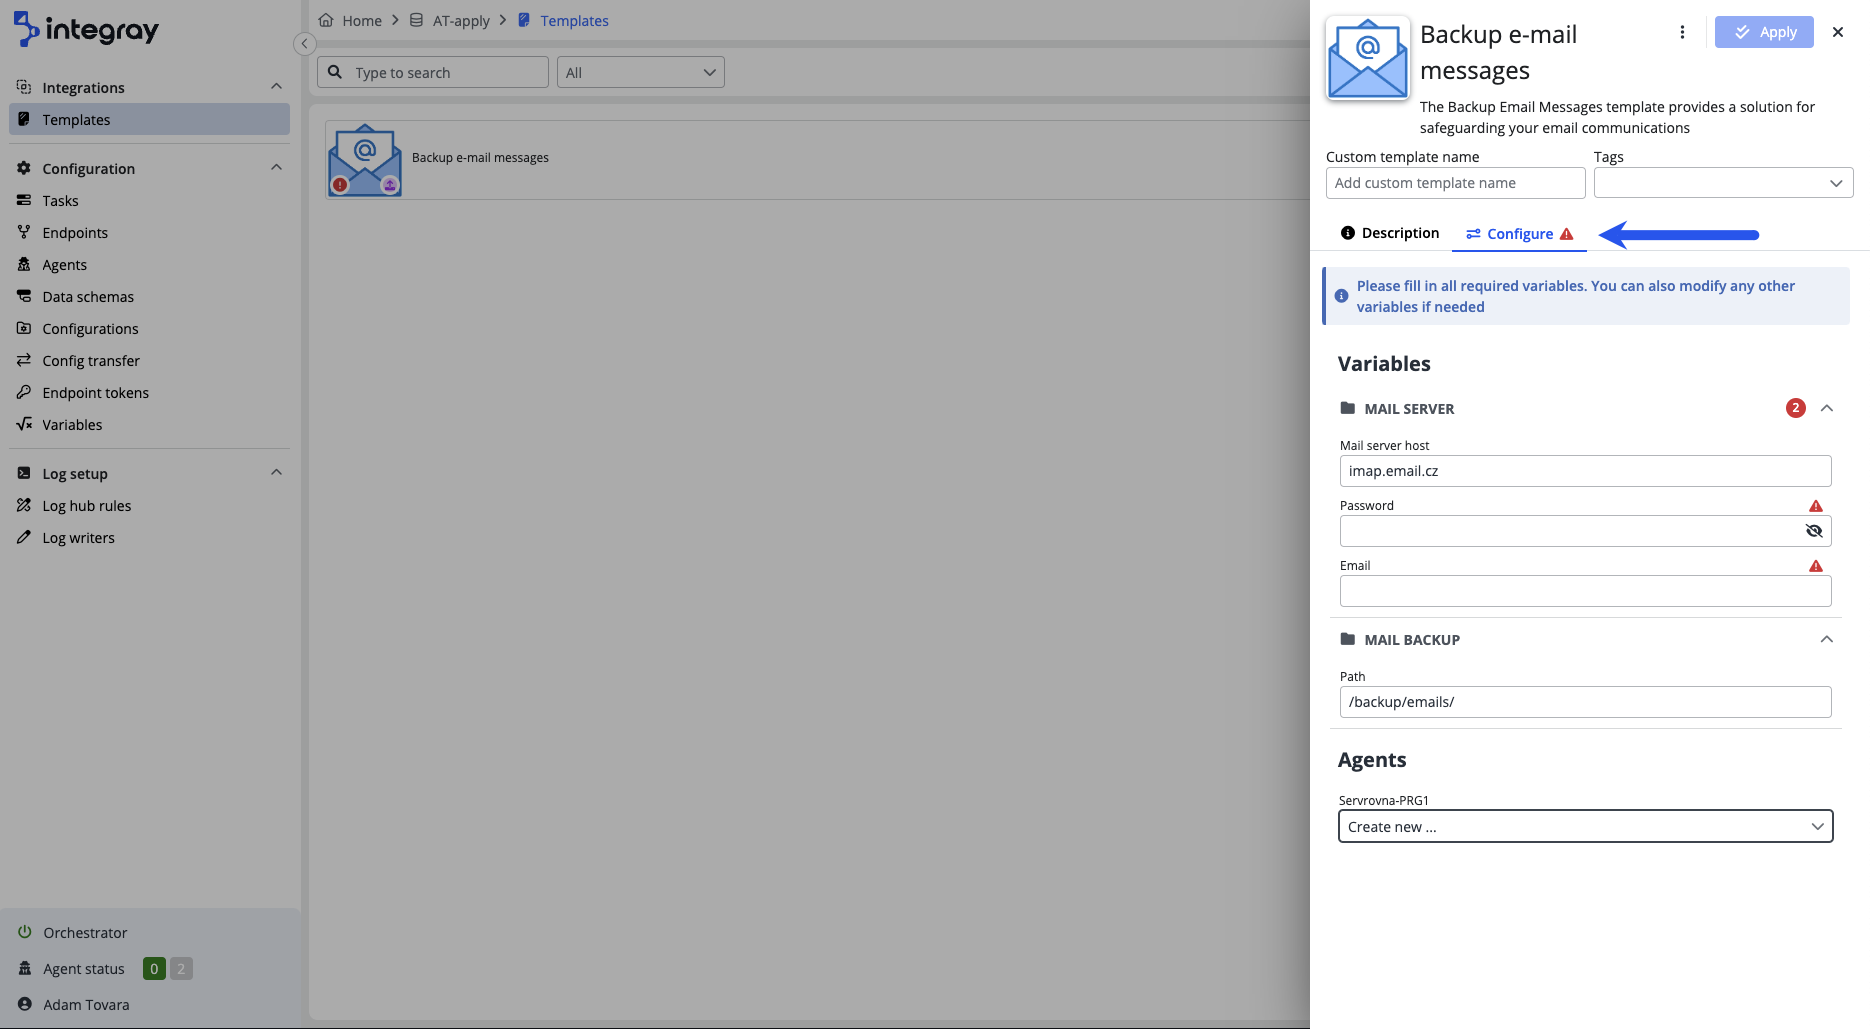
If the template requires further configuration, a message stating "This template needs to be configured before applying it." will appear. In such cases, click on the Configure tab.
On this tab, you will see a list of all the variables used in the configuration. Fill in or modify each item according to its description. Items with a red exclamation mark are mandatory and must be filled in. Without this, you cannot apply the template. If the configuration involves a remote agent, you will be allowed the option to create a new agent by default. Alternatively, you can select an existing agent from the list.
After filling out the information on the tab as desired and following the template's descriptions, press the Apply button. You will be taken to a Summary page, which offers a comprehensive overview of the components (such as Variables, Endpoints, Agents, and Tokens) that will be added to your company upon applying the template. You can return to the template configuration by using the button with an arrow symbol located next to the Summary title.
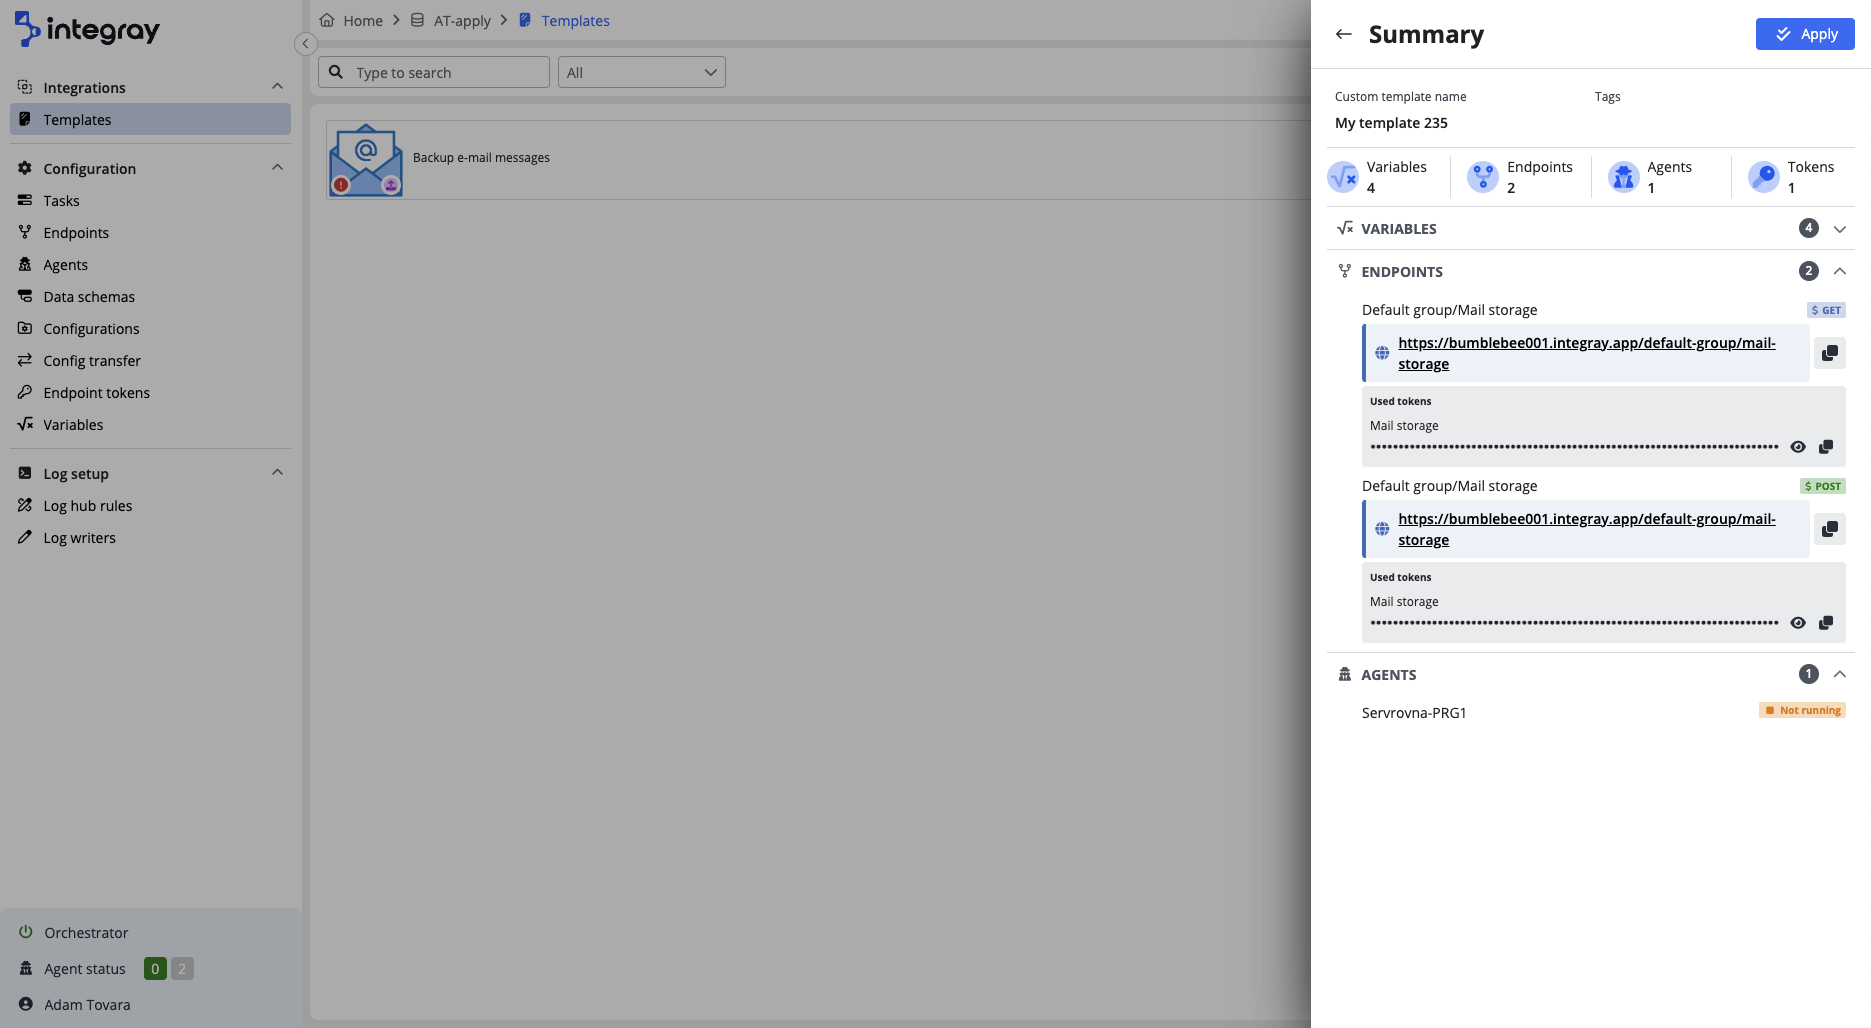
On the Summary page, you'll find a useful feature that allows you to copy endpoints and tokens, should you need to input these details into other systems. If you wish to copy these details later, they can be readily found in the Endpoints section, respectively, Endpoint tokens.
Unsaved changes alert
When filling a template, your modifications will be lost if you make changes and attempt to close it without saving it. To safeguard against unintentional data loss, we've implemented a feature that detects unsaved changes. In that case, a popup notification will alert you, allowing you to return or confirm your intention to discard them.
After thoroughly reviewing the entire summary, click the Apply button to finalize the template's application. The template will display in the Template list with a green icon indicating its Applied status. Next to this icon, another will show whether the template was uploaded via file upload or through a link.
Publish required
Please note that after applying the Template, it is necessary to press the Publish button to ensure the changes are fully implemented and made available for use.
When the template is applied, and you want to view its associated tasks or endpoints, navigate to the Template selector located in the upper right corner of the Task list or Endpoint list, next to the Publish button. Selecting a specific template from this dropdown will filter the visible tasks or endpoints in the list, displaying only those that conform to the selected template's configurations.

Advanced config
Choosing Advanced config will give you a different window than Basic config. Besides the Description and Summary sections, which remain unchanged from the Basic config view, you will also see separate sections for Variables, Endpoints, Agents, and Tokens, where you can make advanced modifications.
-
General: In this section, you can override the data snapshot settings of all tasks in the template.
-
Variables: Here you will see a list of all the variables used in the configuration, divided into individual groups. Fill in or modify each item according to its description. Items with a red exclamation mark are mandatory and must be filled in.
-
Endpoints: In this section, you can edit the endpoint slug. Note that endpoint slugs must be unique within the company.
-
Agents: If the configuration involves a remote agent, you will be allowed the option to create a new agent by default. Alternatively, you can select an existing agent from the list.
-
Tokens: If an endpoint included in the template is secured by a token, you can modify its value here. It's important to note that the token cannot be modified if the same template has been applied twice or more. Changing the token in such instances could affect the proper functioning of the initially applied template. However, you can later adjust the token value in the Endpoint tokens section.
-
Summary: Here, you will see a detailed overview of all entities within the template to be applied.
Info
Data snapshot - After applying the template, you can also adjust the override data snapshot setting for a particular step related to the template directly in the Task editor.
After filling out the information as desired and following the template's descriptions, press the Apply button. You will be taken to a Summary page, which offers a comprehensive overview of the components (such as Variables, Endpoints, Agents, and Tokens) that will be added to your company upon applying the template. You can return to the template configuration by using the button with an arrow symbol located next to the Summary title.

Click the Apply button again to finalize the template's application. The template will display in the Template list with a green icon indicating its Applied status. Next to this icon, another will show whether the template was uploaded via file upload or through a link.
Publish required
Please note that after applying the template, it is necessary to press the Publish button to ensure the changes are fully implemented and made available for use.
Info
After applying the template, the existing configuration in the target company will not be affected.
Applying a template using a link
Another method to apply a template, besides file upload, is using a link. Use this option if you have a link to the template available. Click on the Insert link button to open a modal window to insert the link. Confirm the link insertion by clicking the Insert button.

At this point, a new window appears on the right side of the user interface. Here, you'll see the template's name, a brief description, version number, the date the template was downloaded, and its current status. Additionally, this window provides a detailed description of the template, a list of all the connectors used, and a change log detailing modifications made to the template across its versions.
Now, using the button with three dots, you can choose whether you want to configure the template through Basic config which is set as the default, or Advanced config. Further configuration of the template remains the same, whether you apply the template using a file or a link.
Info
After applying the template, the existing configuration in the target company will not be affected.
Template context
Upon successfully applying a template to your project, the Template selector, located at the top right corner of the interface next to the Publish button, becomes a pivotal feature. This selector allows you to filter and display entities - such as Tasks, Endpoints, Configurations, etc.- exclusively associated with the selected template. As a result, entities not added through the applied template will not be visible on a specific list, ensuring a focused and streamlined view of your project's components. However, you can easily adjust the Task list, Endpoint list view, and others to display entities from a different template or revert to viewing all entities by clearing the Template selector.
Template update
It may be a situation where a new template version is released, offering enhanced features or fixes to previous issues. You can update to this newer version, ensuring you leverage the latest improvements and functionalities within your projects. The process of updating is designed to be straightforward, enabling you to quickly adapt to the latest standards and benefit from continuous improvements with minimal disruption to your workflow. You can maintain optimal performance and compatibility across your configurations by keeping your templates up to date.
The update process varies slightly depending on whether it was uploaded using a file or inserted through a link. If you uploaded the template via a file, you'll begin by opening the Template list and selecting the template you wish to update. A new window with the template's description will open on the interface's right side. By clicking the three-dot button, you access a menu that, for file-uploaded templates, includes a Reupload option.
This option allows you to upload a new file containing the updated template. Following this action, a precheck overview window will verify the connectors and their versions. After reviewing, clicking the Apply button takes you to a Summary window, and a final click on Apply completes the update process.
On the other hand, if you applied the template using a link, the process begins similarly by selecting the template from the Template list. However, after clicking the three-dot button in this scenario, you'll see a Check for updates option.

Selecting this checks for available updates to your template. If your version is up-to-date with no new versions released, a message will inform you that "Template has no updates available." If a new version is available, a modal window will alert you to the availability of this new version. By clicking the Update button, you will be presented with the new version of the template, complete with an updated description and change log. Applying this new version involves clicking Apply, leading you to a Summary window, and a final click on Apply finalizes the template's update.
Tip
You can create a new endpoint token and assign it to an endpoint in the applied template without having to update the template.
Managing template activity
After successfully applying a template and clicking the Publish button to confirm the changes, the configuration becomes active. If you need to stop it temporarily, go to the Template list, select the template you wish to stop, click the three-dot icon for more options, and choose Stop. This action will mark the template with an orange cube symbol in the Card view of the Template list, signifying that all associated Tasks are now in a Suspended state.
To start the template again, repeat the same steps to stop it, but press Start instead of Stop. In the Template list, the orange cube symbol will change to indicate that the template is active again, and all Tasks within the template will be marked as Runnable.