

Writing Files to a WebDAV Server
Hello, welcome to new text tutorial! Today, we will delve into the of WebDAV connectors. WebDAV stands for Web Distributed Authoring and Versioning, an extension to the HTTP protocol designed to support the collaborative editing and management of files on remote servers. It offers a structured way for users to create, modify, relocate, and remove documents from a server, proving essential for managing files via the web.
You can use two ways of doing your own example.
For a detailed dive into the steps of the task, continue exploring the text tutorial below, complete with visuals. Or if you prefer an audio-visual experience, take advantage of a video tutorial from our YouTube channel. And, of course, you can combine reading and watching to fully understand the process of creating an integration between Integray and WebDAV.
Prerequisites
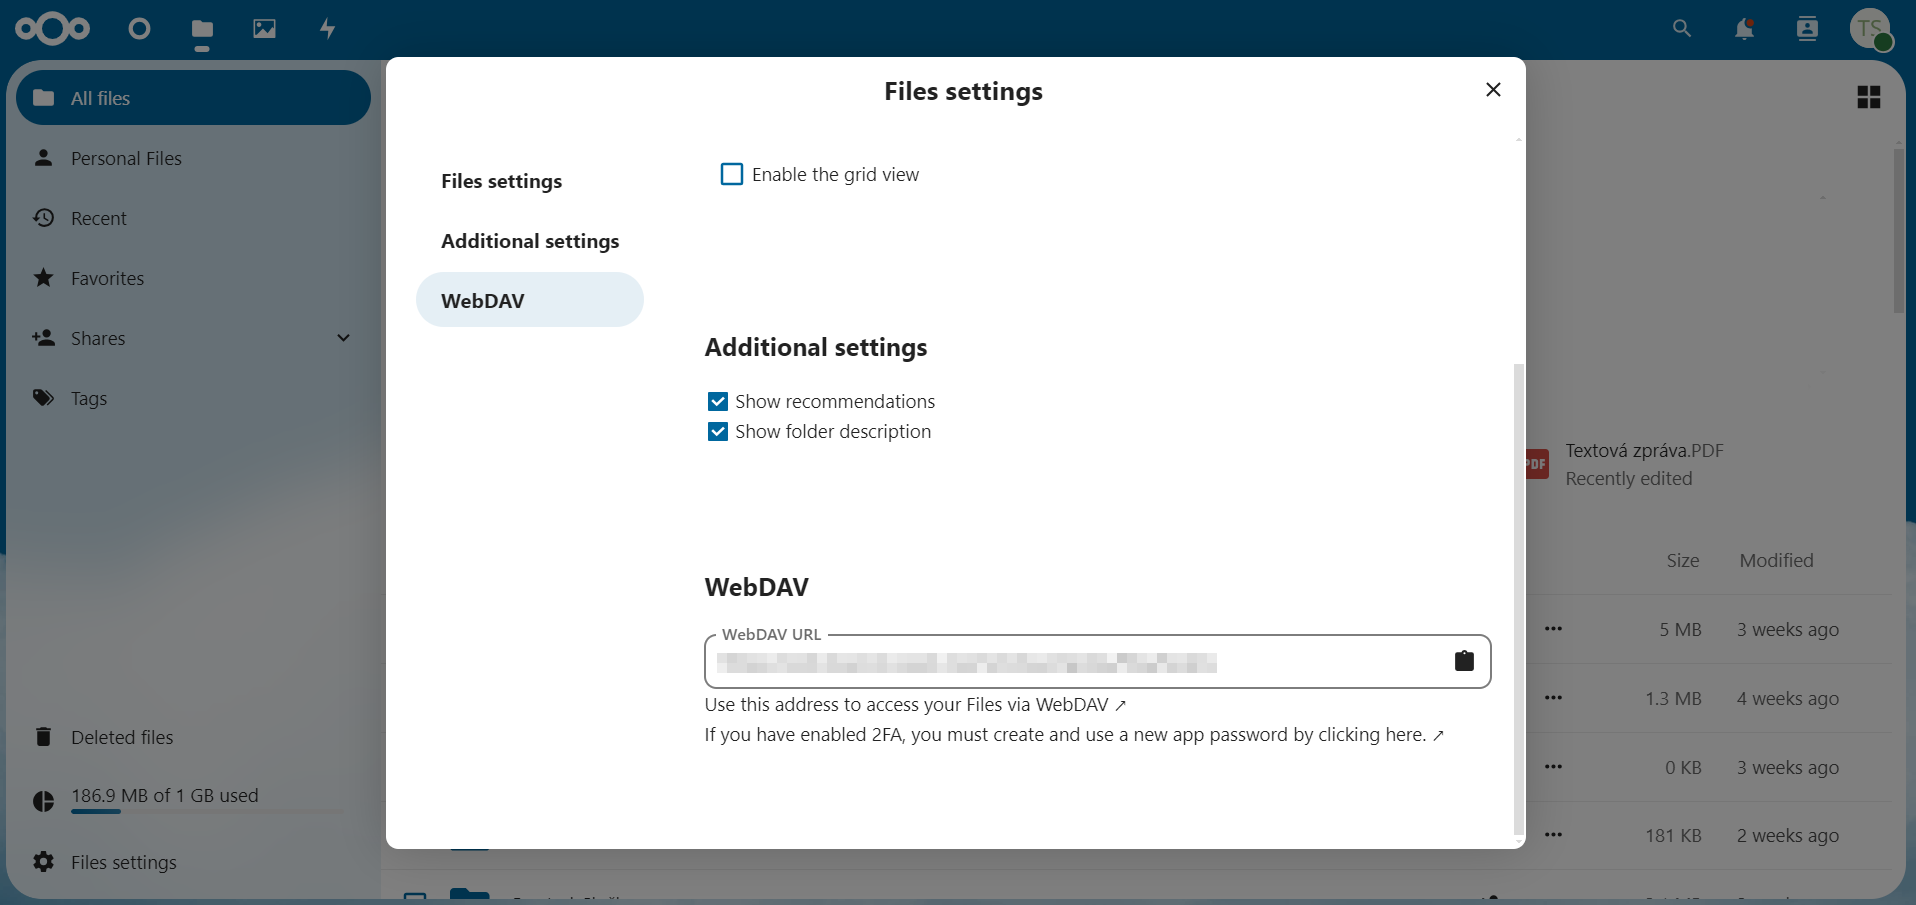
We need access to Nextcloud, which already contains various files. Create an account with an email and password at Nextcloud (a confirmation code will be sent to your email, so you must have access to the email). After logging in, click on the "Files" icon in the top left corner. In the bottom left corner, navigate to Files Settings > WebDAV. Here, you can see the URL we will start with to connect the connector to the Nextcloud repository.
The WebDAV - Write File connector facilitates the transfer of files to a WebDAV server, requiring configuration of the server's URL, username, and password. Key configuration settings include the base directory, directory creation options, and error management protocols. This connector performs its function by sending Base64-encoded data to a specified directory and filename on the server, and it returns status codes that indicate either success or failure. For this demonstration, we have designed two scenarios: one for storing sent messages and another for archiving received messages using a WebDAV service. Typically, these tasks are automated with scheduled triggers; however, for this demonstration, we will execute them manually. As both configurations are similar, we will elaborate on only one in this example.
Configuration
We will create the first task and name it Send incomming messages. When you add all the steps, the configuration of this task will look like this
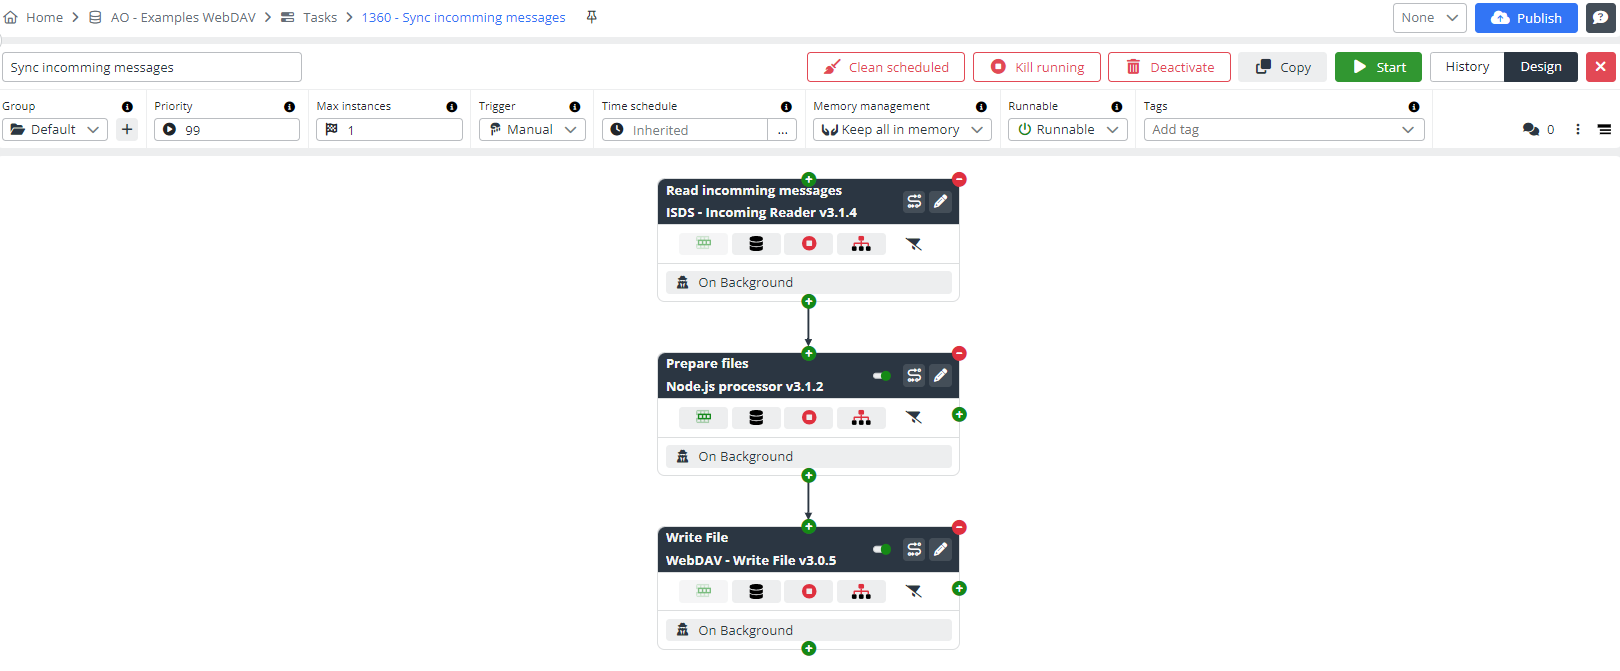
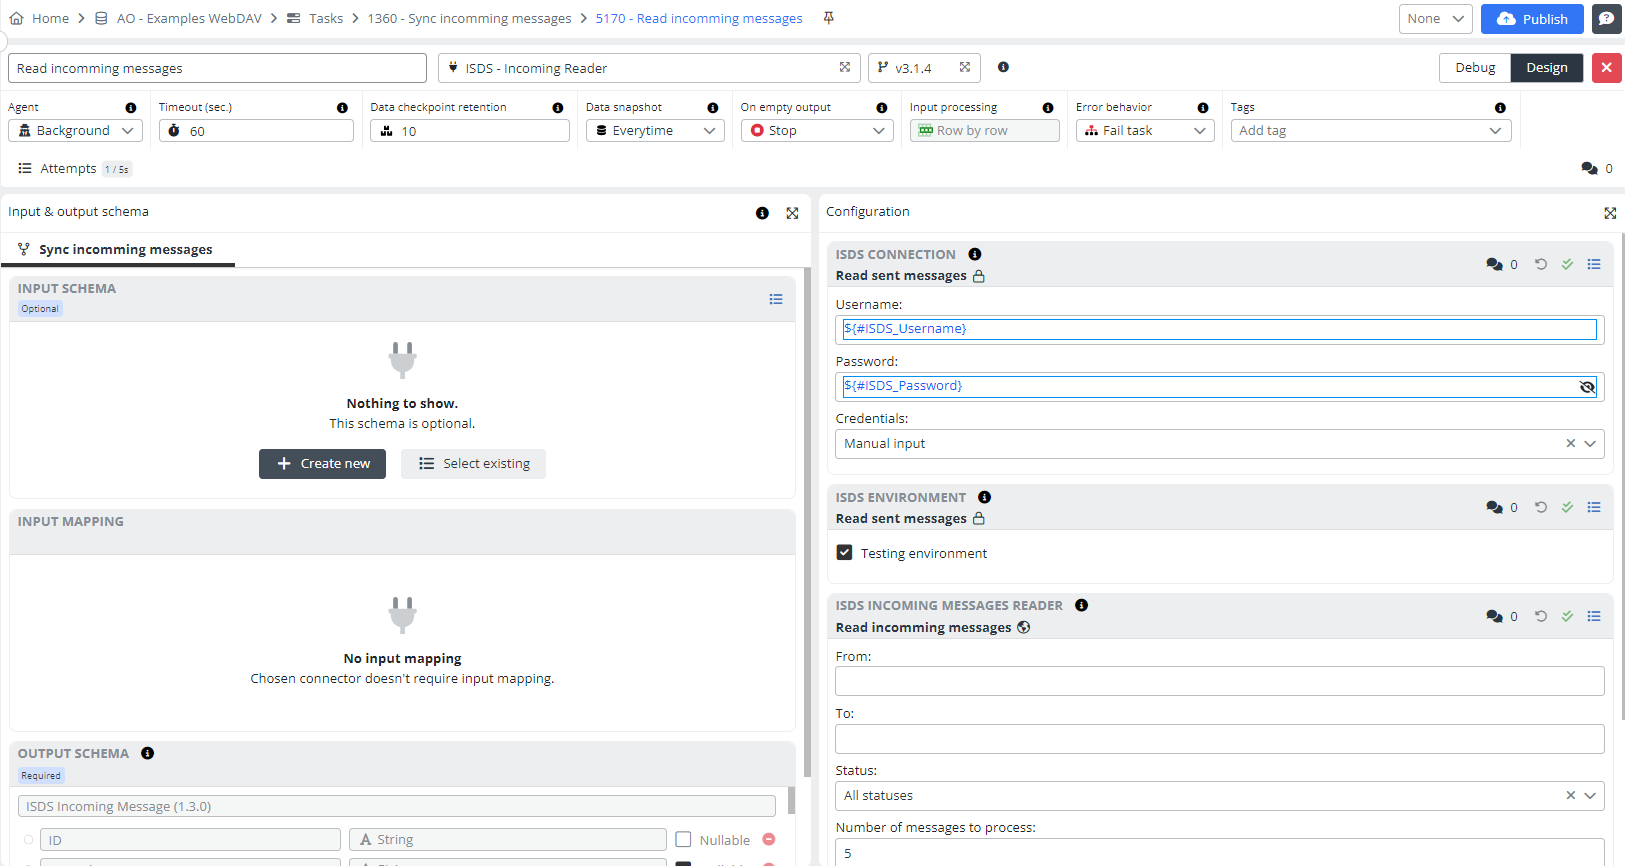
We begin with the ISDS - Incoming Reader connector, tasked with retrieving messages from the Czech Data Box platform.
Add a first Task step:
- Step name: Read incomming messages
- Connector: ISDS - Incoming Reader
Open the Task step editor by clicking the button with the pencil symbol.
Fill in the configuration fields: username, password, RecipientID and others as you can see in the screenshot. Save all configurations and close the step.
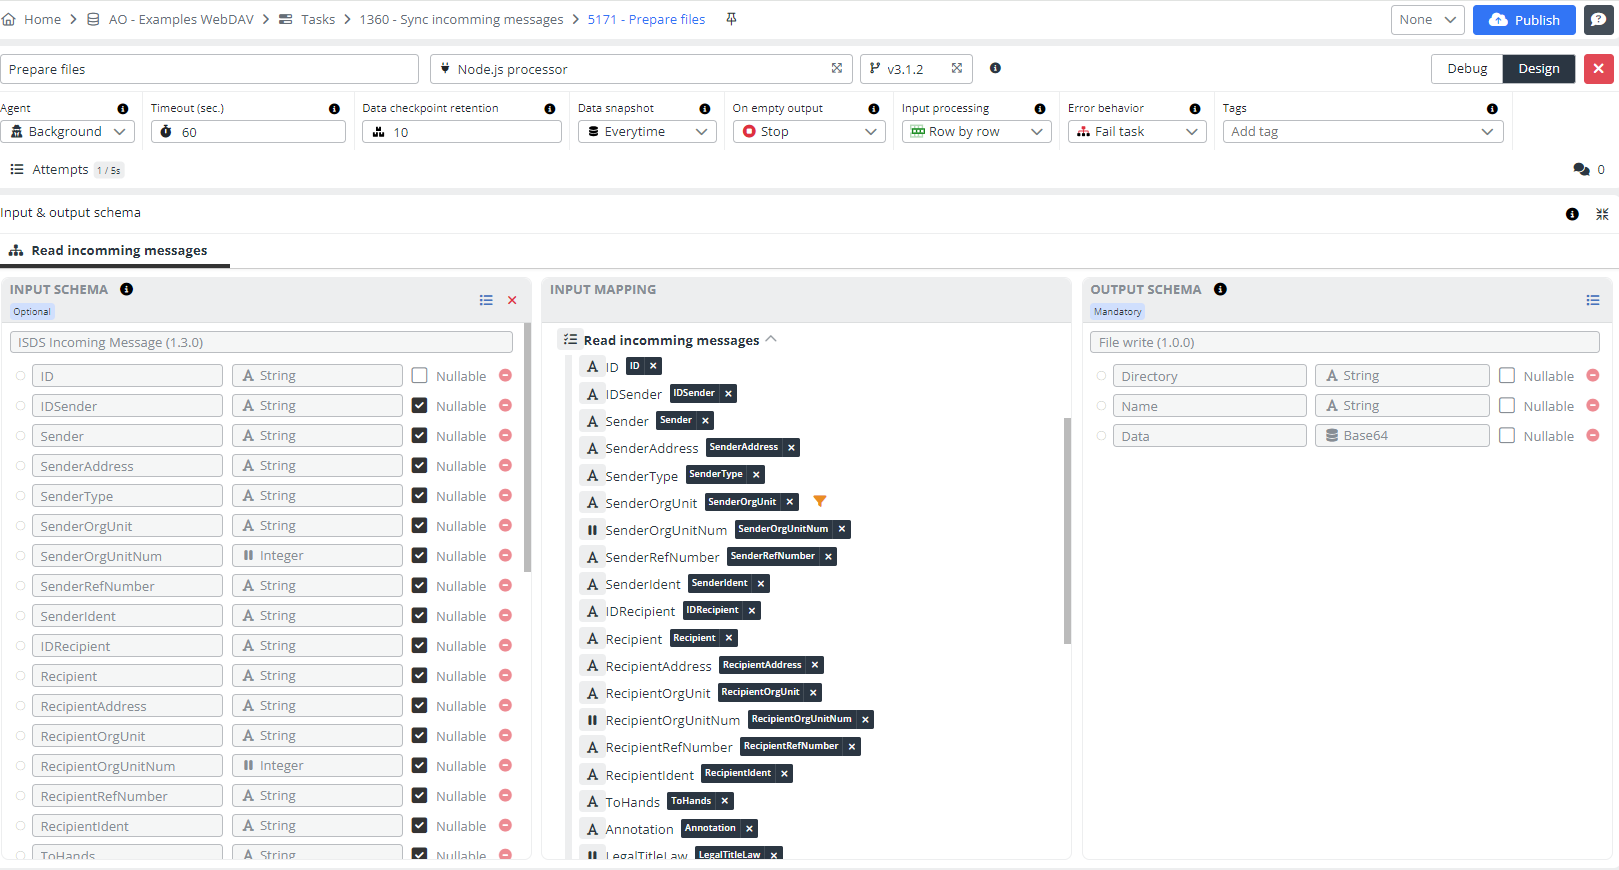
In the second step, Node.js processor is employed to format files for the WebDAV - Write File connector.
Add a second Task step:
- Step name: Prepare files
- Connector: Node.js processor
Open the Task step editor.
Insert the following code into the Node.js statement configuration:
const output = [];

const browser = await puppeteer.launch();

function createDir(m) {
  const baseURL = '${#Nextcloud_ReceivedUrl}';
  const date = new Date(m.DeliveryTime);
  const year = date.getUTCFullYear();
  const month = String(date.getUTCMonth() + 1).padStart(2, '0'); // Months are zero-based
  const day = String(date.getUTCDate()).padStart(2, '0');
  return `${baseURL}/${year}/${month}/${year}-${month}-${day} ${m.Annotation.replace('/', '_')}`;
}

async function createMainFile(m) {
  const deliveryEventList = m.DeliveryEvents?.map((e) => {
    return `<li>${e.Time} : ${e.Description}</li>`
  }).join('');
  const deliveryEvents = deliveryEventList?.length > 0 ? `<ul>${deliveryEventList}</ul>`: '';
  const content = `
<html>
<style>
.strong { font-weight: bold;}
</style>
<body>
<h1>${m.Annotation}</h1>
<table>
<tr><td>Odesílatel</td><td class="strong">${m.IDSender} - ${m.Sender} (${m.SenderAddress})</td></tr>
<tr><td>Adresát</td><td class="strong">${m.IDRecipient} - ${m.Recipient} (${m.RecipientAddress})</td></tr>
</table>
${deliveryEvents}
</body>
</html>
  `;
const page = await browser.newPage();
await page.setContent(content);
const pdfBuffer = await page.pdf({ format: 'A4' });

  return {
    Name: `zprava_Receive.pdf`,
    Data: pdfBuffer.toString('base64'),
  }
}

for (let i = 0; i < inputData.length; i++) {
  const m = inputData[i];
  const Directory = createDir(m);
  output.push(
    {
      Directory,
      ...await createMainFile(m),
    },
    {
      Directory,
      Name: 'zprava_Receive.zfo',
      Data: m.SignedFileContent,
    }
  );
  const files = m.Files.map((file) => {
    return {
      Directory,
      Name: file.Name,
      Data: file.Data,
    }
  });
  output.push(...files);
}

await browser.close();
return output;
Configuring the WebDAV connection settings accurately, such as hostname, password, error behavior preferences, and the base directory, the which is a link you will get on the WebDAV platform.
Add a third Task step:
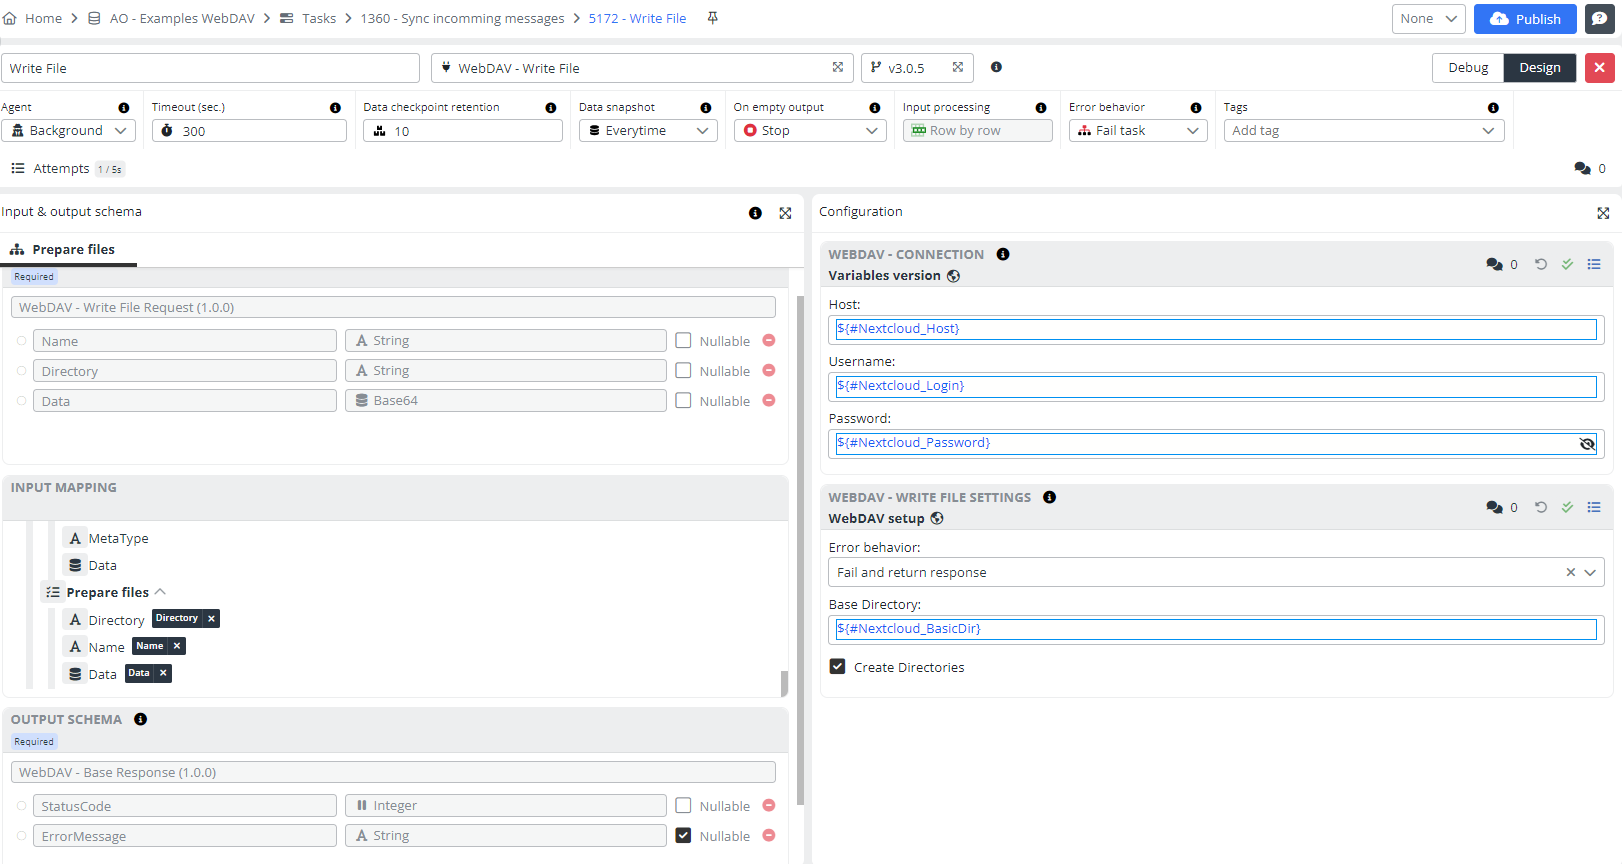
- Step name: Write File
- Connector: WebDAV - Write File
Open the Task step editor. Fill in all fields for the WebDAV connection and WebDAV write file settings. Save the configuration and pin the input mapping.
The setting of the third step can look like follows:
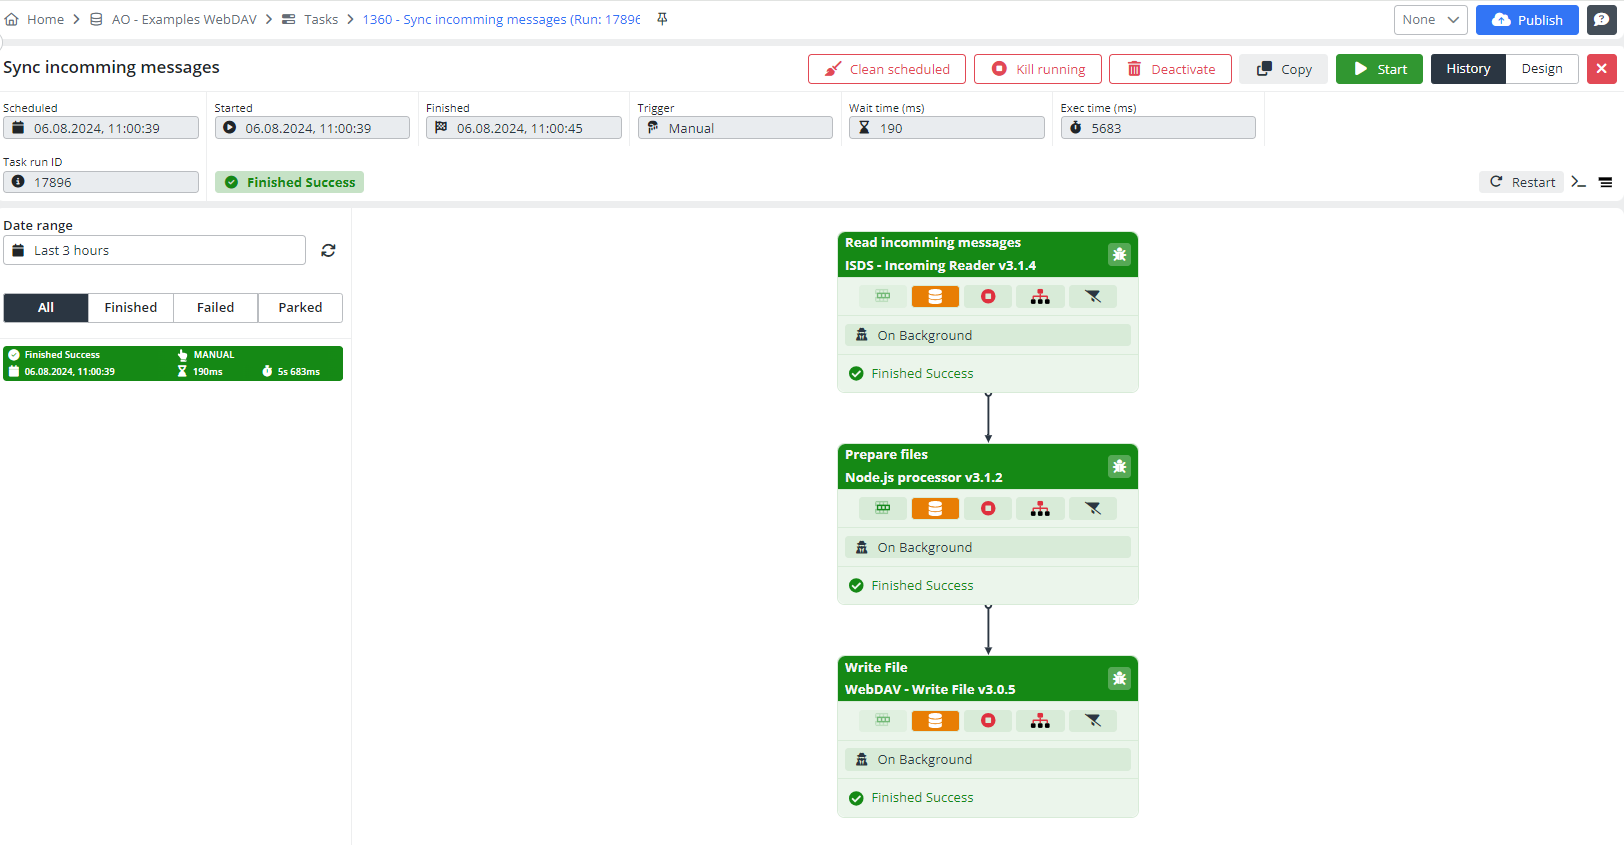
Press the Publish button. Alright, now we can start this task.
Result
By clicking on History, we can see that the configuration finished successfully.
This is the result in Integray. By accessing the History tab, we observe that the configuration was executed successfully.
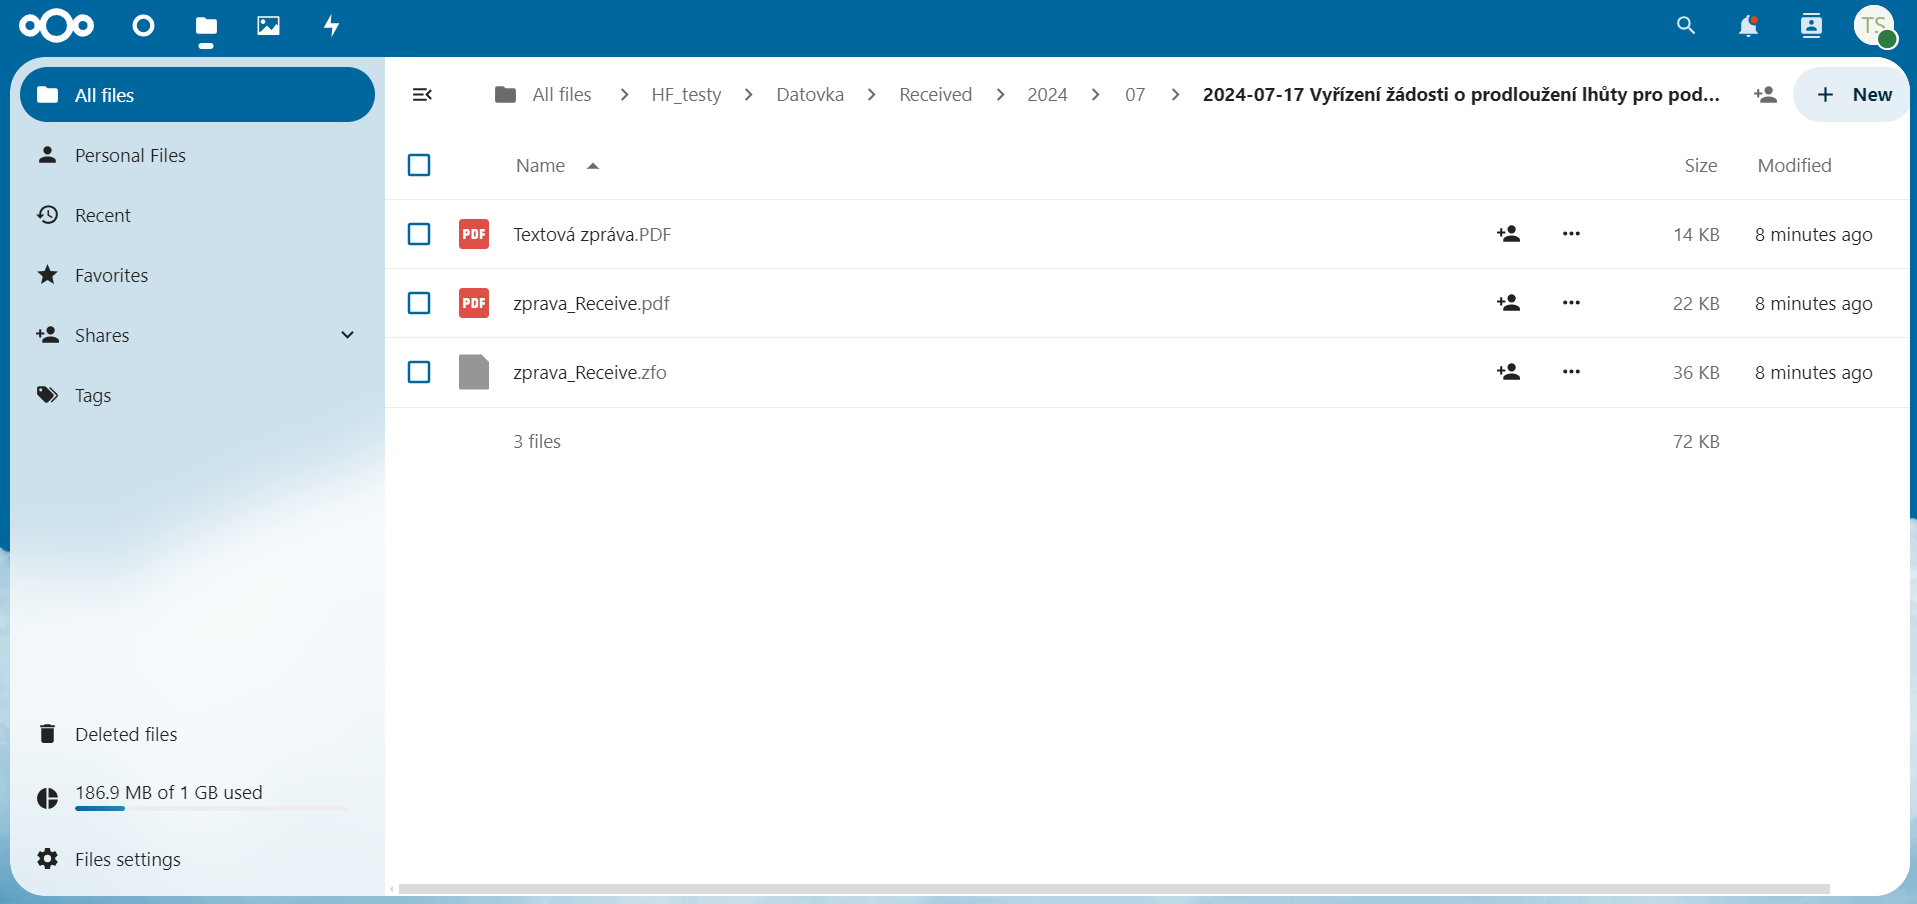
In Nextcloud, which uses the WebDAV service, we can navigate to the 'received' folder, then to the '2024' folder, and finally to the '07' folder to see that the message from the Czech Data Box was successfully uploaded.
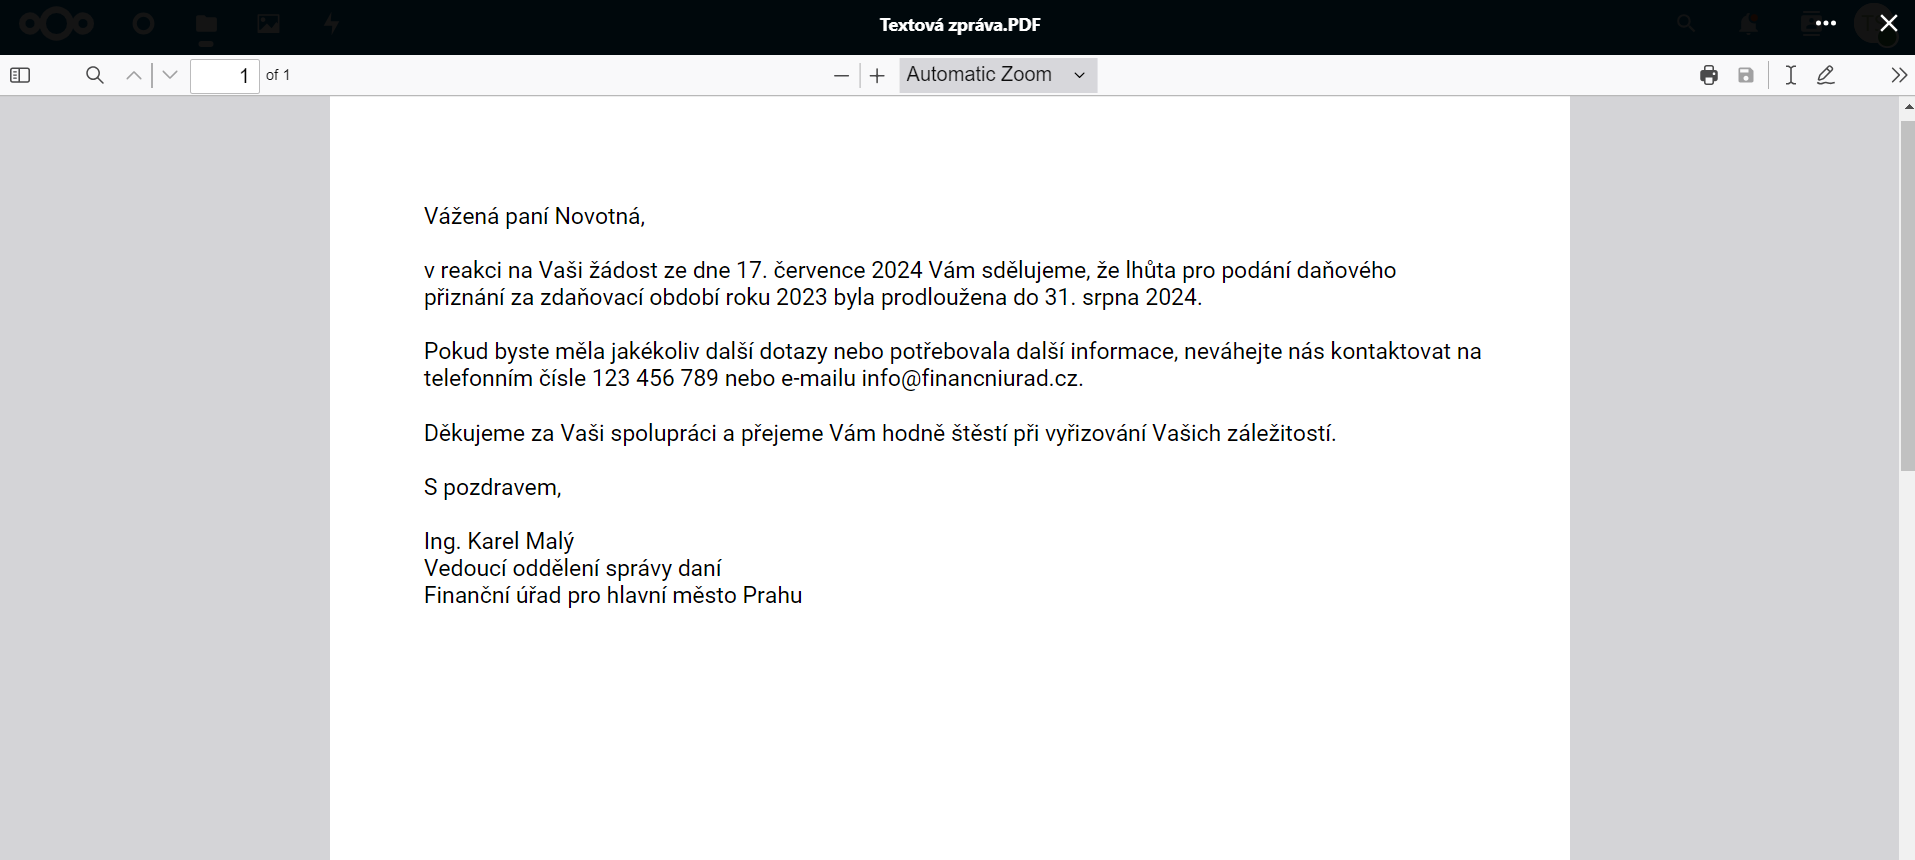
Here, you can see the message. The content and header of the message are displayed separately, allowing for easier and more efficient processing.
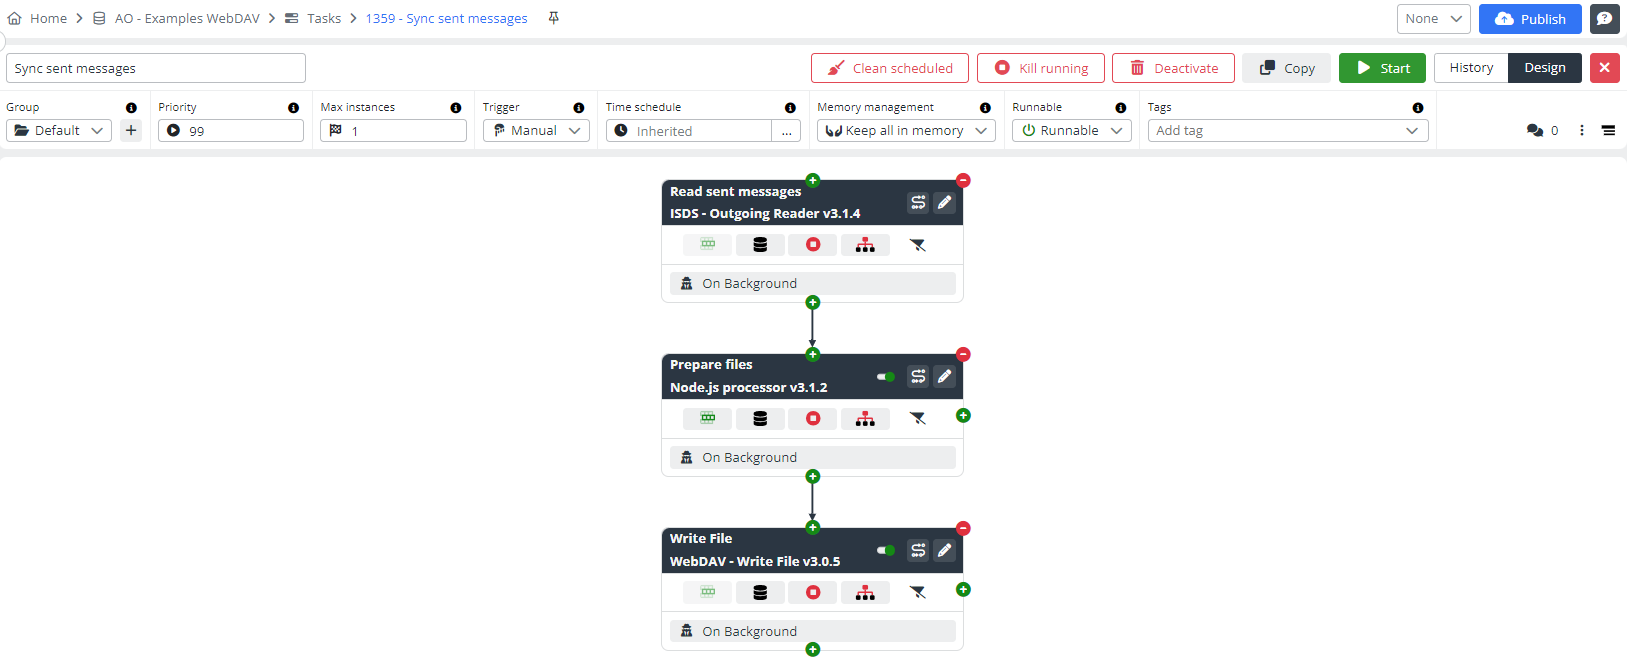
Similarly, you can create a task for syncing sent messages. In this case, use the ISDS - Outgoing Reader connector in the first step, which reads sent messages. These connectors are versatile and can be utilized throughout the entire platform.
We are happy if you got the expected result. You can create your own new integrations based on this example.