

List contacts, list contact channels, send attachment, and send email
In this example, let's talk about four other Respond.io connectors - List Contacts, List Contact Channels, Send Attachment, and Send Email.
You can use two ways of doing your own example.
For a detailed dive into the steps of the task, continue exploring the text tutorial below, complete with visuals. Or if you prefer an audio-visual experience, take advantage of a video tutorial from our YouTube channel. And, of course, you can combine reading and watching to fully understand the process of creating an integration between Integray and Respond.io.
Prerequisites
Create an account with an email and password at Respond.io (a confirmation code will be sent to your email, so you must have access to the email). Fill in the necessary information in "Let's set up your organization". Set the first channel (TELEGRAM) by clicking on settings.
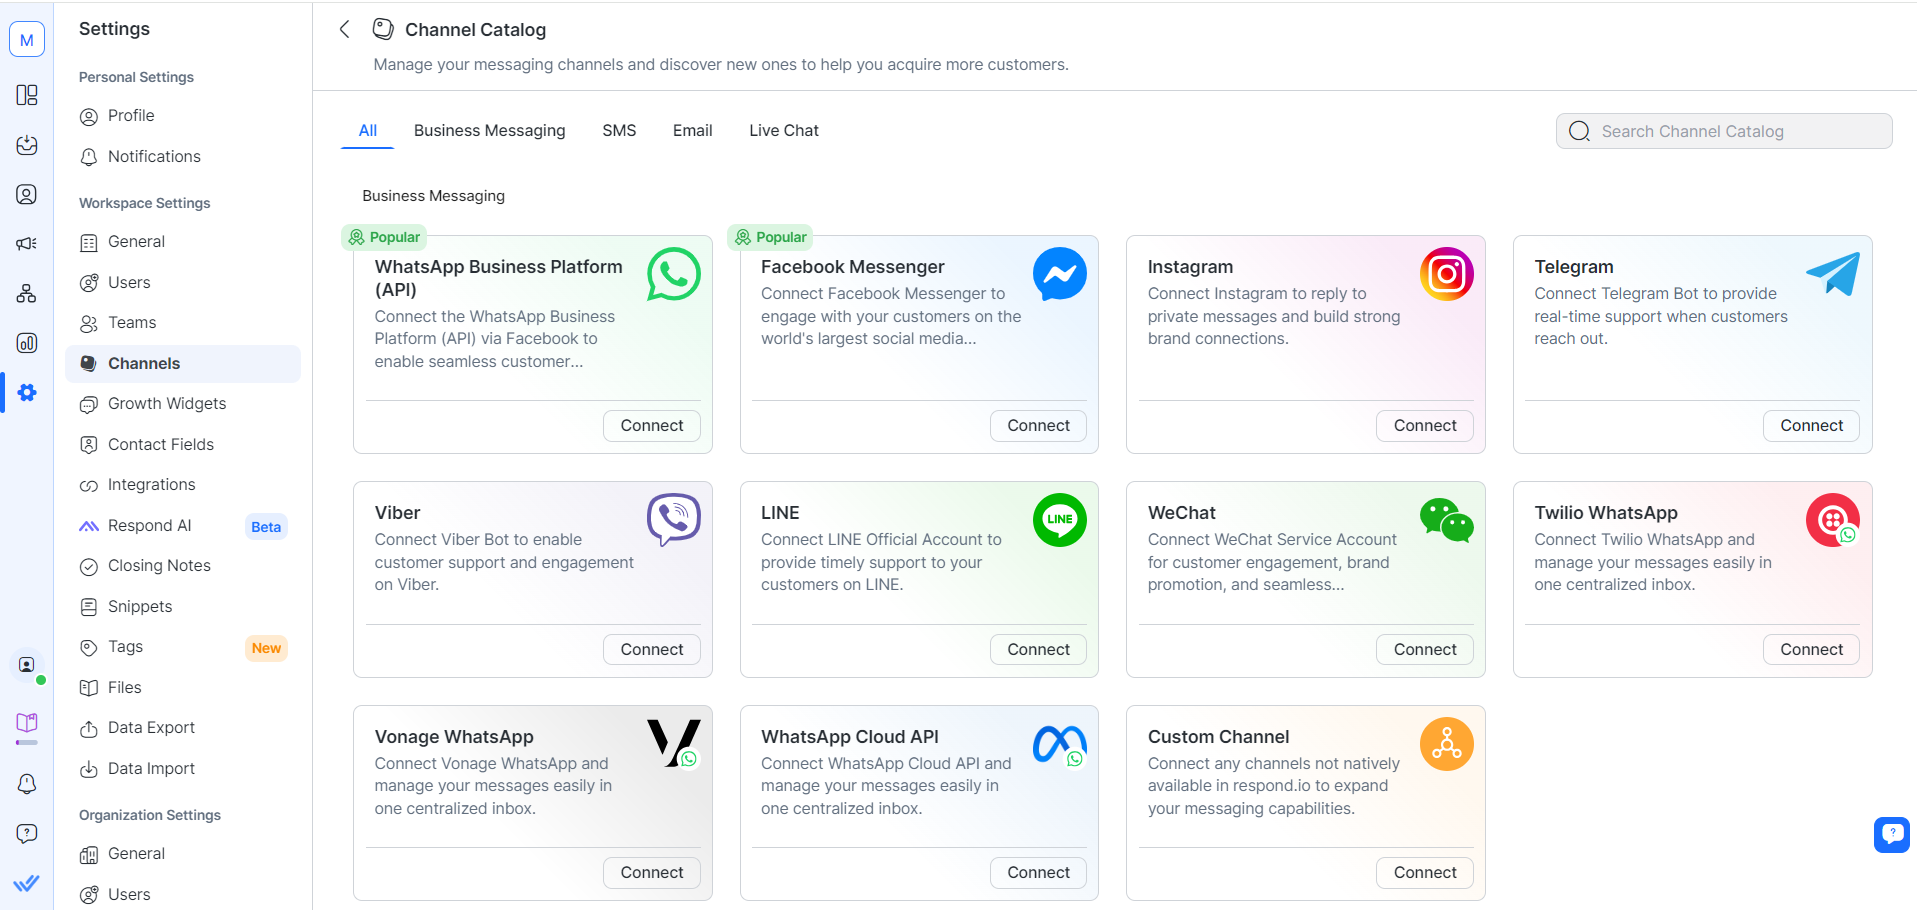
Click on Connect to get to the Telegram connection options.
Select CREATE A NEW BOT and follow the instructions on how to create a chatbot.
We get a token from the Bot which we copy into the appropriate field and we can start chatting.
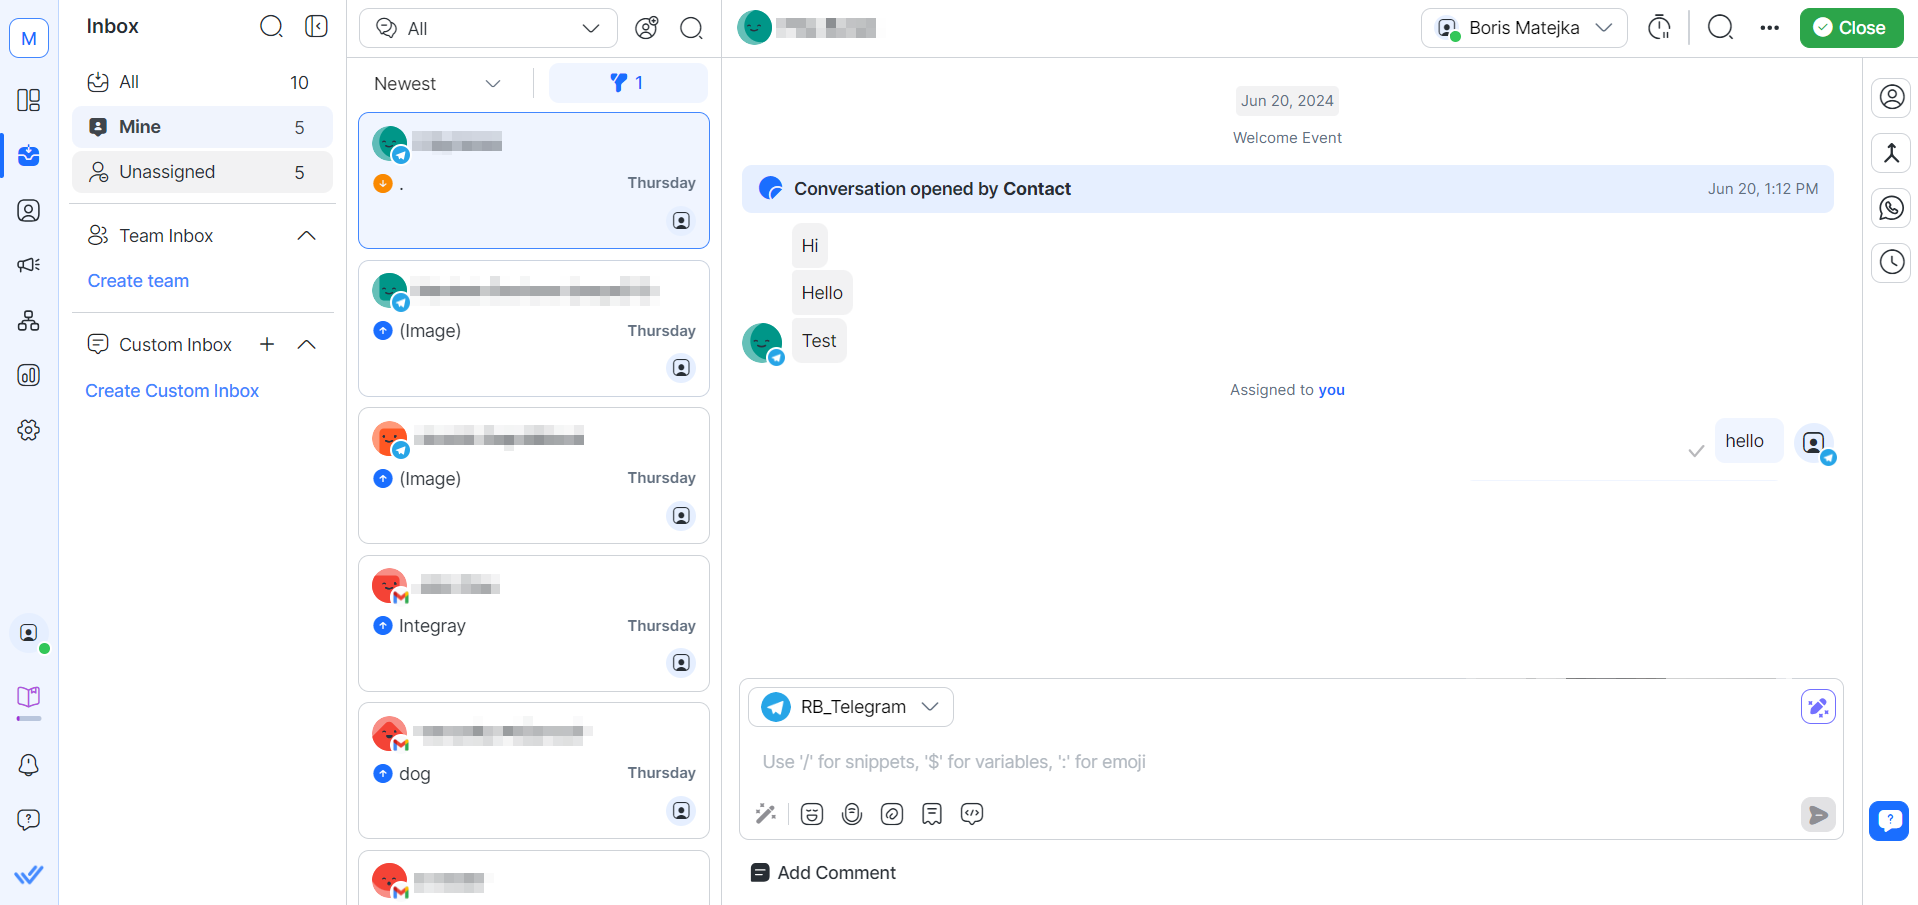
On Respond.io the conversation looks like this:
In the same way, connect another channel - Gmail. Follow the instructions on the VIDEO.
You also need to enter a list of contacts who will also have channels set up, at least on Telegram. You can enter the contacts manually or use our example Create, update, or get a contact.
We know we have the chats connected and working, so we set up the Integray.
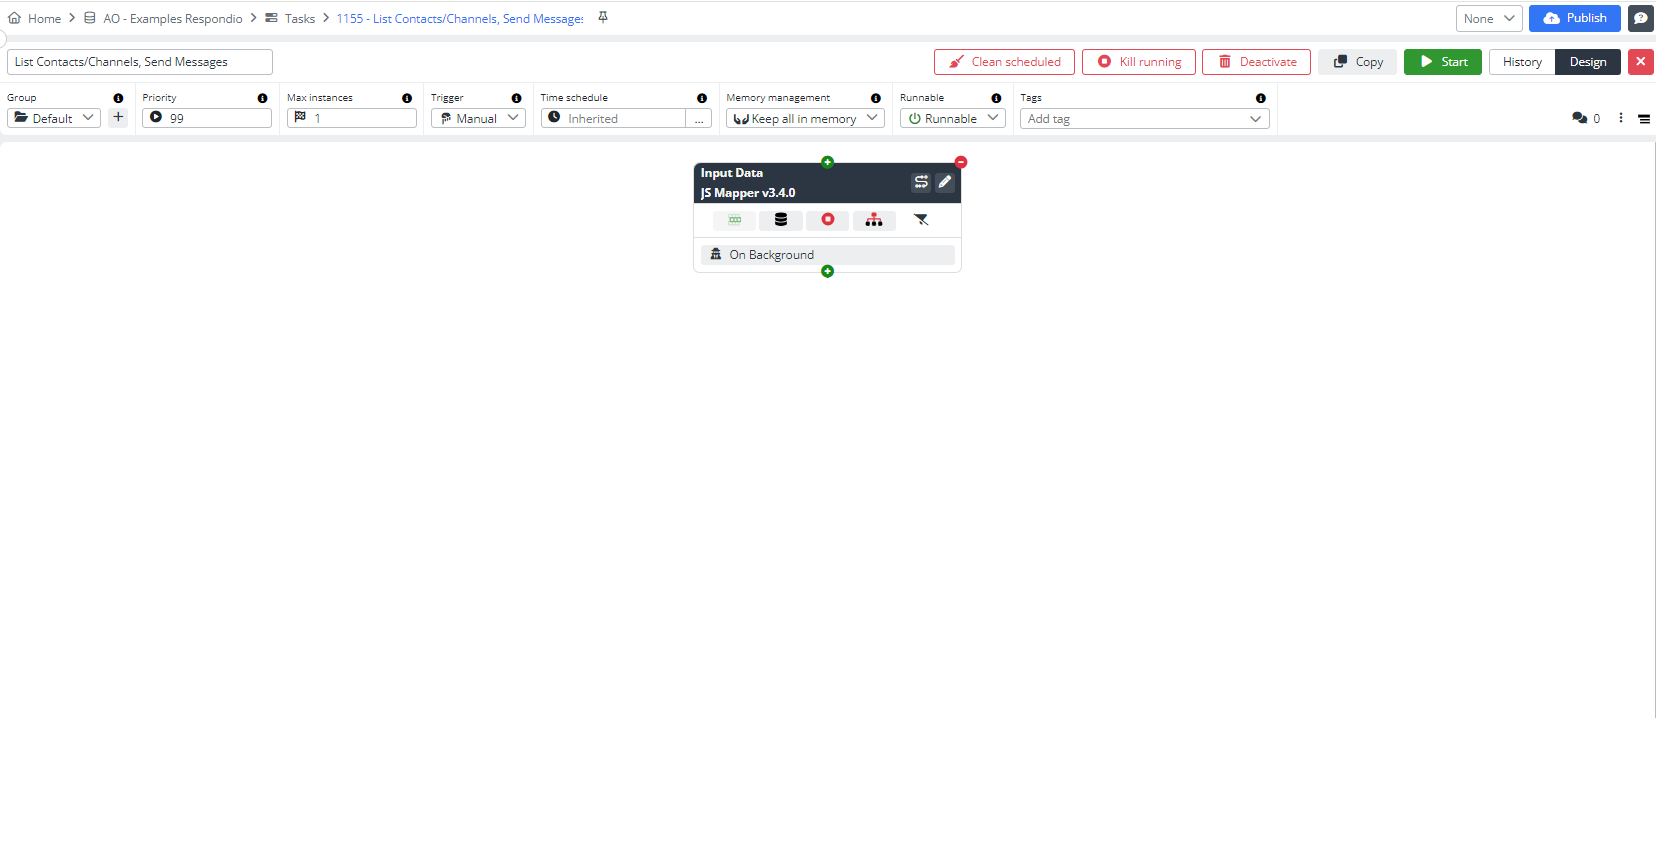
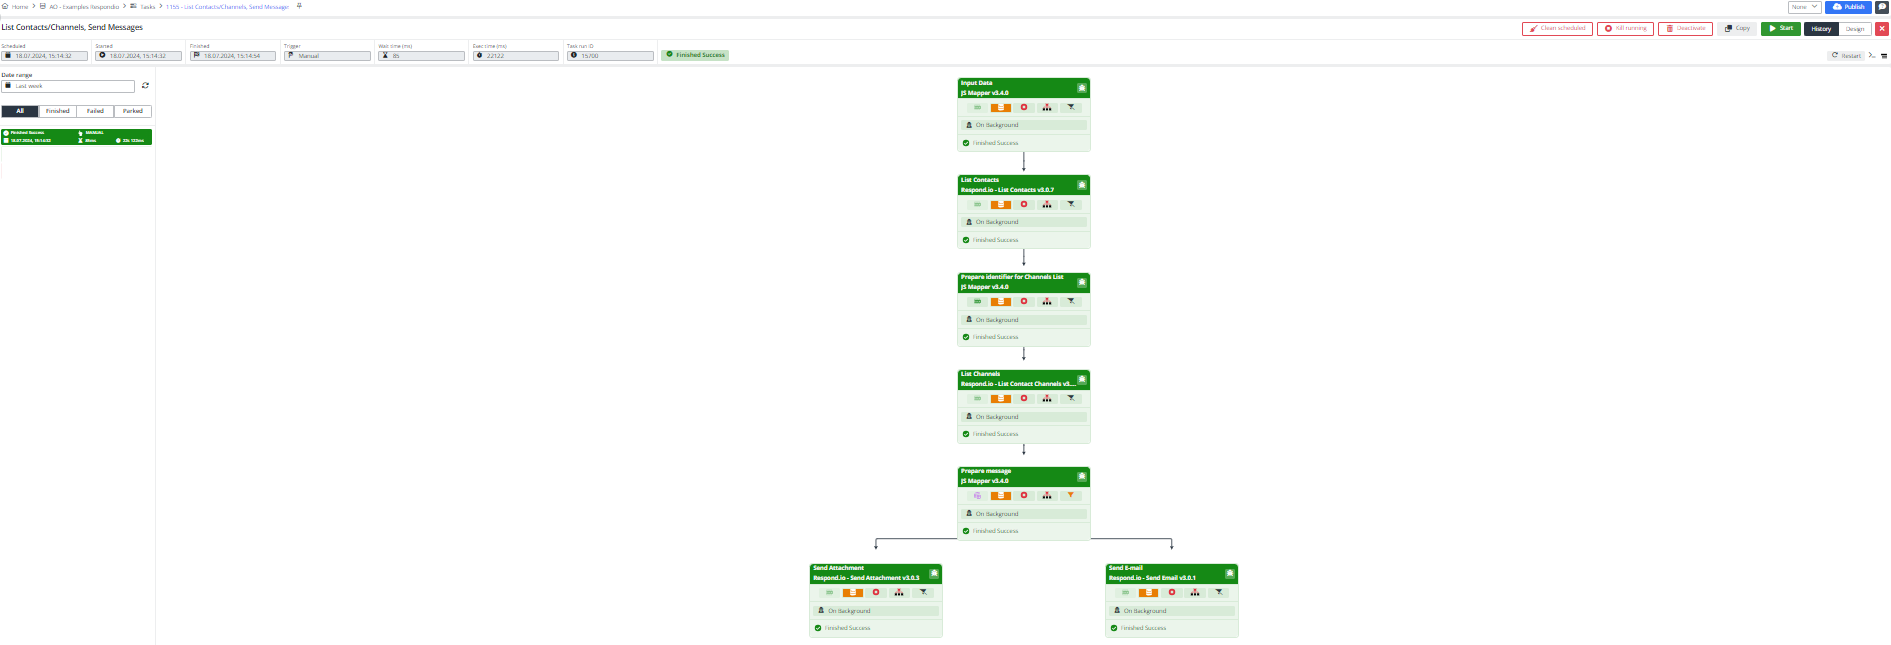
Add a new Task and name it List Contacts/Channels, Send Messages.
As in the last example, we used the JS Mapper, in which we simulated input data. For convenience, we have combined all connectors in one task.
You can use other connectors and other resources for input data. Also, you can create integrations with each
Respond.io connector separately rather than combining them into one task.
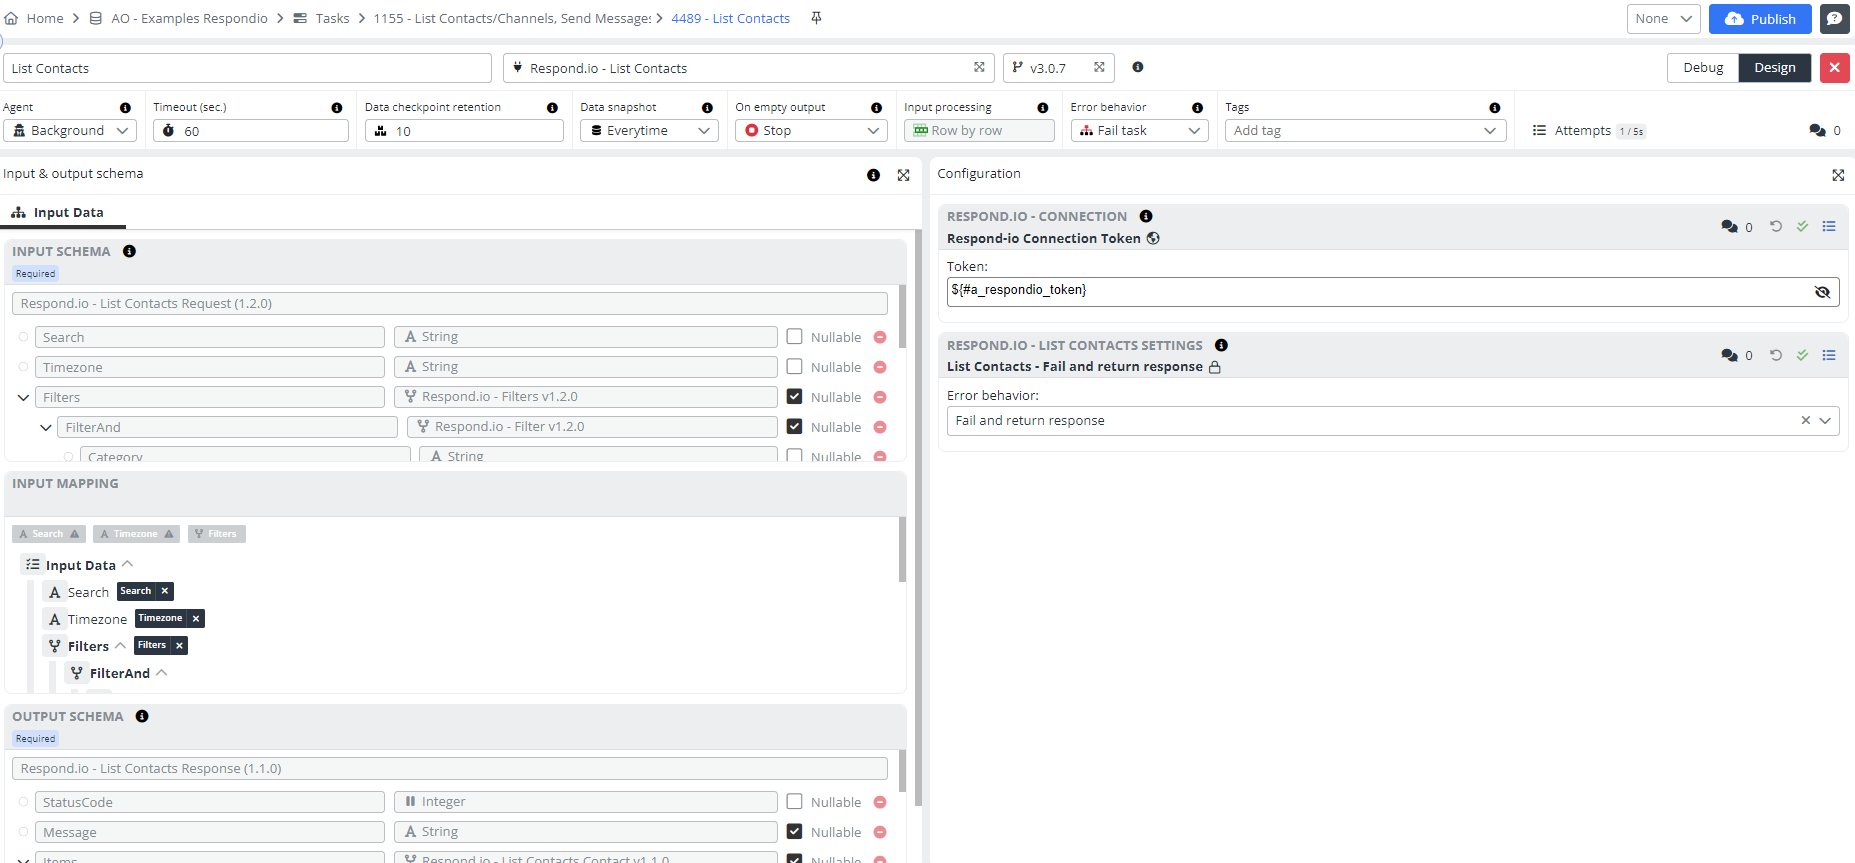
List Contacts
Let's start with the first example, where we use the connector Respond.io - List Contacts to retrieve a list of contacts from the Respond.io. It is useful for managing and viewing all the contact information you have stored. By using this connector, you can filter and sort contacts based on various criteria, helping you efficiently manage your contact database.
Configuration
Add a first Task step:
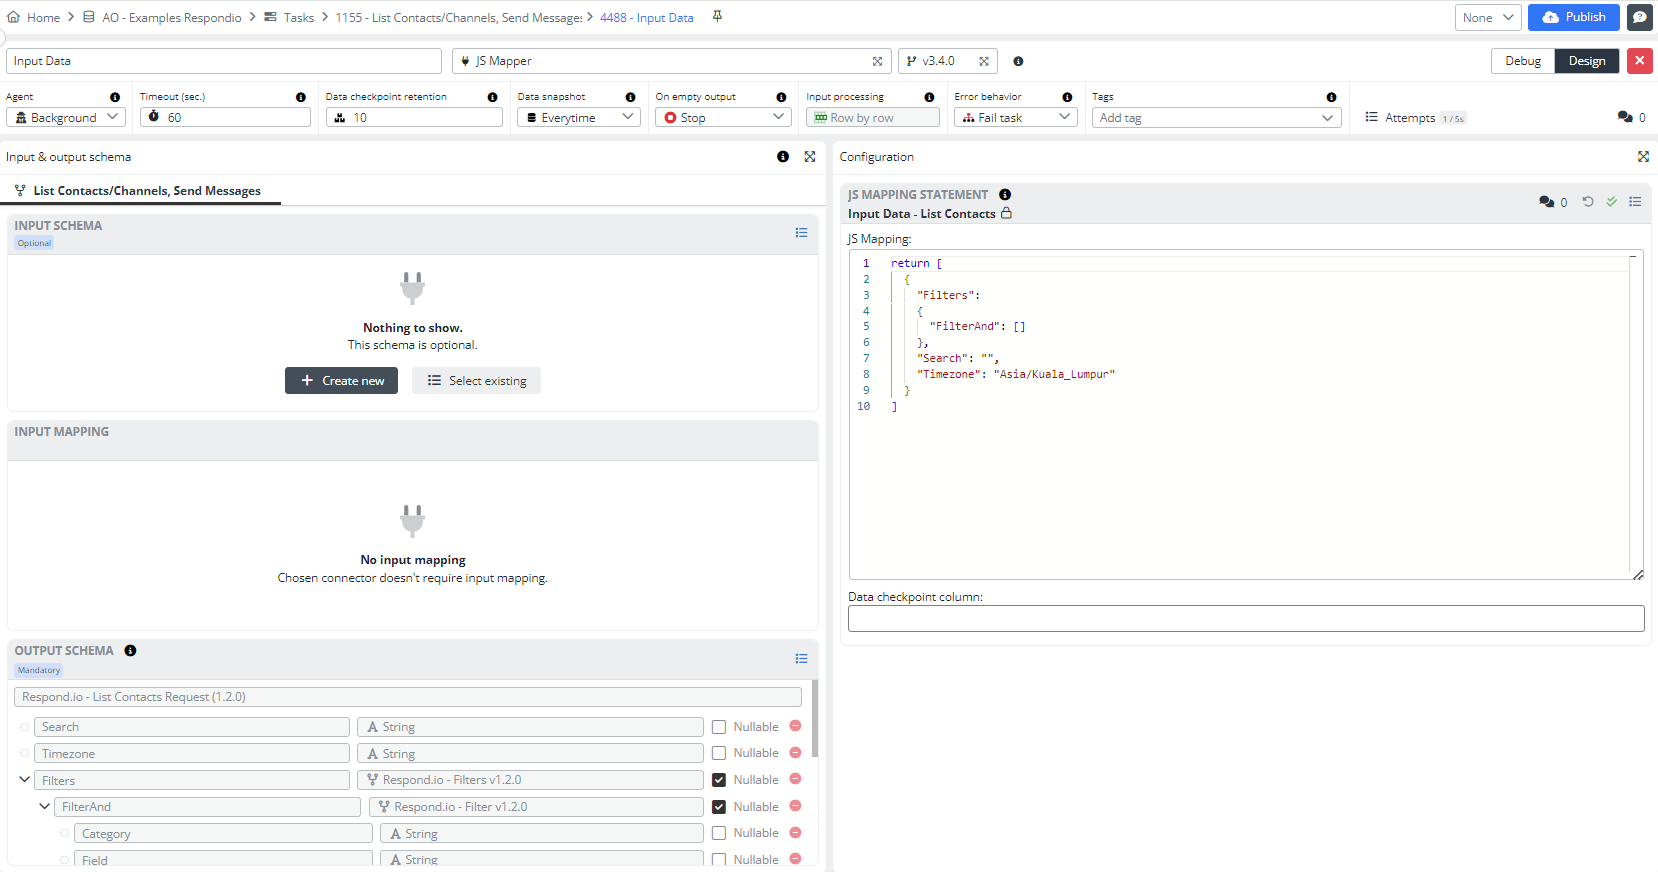
- Step name: Input Data
- Connector: JS Mapper
Open the Task step editor by clicking the button with the pencil symbol.
Insert the following code into the JS Mapping statement configuration:
return [
  {
    "Filters":
    {
      "FilterAnd": []
    },
    "Search": "",
    "Timezone": "Asia/Kuala_Lumpur"
  }
]
Select the Output schema Respond.io - List Contacts Request, which is the mandatory input schema.
The setting of the first step can look like follows:
Add a second Task step:
- Step name: List Contacts
- Connector: Respond.io - List Contacts
Open the Task step editor.
Pin input mapping.
Fill in the token - find it after the instructions here: API Respond.io.
Save the configuration.
Select error behavior and save the configuration again.
Press the Publish button.
Start the task.
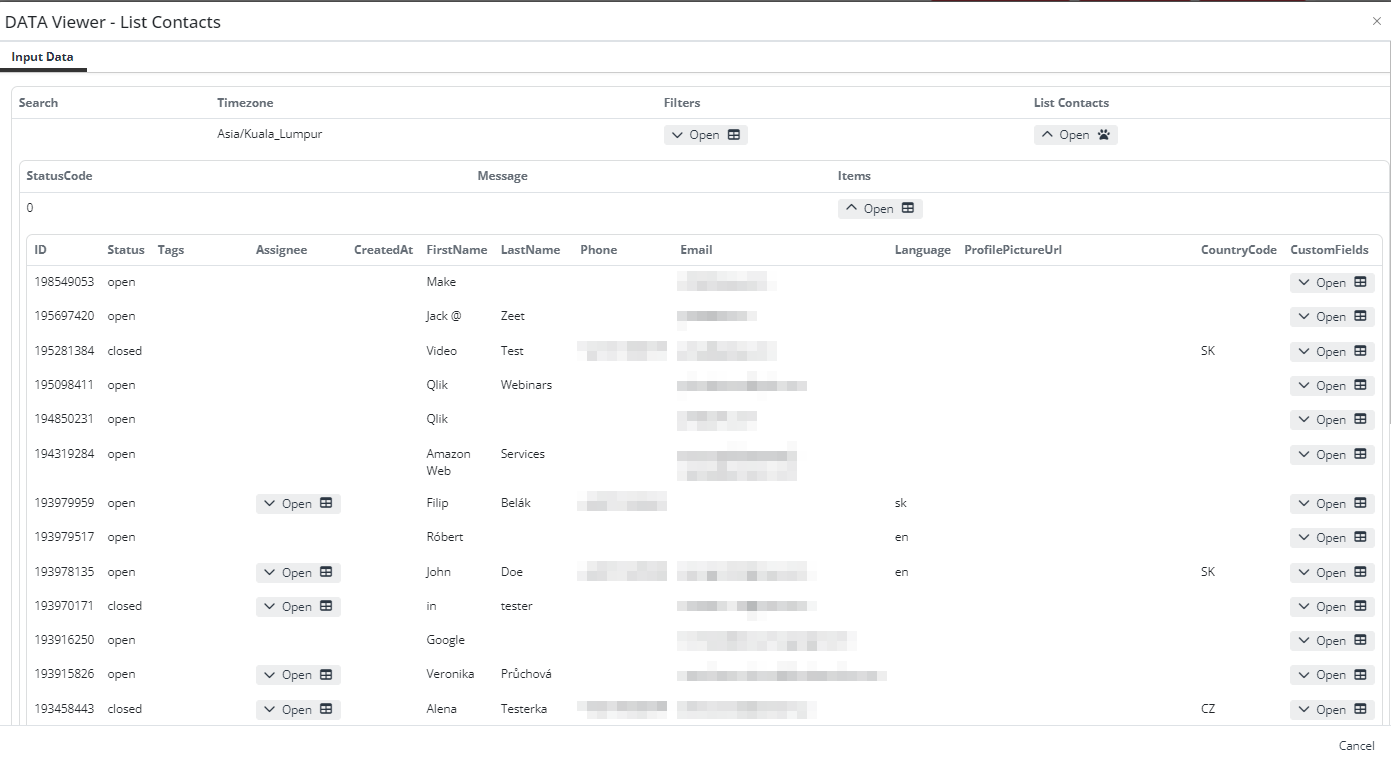
Result - list of contacts retrieved
As a result, we get a list of our contacts. This is the result in Integray.
List Contact Channels
The List Contact Channels connector lists all the communication channels associated with each contact. It provides insights into the different ways you can reach out to your contacts, such as through email, phone, or social media. This is particularly useful for understanding the preferred communication methods of your contacts and ensuring you use the right channels for your messages.
Configuration
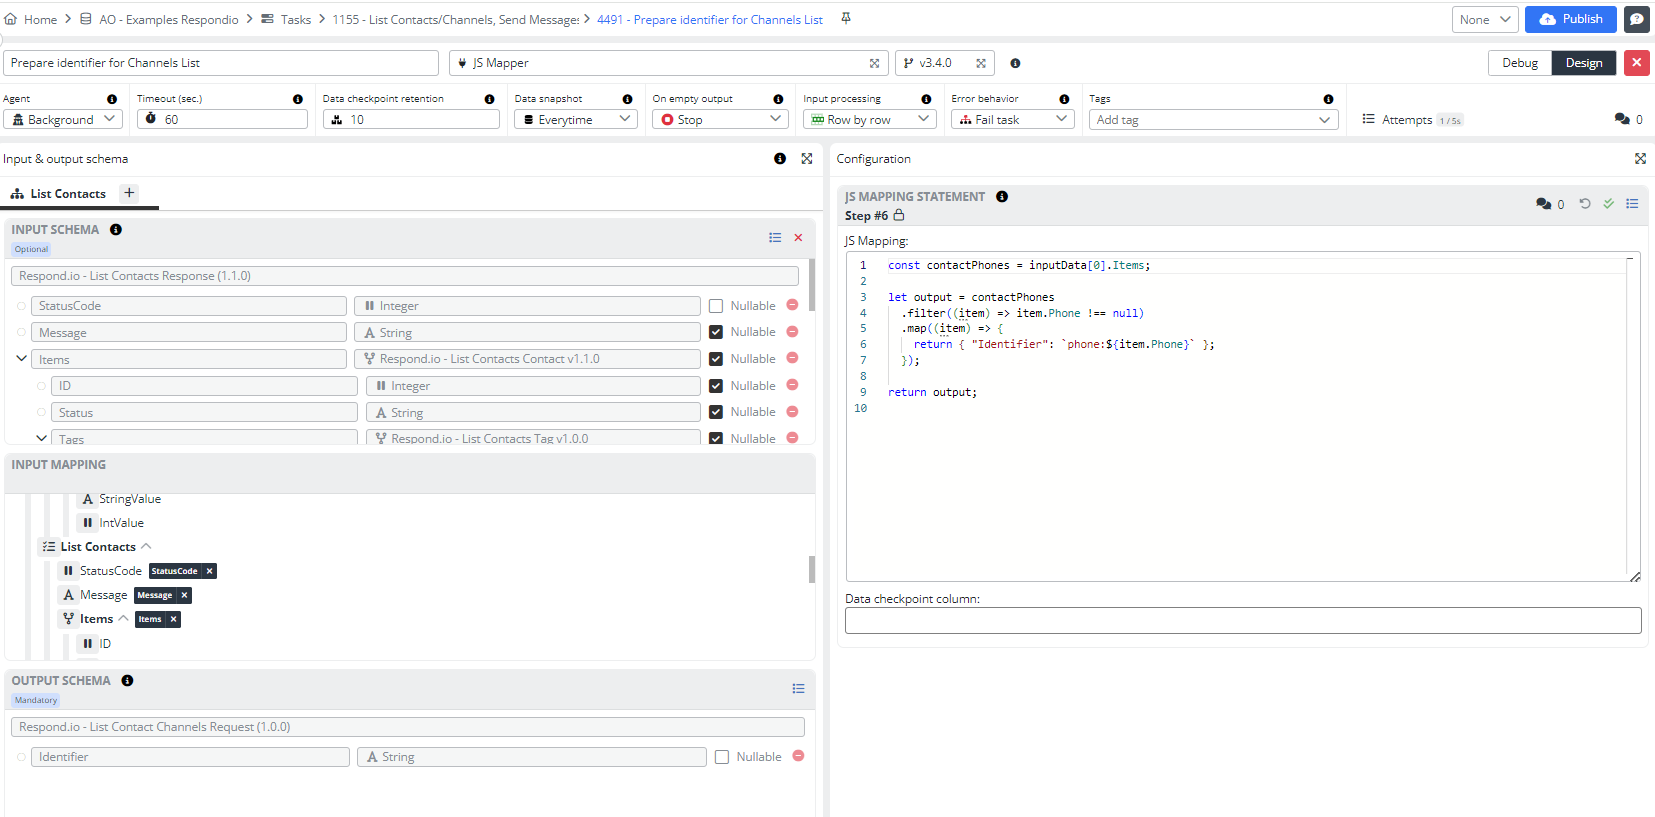
In the third step, we again have a JS Mapper in which we filtered all users who have active conversations in Respond.io.
Add a third Task step:
- Step name: Prepare identifier for Channels List
- Connector: JS Mapper
Open the Task step editor.
Insert the following code into the JS Mapping statement configuration:
const contactPhones = inputData[0].Items;

let output = contactPhones
  .filter((item) => item.Phone !== null)
  .map((item) => {
    return { "Identifier": `phone:${item.Phone}` };
  });

return output;
This entry filters out only those users that have a phone number.
If you want to filter this by email or contact ID, enter a different Identifier in the schema.
The name of Input schema Respond.io - List Contacts Response.
The name of Output schema Respond.io - List Contact Channels Request.
Pin input mapping.
The setting of the third step can look like follows:
Add a fourth Task step:
- Step name: List Contacts channels
- Connector: Respond.io - List Contacts Channels
Open the Task step editor.
Pin input mapping.
Fill in the token - find it after the instructions here: API Respond.io
Save the configuration.
Select error behavior and save the configuration again.
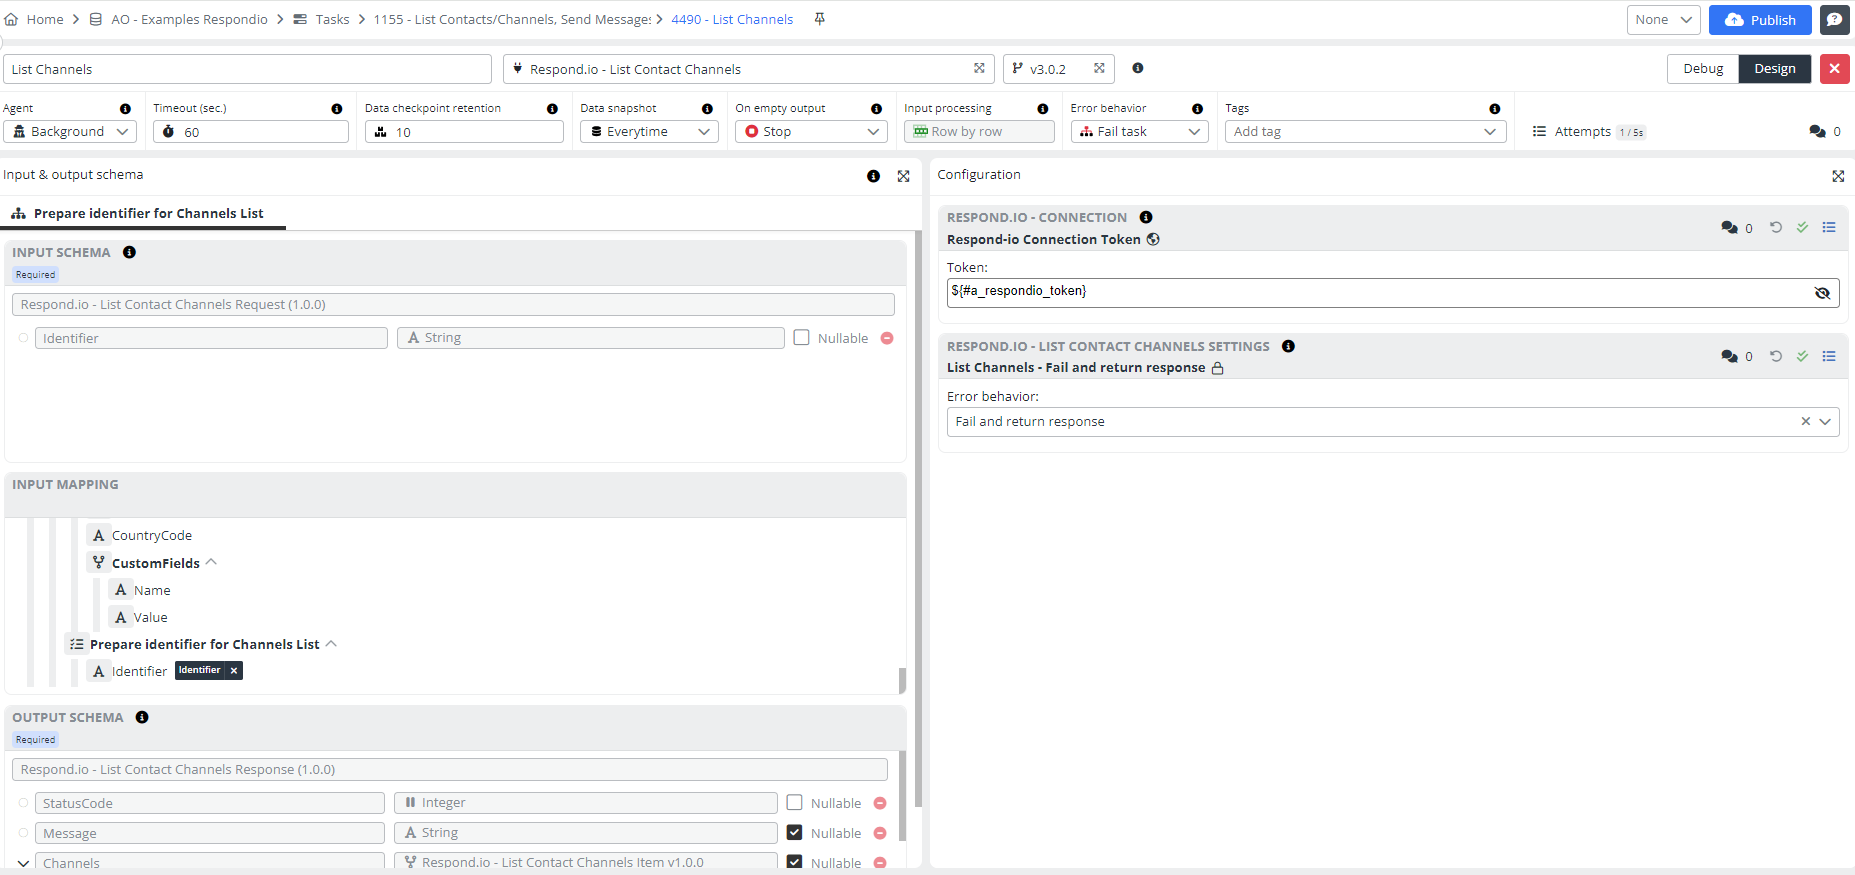
Press the Publish button.
You can start the task to see the result.
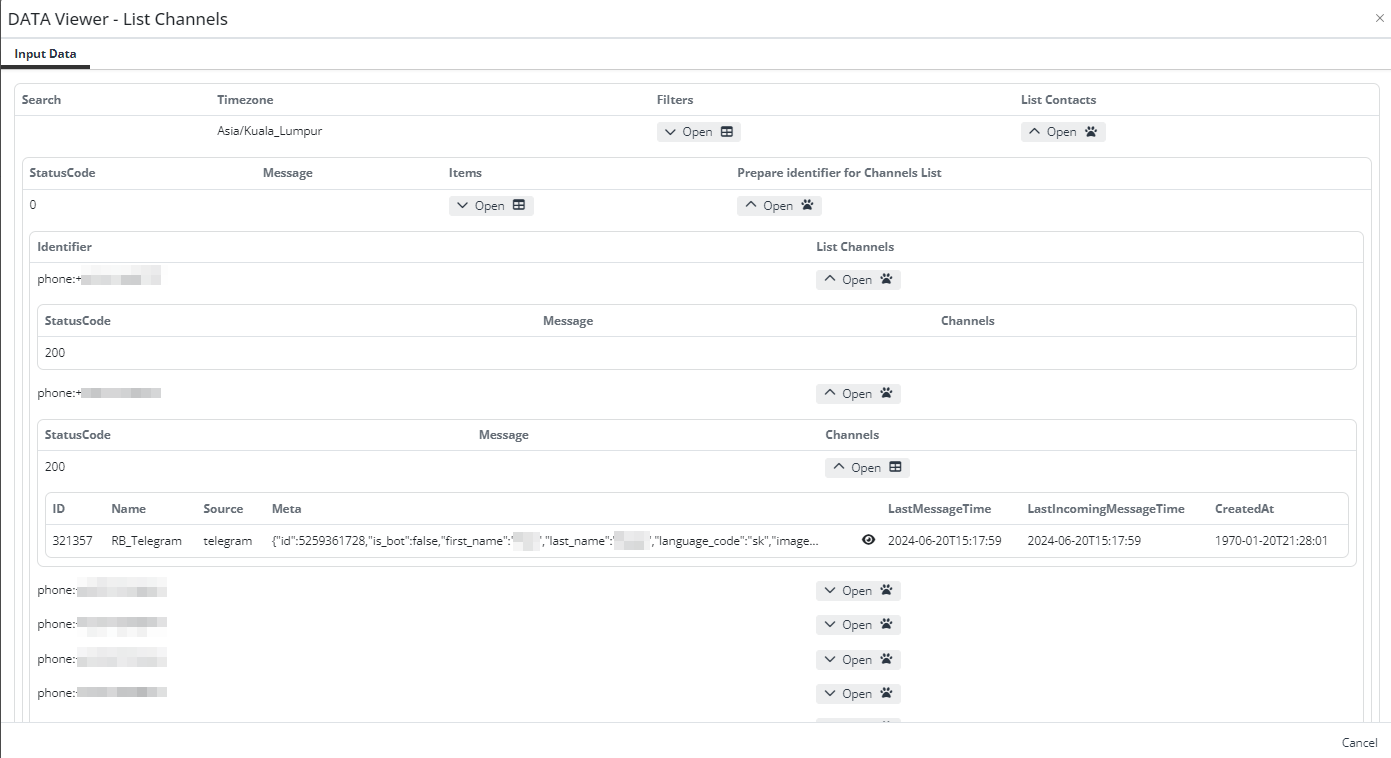
Result - list of contacts channels retrieved
As a result, we get a list of our contacts. This is the result in Integray.
Send Attachment
The Send Attachment connector enables you to send files to your contacts through supported messaging channels. This is particularly useful for sharing documents, images, or other files directly with your contacts. You can specify the recipient, the type of attachment, and other relevant details to ensure the file is delivered appropriately.
To send an attachment, we will also use JS Mapper where we prepare a message. This message is for both email and Telegram and is structured as required. We use the multi input step (MIS). It is a new feature introduced in Integray to enhance the flexibility and efficiency of data integration workflows. More about MIS here.
Configuration
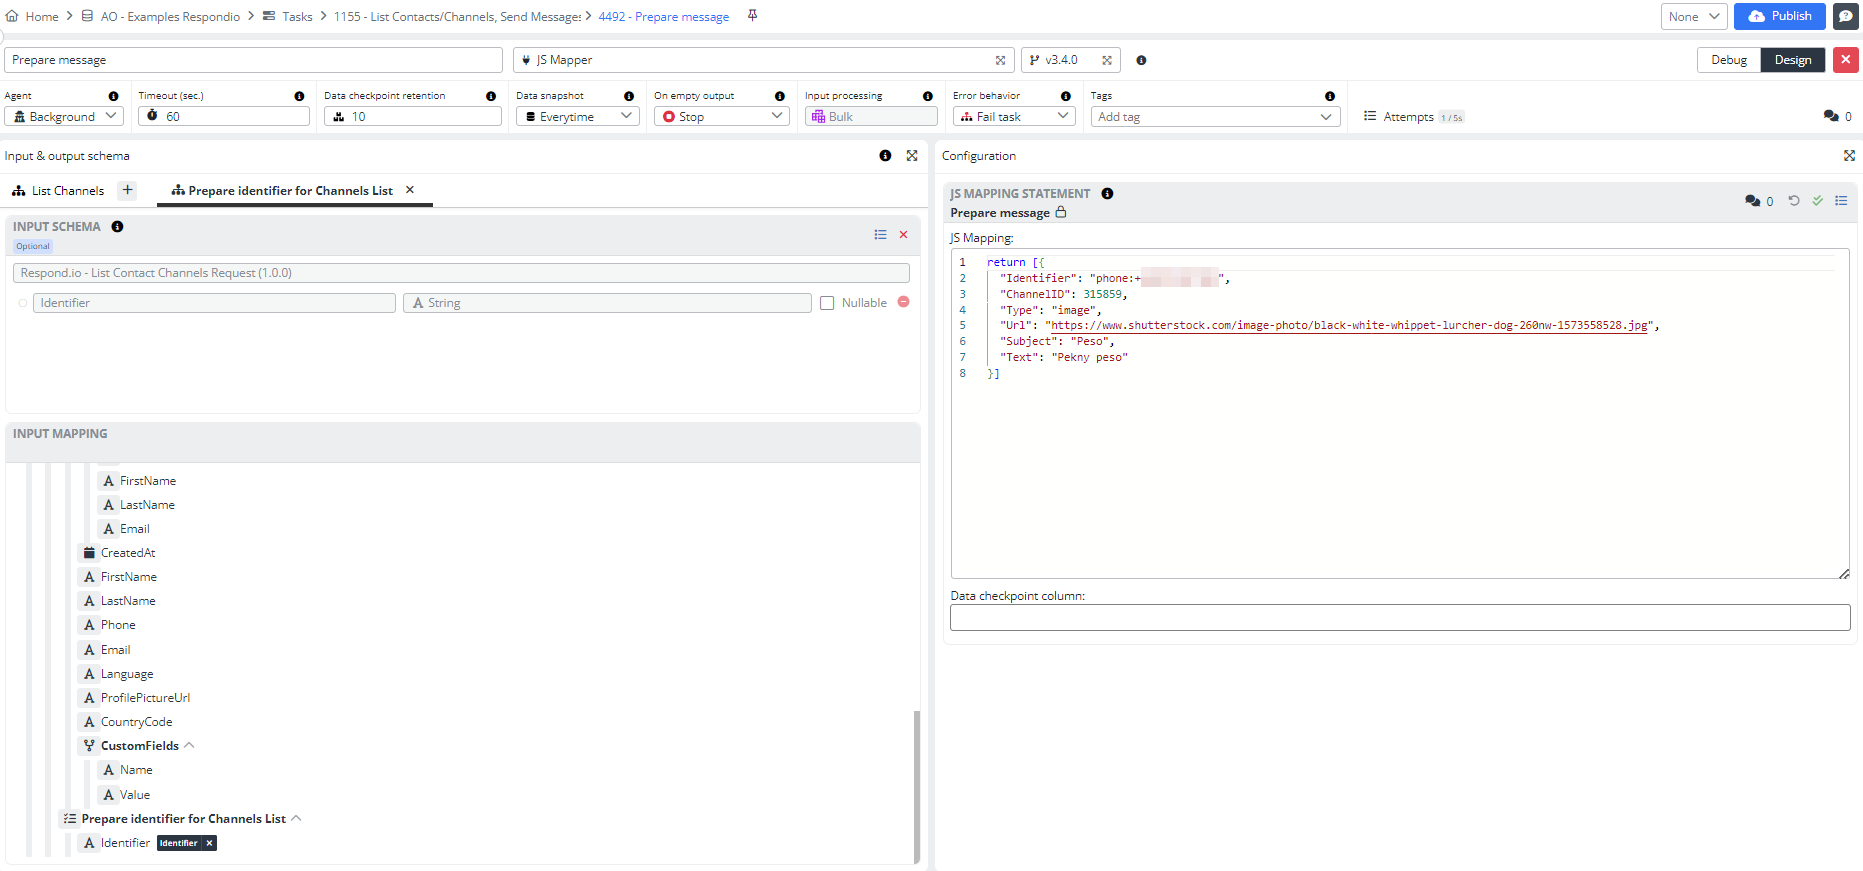
Add a fifth Task step:
- Step name: Prepare message
- Connector: JS Mapper
Open the Task step editor.
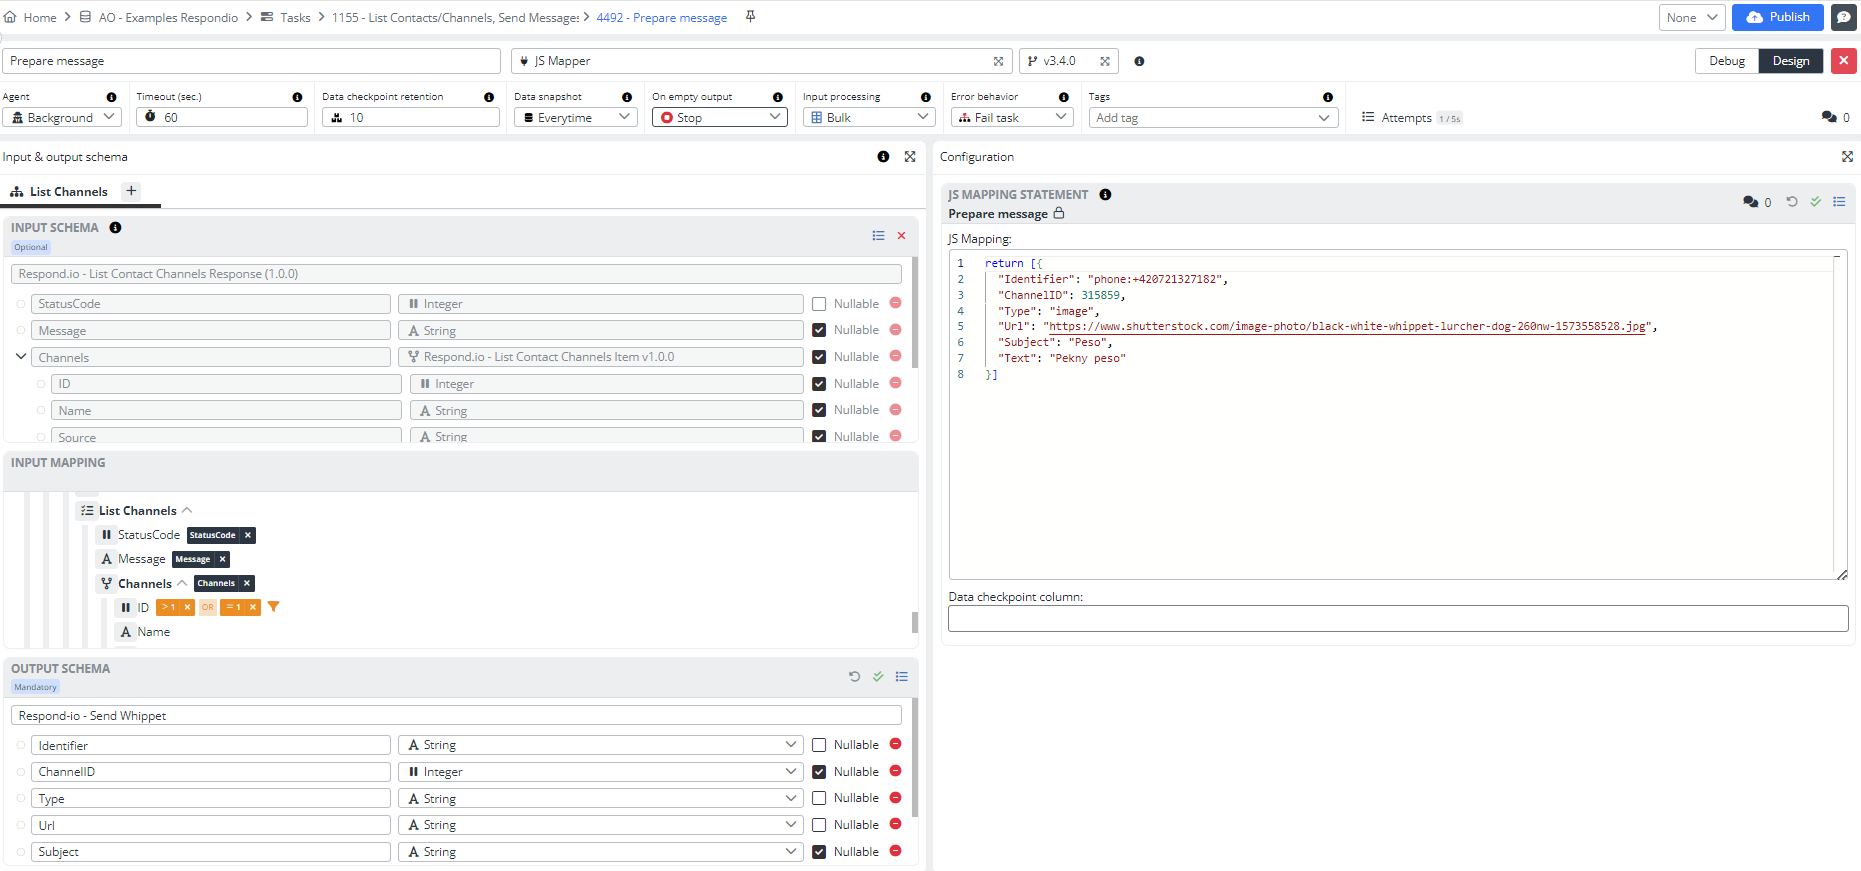
Insert the following code into the JS Mapping statement configuration:
return [{
  "Identifier": "phone:+42**********",
  "ChannelID": 123456,
  "Type": "image",
  "Url": "https://www.shutterstock.com/image-photo/black-white-whippet-lurcher-dog-260nw-1573558528.jpg",
  "Subject": "Peso",
  "Text": "Pekny peso"
}]
Identifier - contact identifier, which can be either a phone number, email, or contact ID (we get the contact ID after saving the contact, so it is used in case of editing the contact). The identifier is mandatory-
Channel ID - from channel settings-
Type - format type - allowed : image, video, audio, file-
URL - URL of the page where the file is located
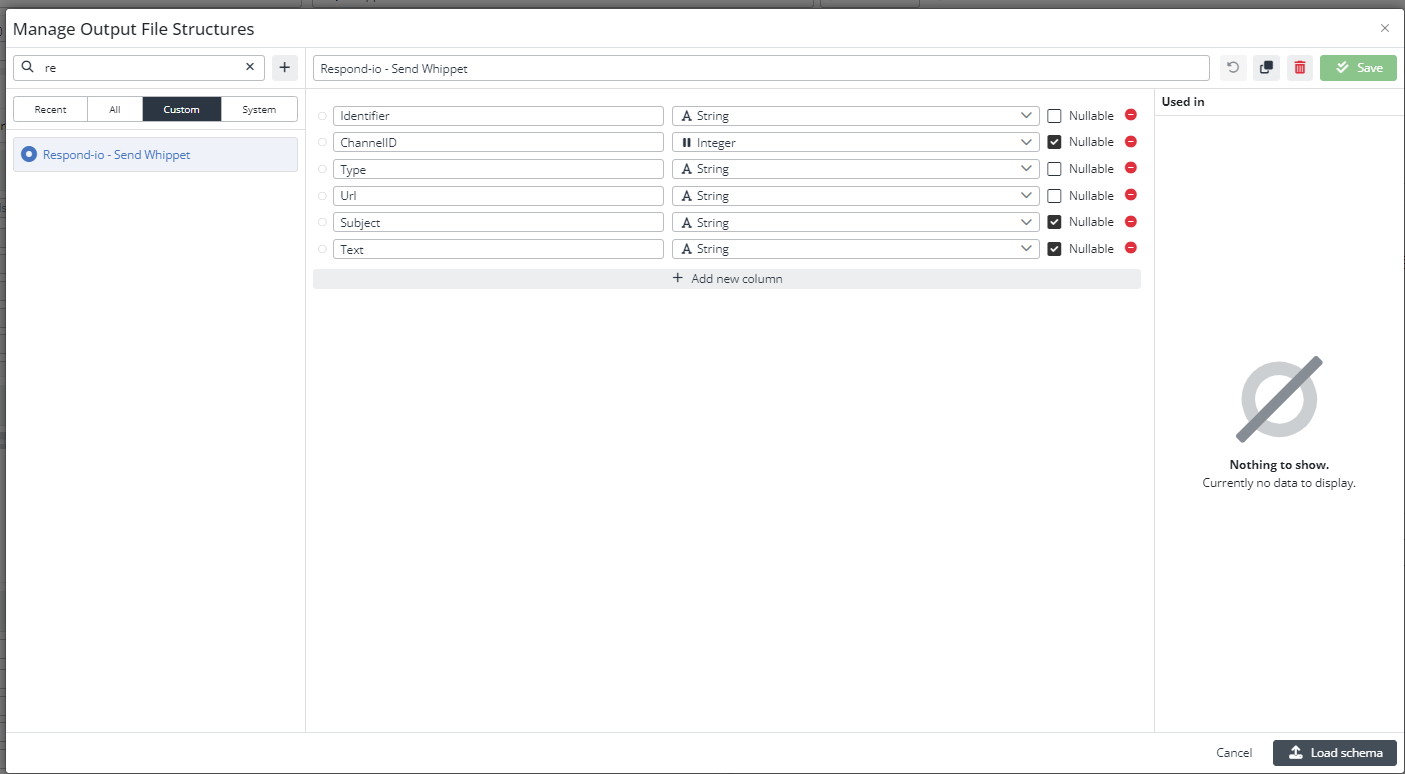
The name of Input schema Respond.io - List Contact Channels Response. Output schema is not configured by default. Create it manually, depending on the data you send from the JS Statement. Save it and Load the schema.
In our case, the schema looks like this:
Pin input mapping. Note that we used a filter for ID.
Add a sixth Task step:
- Step name: Send Attachment
- Connector: Respond.io - Send Attachment
Open the Task step editor.
Pin input mapping.
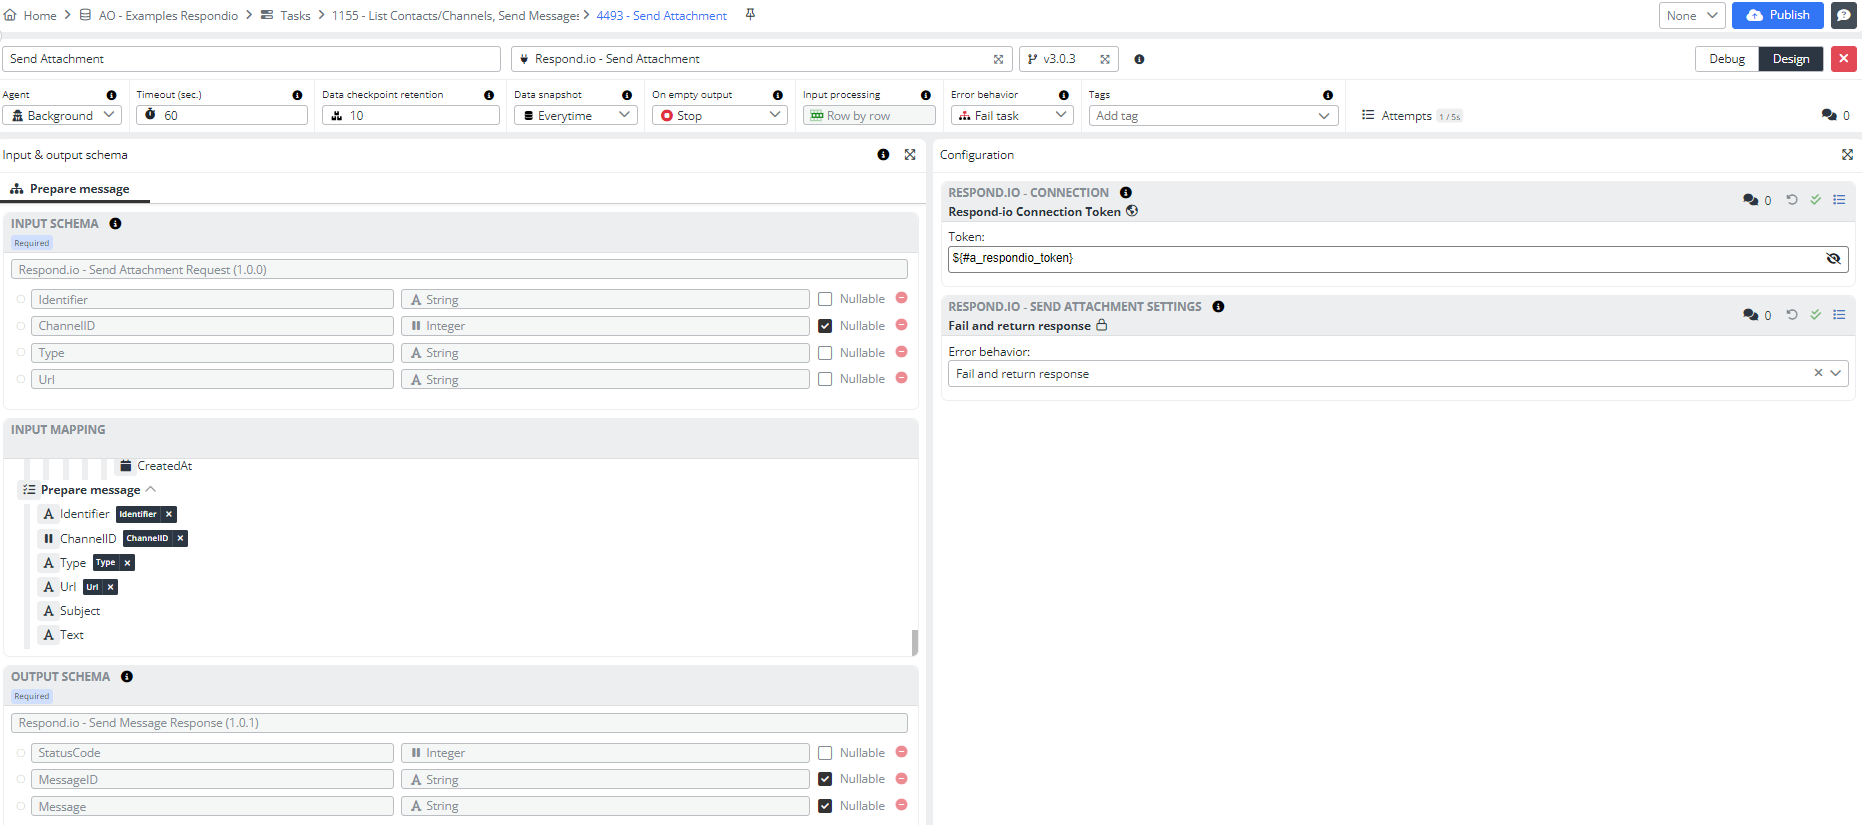
Fill in the token - find it after the instructions here: API Respond.io
Save the configuration.
Select error behavior and save the configuration again.
Press the Publish button.
Start the task to see the result.
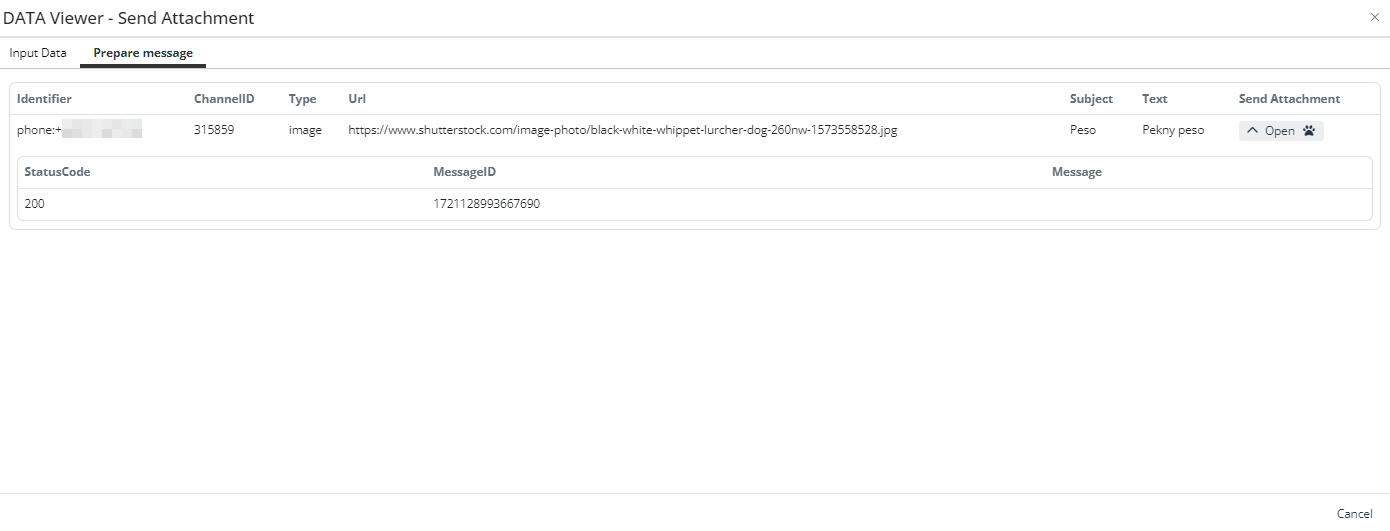
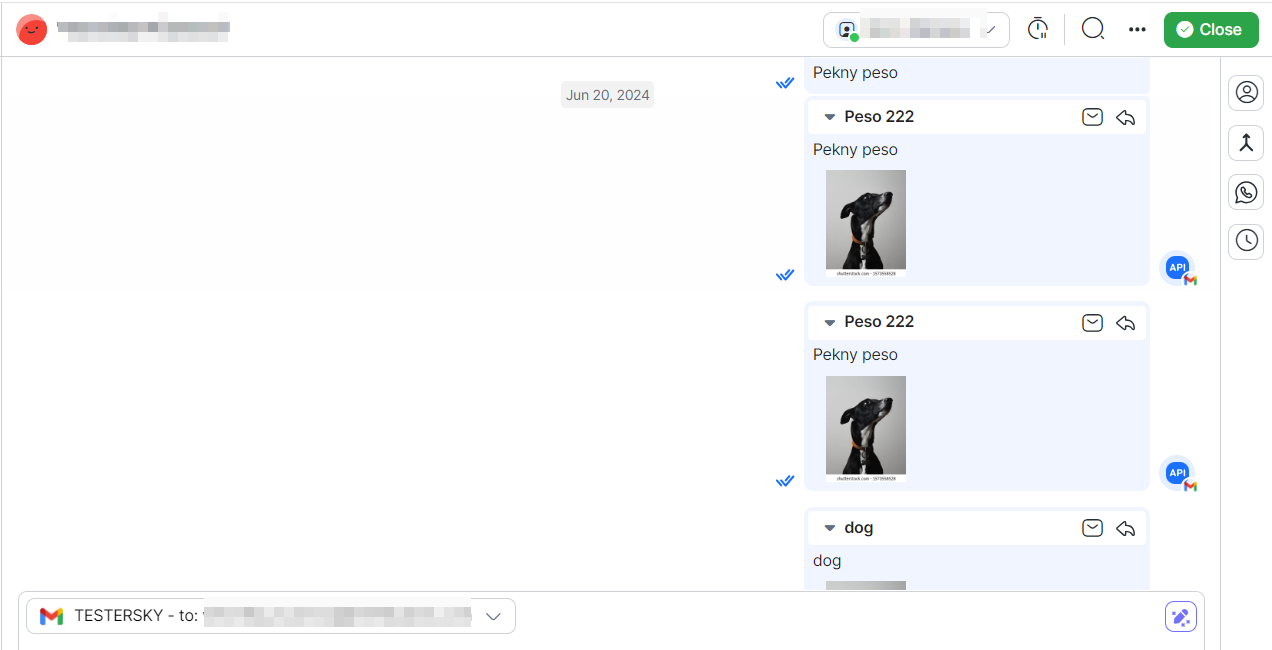
Result - attachment sended
The result should be that the image (or any other file that is available at the specified URL in the JS Mapper statement) is displayed in the conversation on Respond.io as a message directly from Respond.io.
This is the result in Integray.
Send Email
The Send Email connector facilitates sending emails to your contacts. It allows you to craft email messages within the platform and send them to your contact list. You can customize the email content, subject, and recipients, making it a powerful tool for communication and marketing campaigns.
Configuration
We will use the incoming data from the previous step with the connector JS Mapper, for this purpose we will also use the new MIS feature.
Add the last, seventh step. Do this by clicking on the plus sign on the side of step six. This will create a branch.
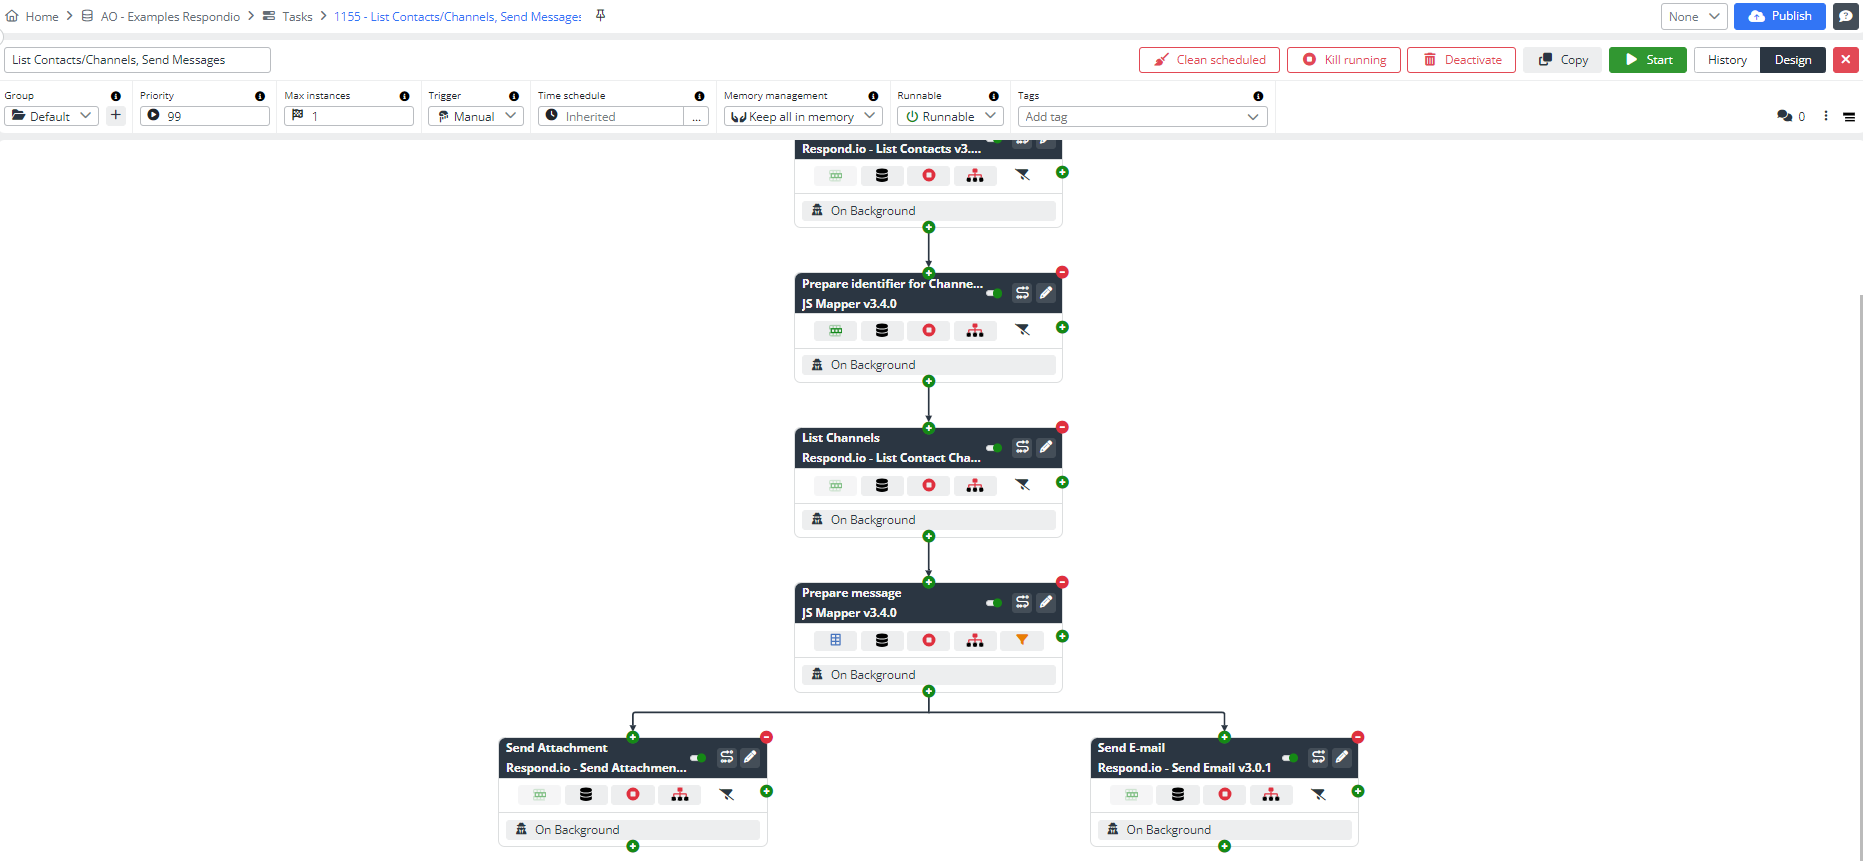
Now we need to make some changes in step five.
Open step five, and click on the plus sign in the Input schema to add an additional schema.
Add a Prepare identifier for Channels List, also note the Input Processing - Bulk, the color of the icon automatically will change from blue to purple.
Pin input mapping.
Press the Publish button.
Start the task to see the result.
Result - email sended - email retrieved
The result should be that the email entered in Intgeray along with the email definition in the statement will arrive in the inbox of the corresponding email and will also appear in the conversation on Respond.io as a message directly from Respond.io.
This is the result in Integray. The task ran successfully, with all steps tinted green.

On the Respond.io, we see that the picture is received from email to email.
We are happy if you got the expected result. You can create your own new integrations based on this example.