

Upload document, and change document status
Hi! Welcome to this new example about Digitoo connectors in Integray. Today we are going to discuss the Digitoo - Upload Document and Digitoo - Change Document Status connectors.
You can create your own examples using the style that best suits your perception. If you prefer a more detailed explanation of all the steps, continue with the text tutorial below, complete with visual examples. If you prefer an audio-visual experience, use the video tutorial from our YouTube channel You can also combine reading and watching to fully understand the process of creating an integration between Integray and Digitoo.
Prerequisites
Create an account with an email and password at Digitoo platform. You need to choose a real mail and phone. Otherwise the account will be deactivated within one to a few days. Then follow the steps and create your first company. Add accounting unit (click on the plus in the bottom left corner). Together with the accounting unit, we have automatically generated the first Queue called Invoices Received - in the URL we can see the queue ID, which we will work with later (or with another queue ID).

Now add some documents (use the plus in the bottom right corner to do this).
We know we have the first created queue with one or several invoices, so we set up the Integray. You'll create two simple configurations.
Digitoo - Change Document Status
The Digitoo - Change Document Status connector is used to change the status of an uploaded document within the Digitoo system. It allows you to update the document status as it progresses through different stages of processing or approval.
Configuration
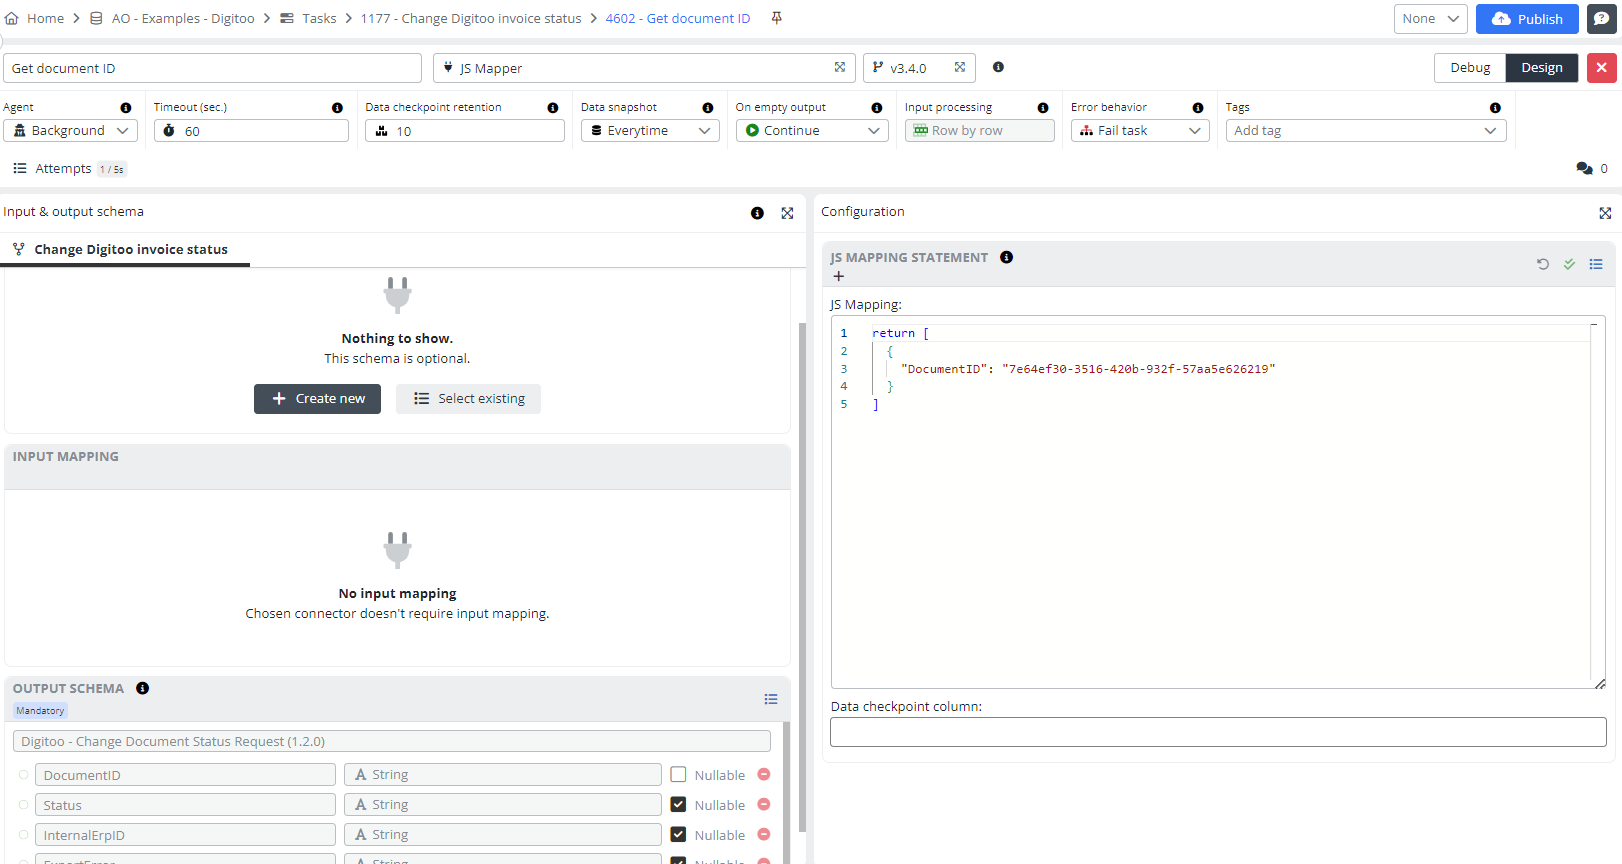
Add a new Task and name it Change Digitoo invoice status. In this task we will be using JS Mapper where we are simulating input data.
Add a first Task step:
- Step name: Get document ID
- Connector: JS Mapper
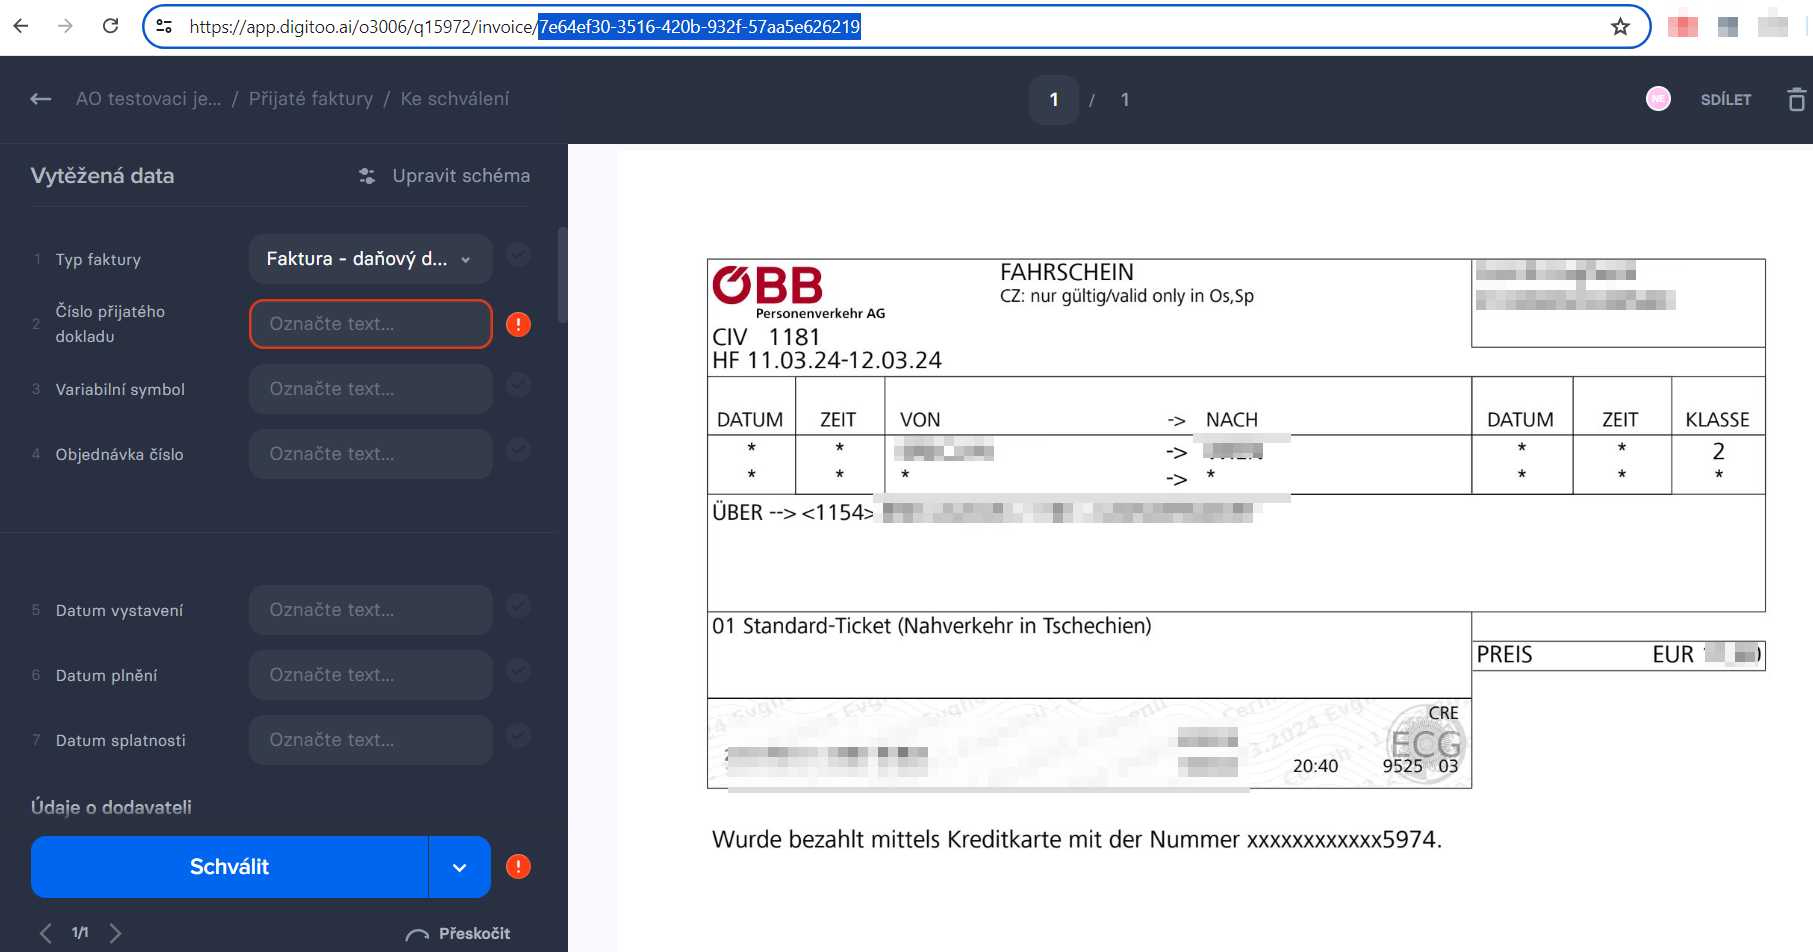
Open the Task step editor by clicking the button with the pencil symbol. In the first step, we simulated input data, which is the ID:
return [
  {
    "DocumentID": "7e64ef30-3516-420b-932f-57aa5e626219"
  }
]
The Output schema Digitoo - Change Document Status Request - which is the mandatory schema.
The setting of the first step can look like follows:
Add a second Task step:
- Step name: Change invoice status
- Connector: Digitoo - Change Document Status
Open the Task step editor. Pin input mapping. Here, in the configuration, we need to fill in the error behavior, the targeted status of the document, and the email and password to your Digitoo account.

Read more about targeted statuses in Digitoo documentation.
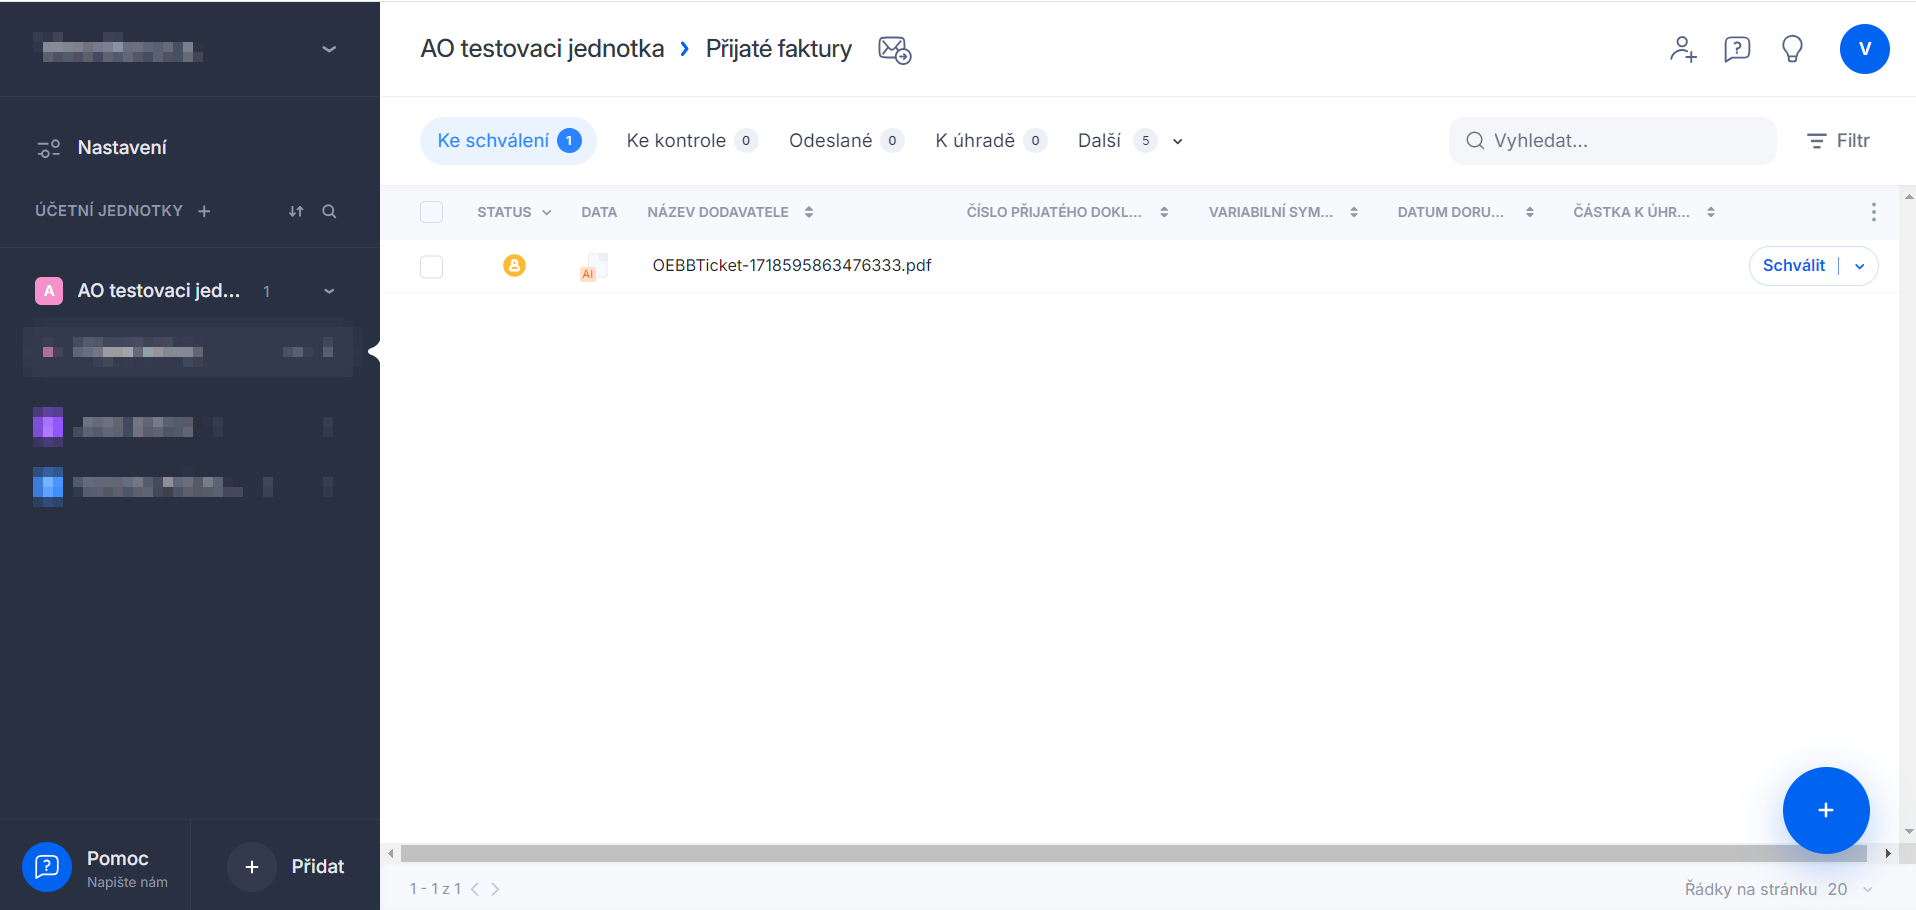
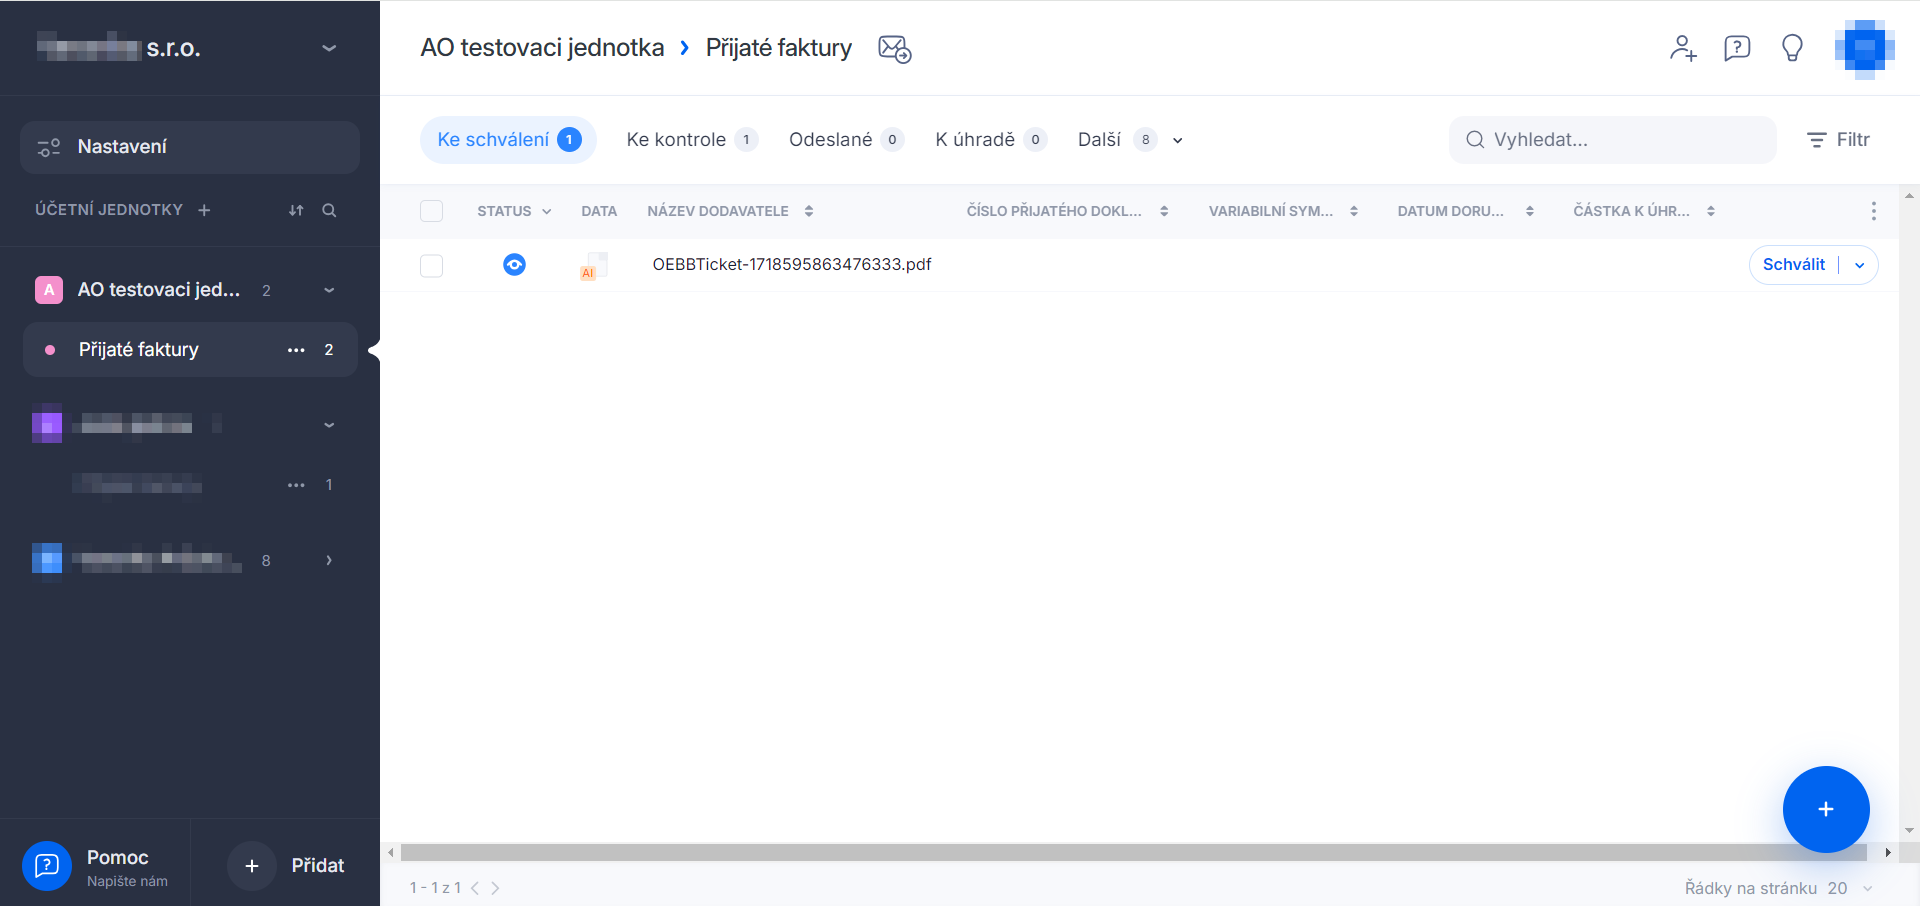
Great! The task is created. Now, all that's left is to publish it. Now, simply open the Digitoo app and let's see what status we have on our document. If you look in the upper left corner, you can see the status, which is "To be approved" in the Czech language ("Ke schválení").
Result
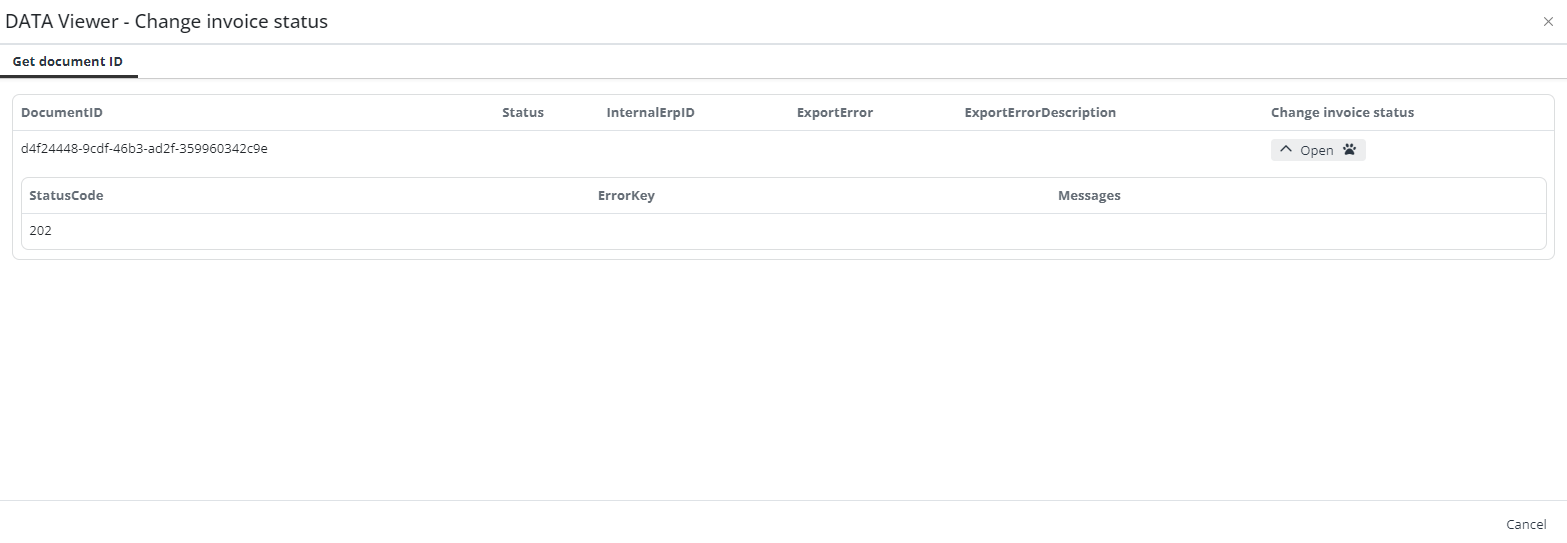
Start the task and upon successful completion, click on "History" and open "Data Snapshot." Here, we can see the status code followed by other data.
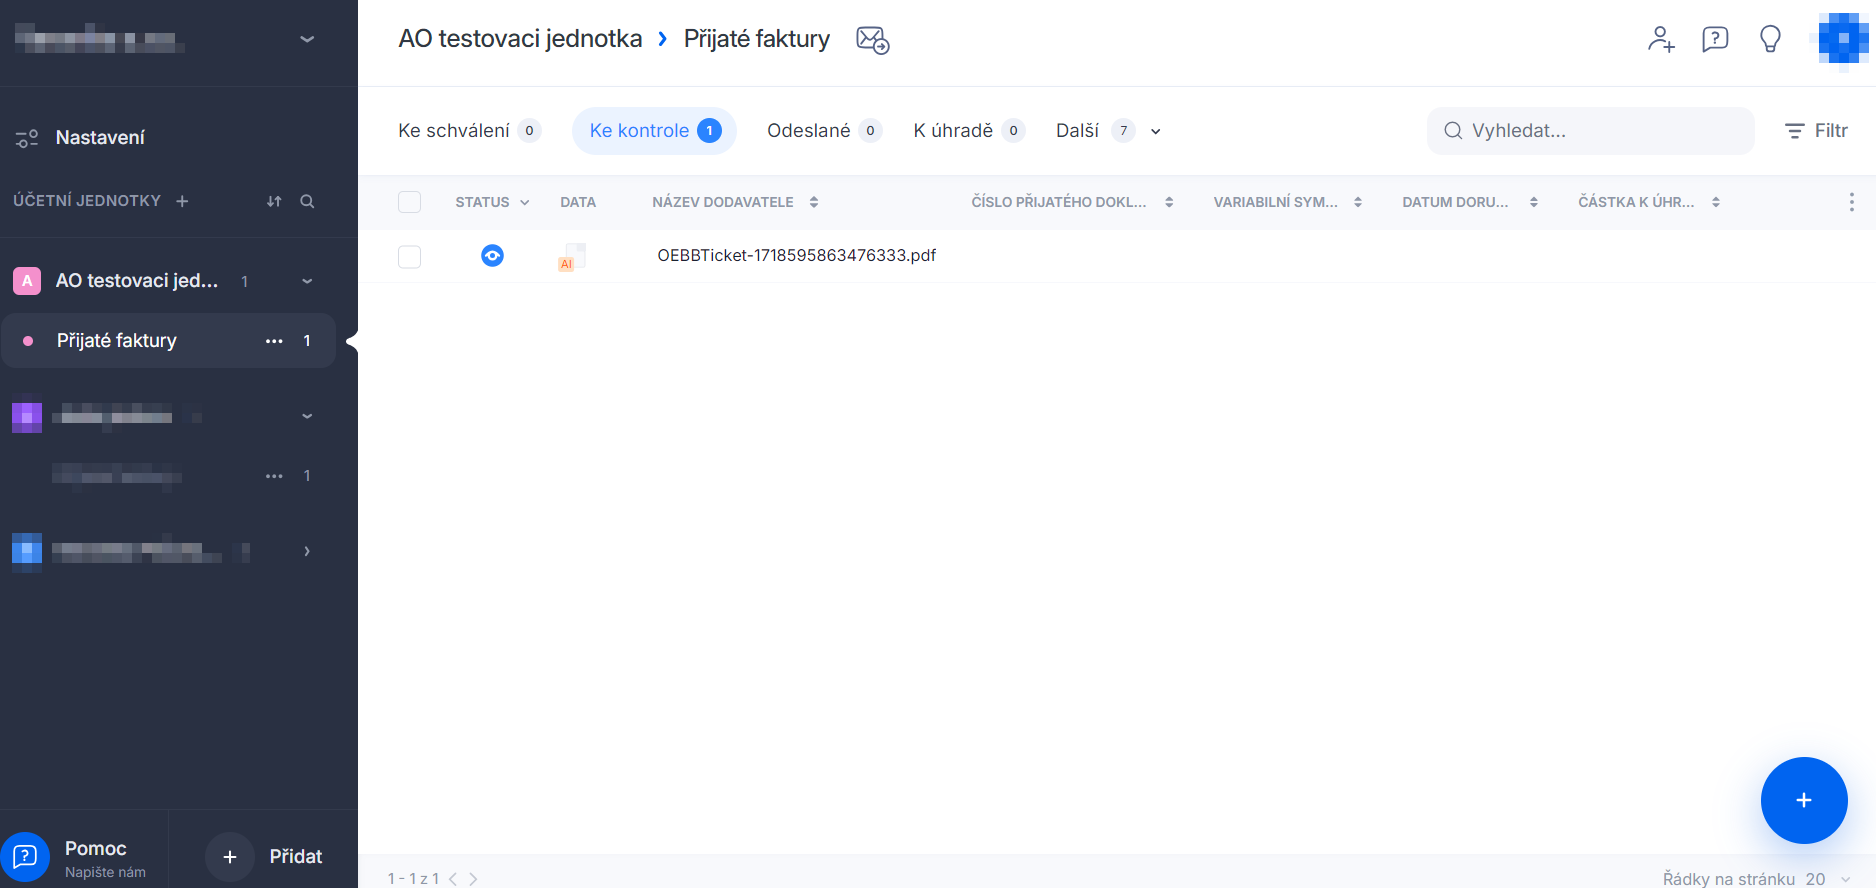
When we go back to the Digitoo app, we can see that the status was successfully changed to "For validation" in the Czech language ("Ke kontrole").
Digitoo - Upload Document
The Digitoo - Upload Document connector is responsible for uploading documents into the Digitoo document queue. It facilitates the initial step of getting documents into the Digitoo system for further processing.
In the second task, we are using a desktop agent to upload a file directly from our PC to the Integray platform with the help of the File Reader. You can learn more about agents on our Learning platform. Once we have the agent running, let's start configuring the steps.
Configuration
Add a new Task and name it Upload document to Digitoo.
Add a first Task step:
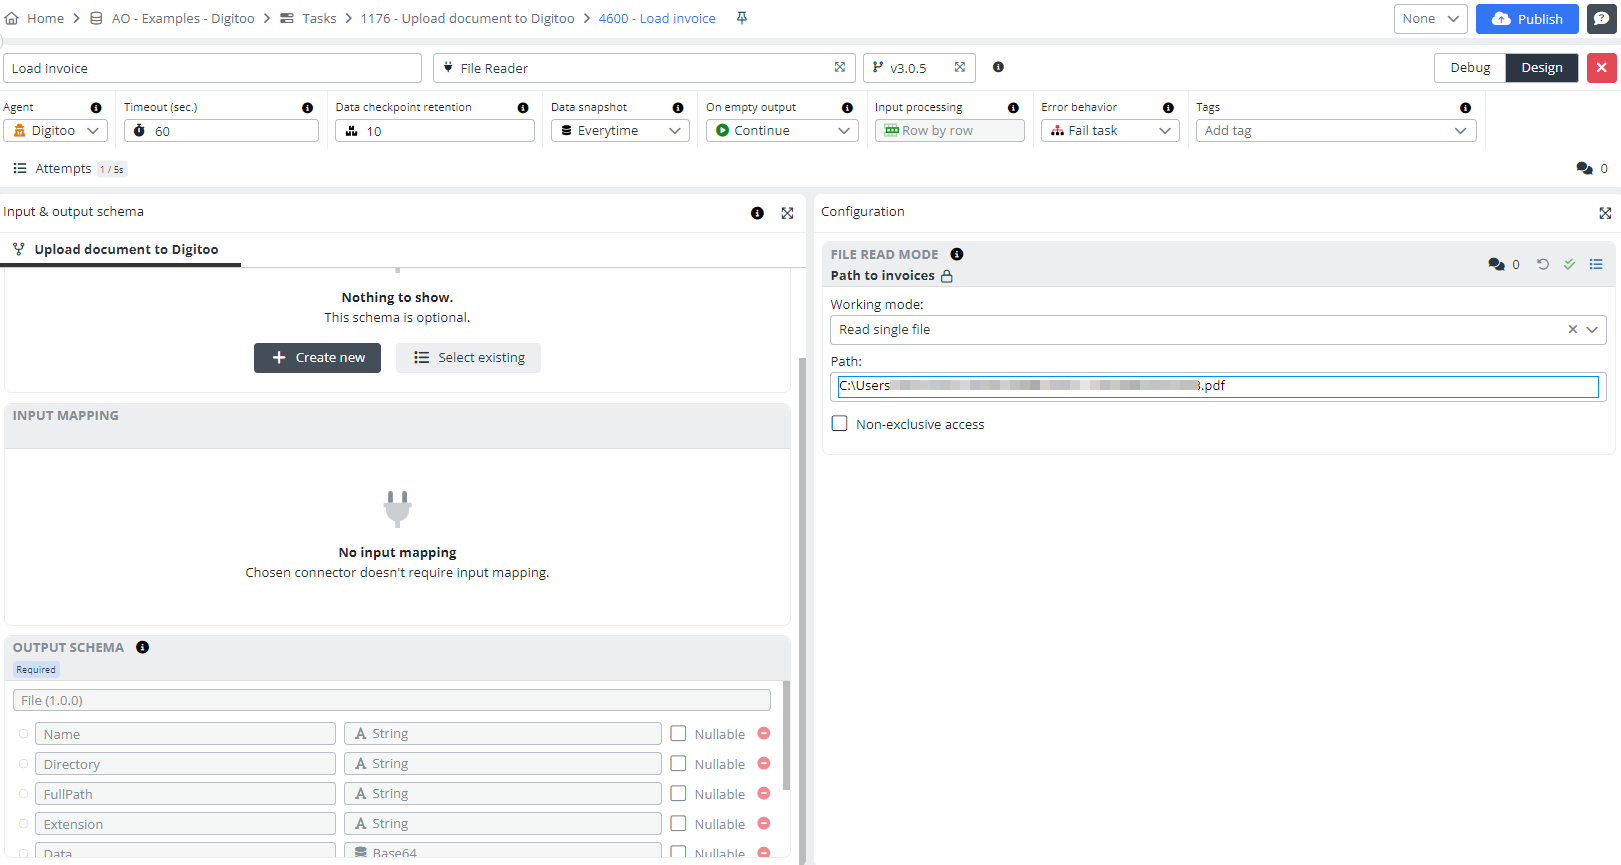
- Step name: Load invoice
- Connector: File Reader
Open the Task step editor by clicking the button with the pencil symbol. Select your enabled Agent.
Fill in the configuration. Working mode - Read a single file if we upload one invoice. Supported formats are .pdf, .png., jpeg, .jpg, .tif. Path - the path where you have saved the invoice. Save the Configuration.
The setting of the first step can look like follows:
Add a second Task step:
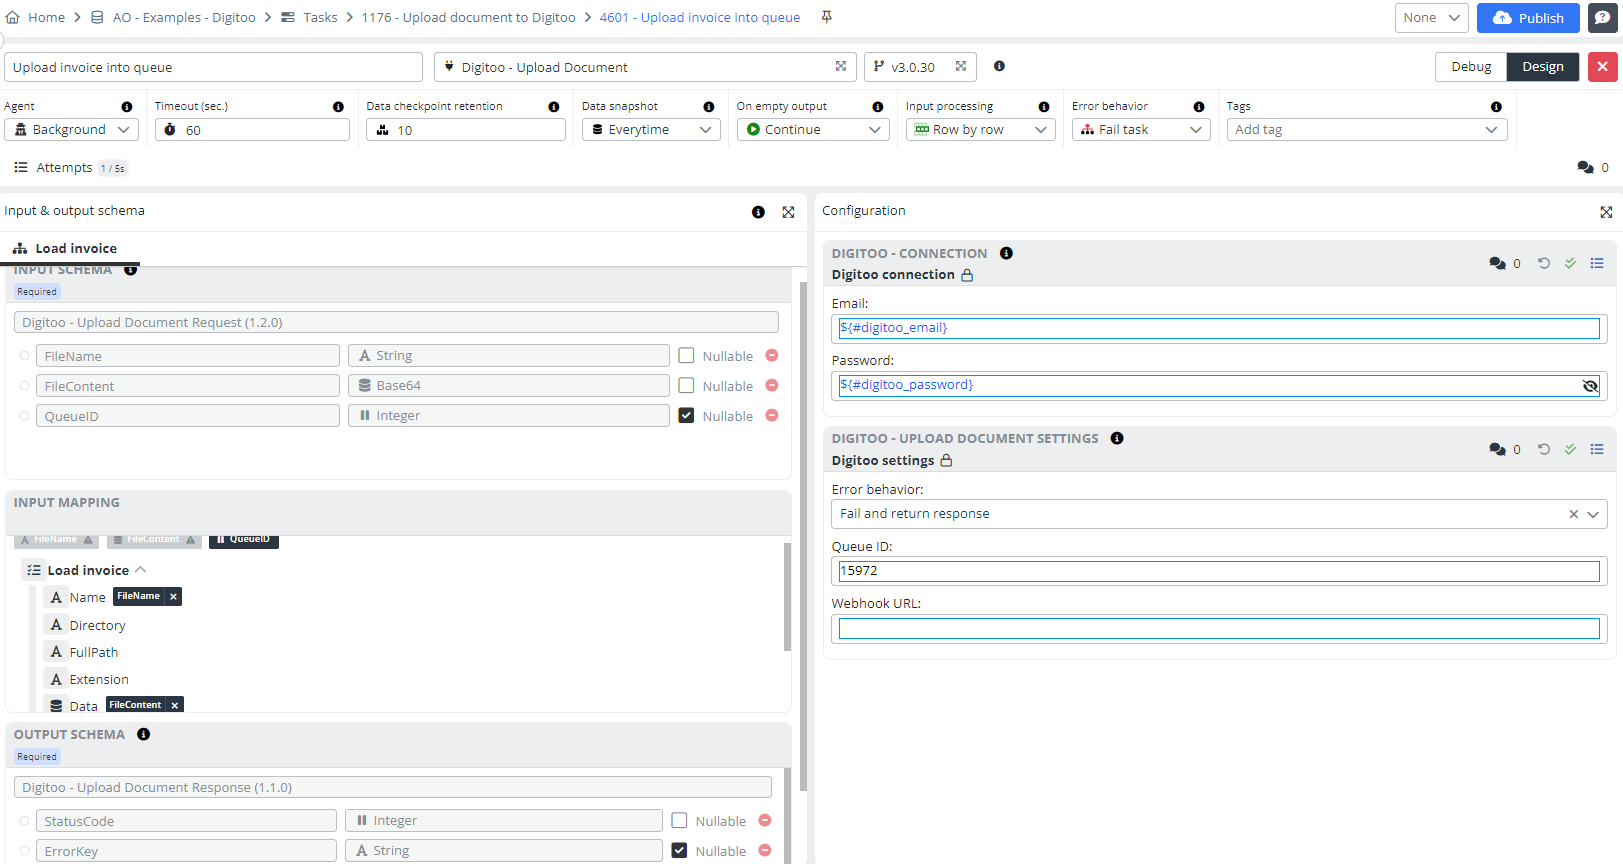
- Step name: Upload invoice into queue
- Connector: Digitoo - Uploafd Document
Open the Task step editor.
Pin input mapping. "QeueID" does not need to be mapped.
Fill in the email and password to your Digitoo account.
Fill in the error behavior, the Qeue ID.
The setting of the second step can look like follows:
Now, publish the task and start it.
Result
Click on "History" and open "Data Snapshot." Here, we can see the status code followed by other data.
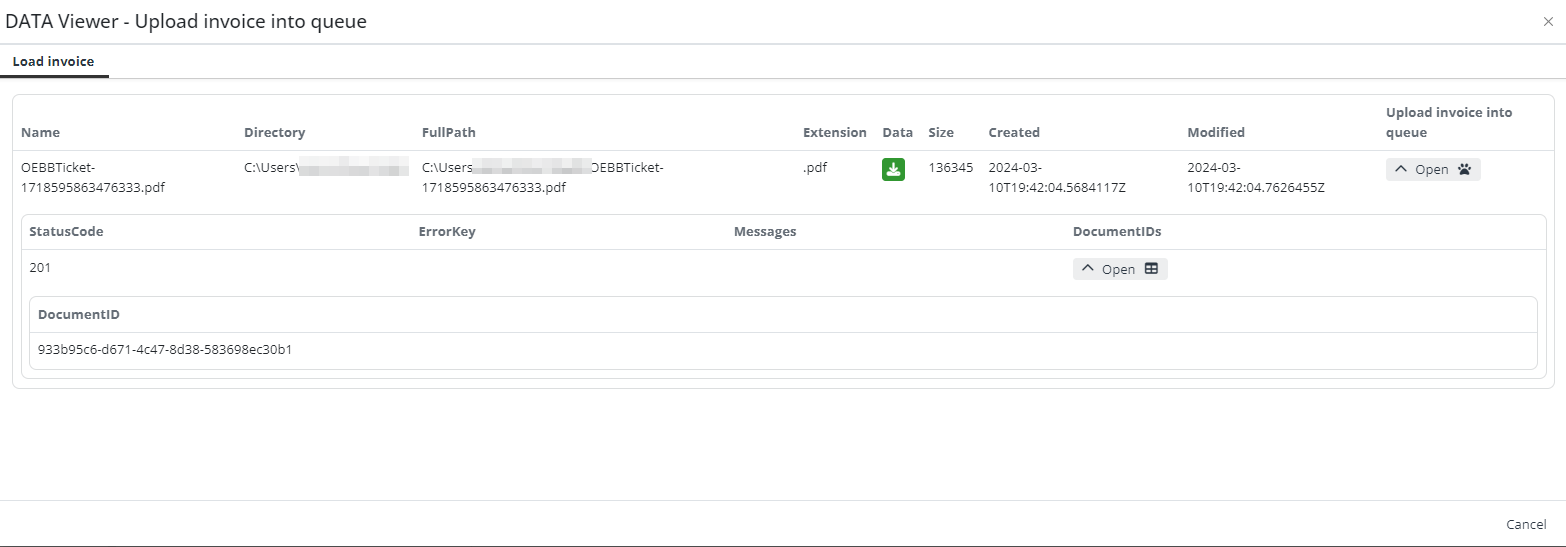
When we go back to the Digitoo app, we can see that the status was successfully changed to "To be approved" in the Czech language ("Ke schválení").
That's all from these connectors. We are happy if you got the expected result. You can create your own new integrations based on this example.