

Step-by-step configuration
This section is designed to provide you with a comprehensive guide to creating your first integration on the platform. It offers detailed instructions, taking you through the setup and configuration of all necessary elements from start to finish, ensuring a smooth and efficient experience. This section includes a tutorial for a simple integration, guiding you step by step with clear explanations and visual aids. By following these instructions, you'll gain the confidence to successfully create your first integration while also grasping basic integration concepts within the Integray platform.
Explore the configuration steps in a format that best suits your learning style. For a detailed, methodical approach, continue with the text-based guide below, enriched with illustrative images for clarity at each step. Alternatively, if you prefer an audio-visual experience, our video tutorial aligns with this guide, offering different way to learn. Feel free to combine reading and viewing to fully grasp the integration process within Integray, enhancing your learning experience with the versatility of these resources.
Create your first integration
Scenario requirements
Based on input parameters:
- YourLang
skfor Slovak languageczfor Czech andenfor English language and YourName.
make available output data on the Rest API endpoint.
- For English: Hi < Name >!,
- For Czech: Ahoj < Name >!,
- for Slovak: Ahoj < Name >!,
- for another language return a message: "The selected language is not in the menu, try to select another language (for example: en, cz or sk)."
- In case the parameter Name is not provided, return the value "Please try again and enter a name".
Scenario solution
To fulfill the requirement mentioned above, you will need to follow number of steps and build the first integration. The steps will include new company creation, configuration of the endpoint and configuration of the integration task including input and output data schemas.
The process description will start from the very beginning and continue step by step towards building integration and checking its functionality.
1. Create your first Company
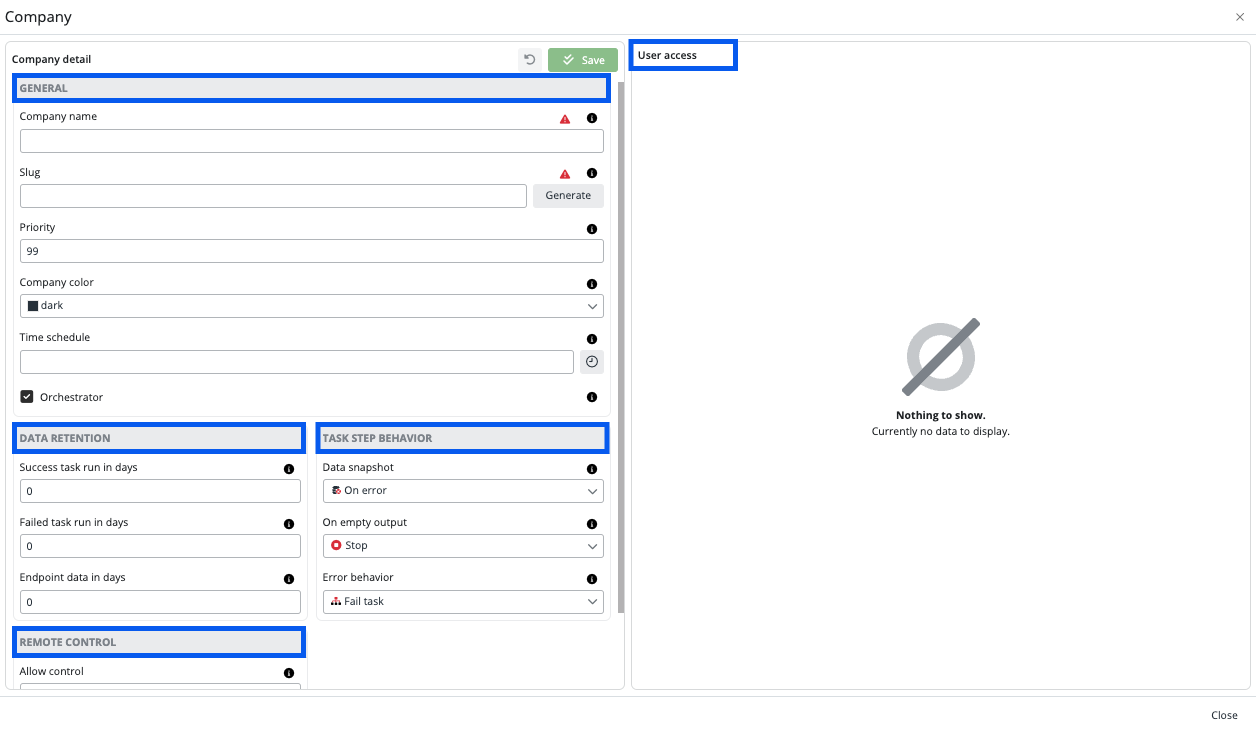
Click the blue plus button on the Home screen -> Company overview panel or select + Create new option on the left Content navigation menu. You will open a modal window named Company consising of 4 sections (General, Data retention, Task step behavior and Remote control) on the left side under the label Company details and company assigned users with granted rights on the right side under the label User access.
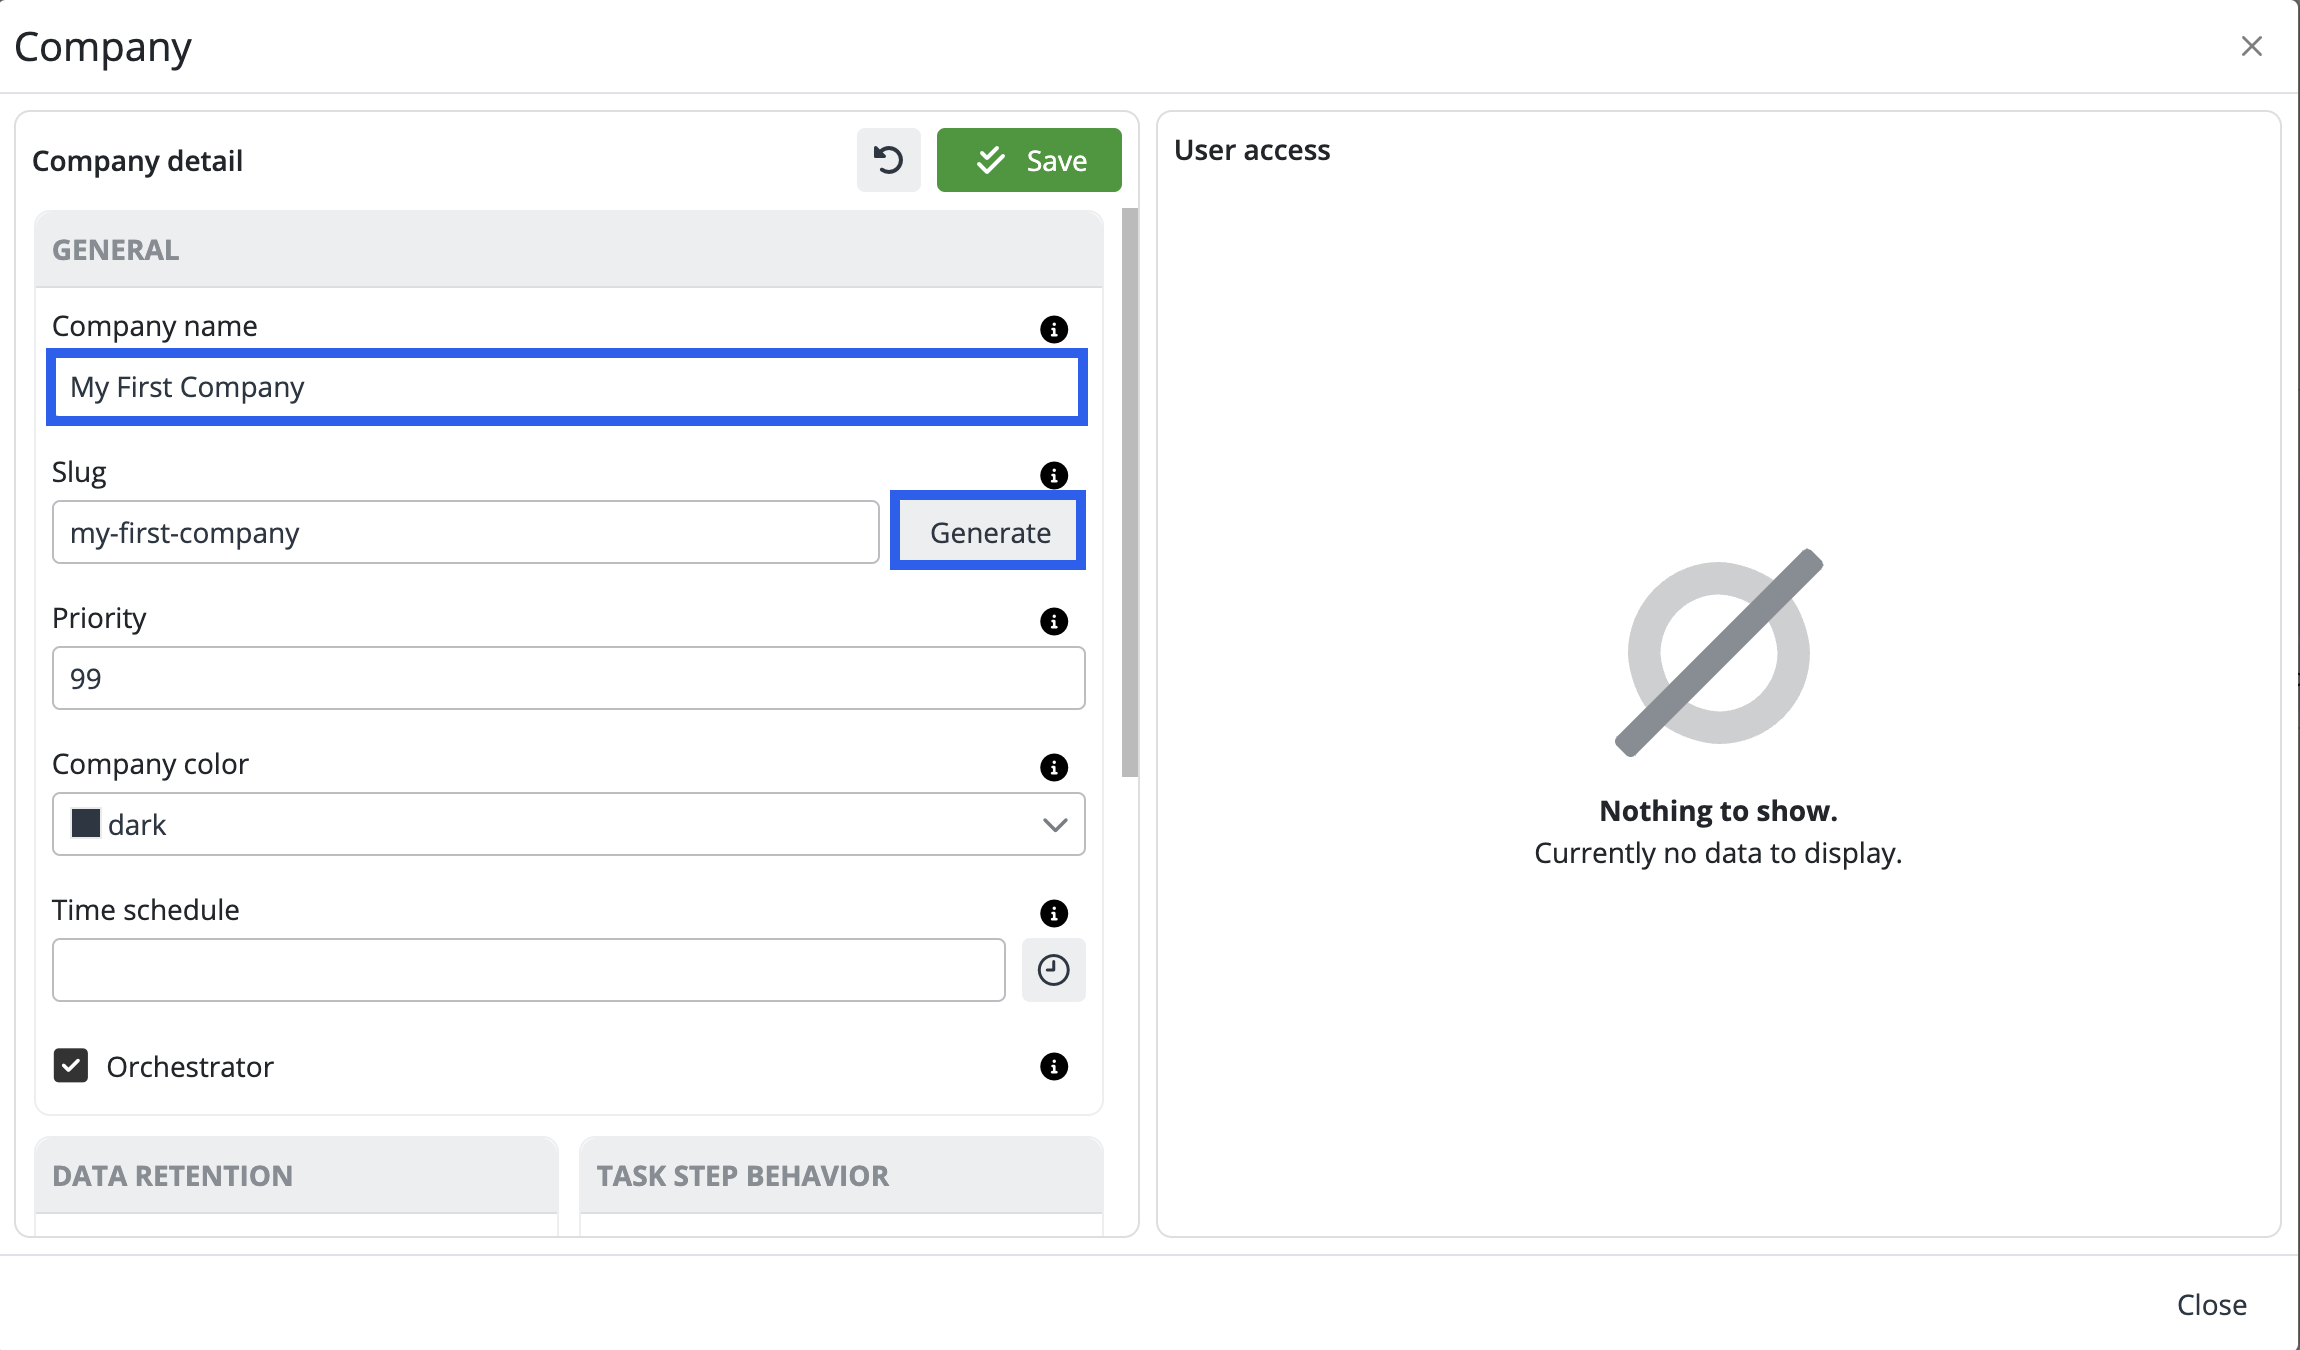
Within the General section, please provide any name you prefer for the Company name field, or copy the name below.
My first company
Slug
In the modal for creating a new company, there are slight differences for users depending on whether they are using the trial version or the licensed version. One of these distinctions is the Slug field, where trial version users will have the slug generated automatically upon saving the Company. In contrast, licensed users will manually enter the slug or have the option to generate it automatically.
For the trial version, save the new Company to have the Slug generated automatically. In the case of the licensed version, you can either manually input the Slug or use the Generate button for automatic generation and then save the new Company.
User access
In the User Access section, there's another distinction between the trial and licensed versions. While a trial version user doesn't have the option to add new users, and thus, they cannot assign them to a new company, a licensed version user can assign other users with the desired roles to a new company. You can find more information about the User Access here.
You've now successfully created your first Company. Close the modal, and you'll find your Company on the home screen. For future edits, you can return to the modal by clicking the pencil icon next to the Company name.
To access the configuration tools, click on the Company name (in the left side panel or on the Company overview).

2. Create the first integration Task
The task is the essence of the integration process. A task can consist of one or more task steps where specific actions are performed. Every task step uses a connector. Connectors are selected from the connector repository. Depending on the selected connector, the input and output schema and workspace for configuration are preselected in the task step.
Add new task
Click the + Add button to enter the new Task.
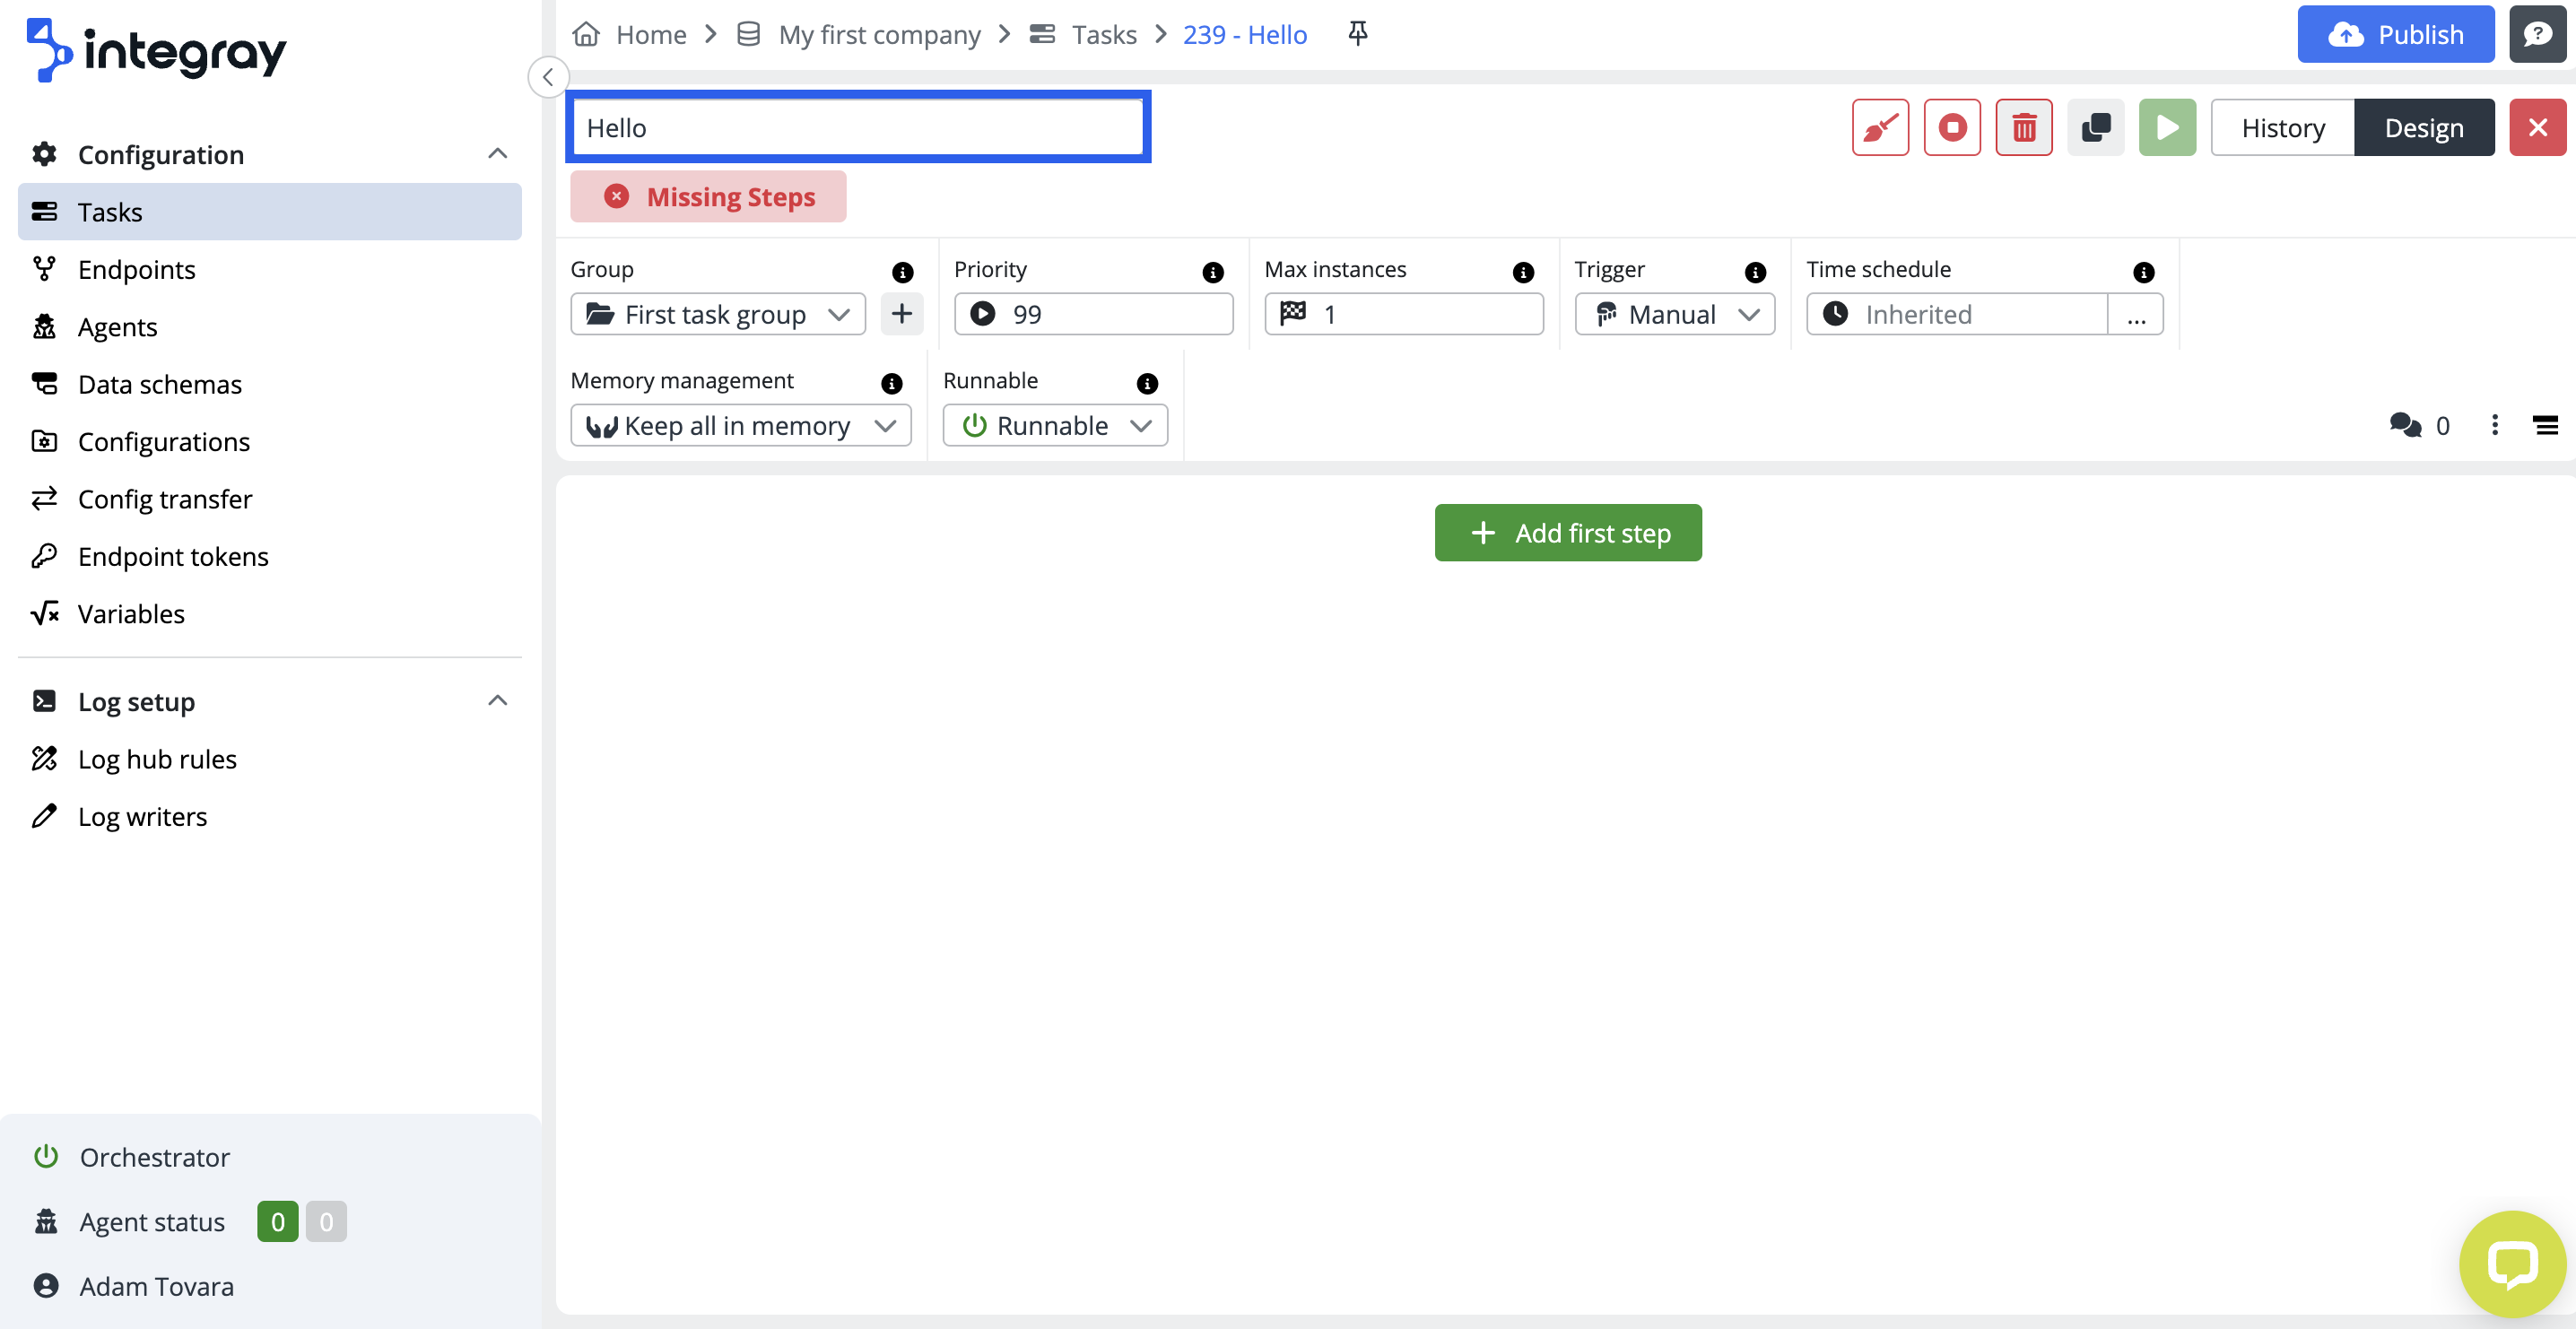
Name the task in the field in the top left corner. Replace the default name of the task New Task YYYY-MM-DD HH:MM with the new task name Hello.
Hello
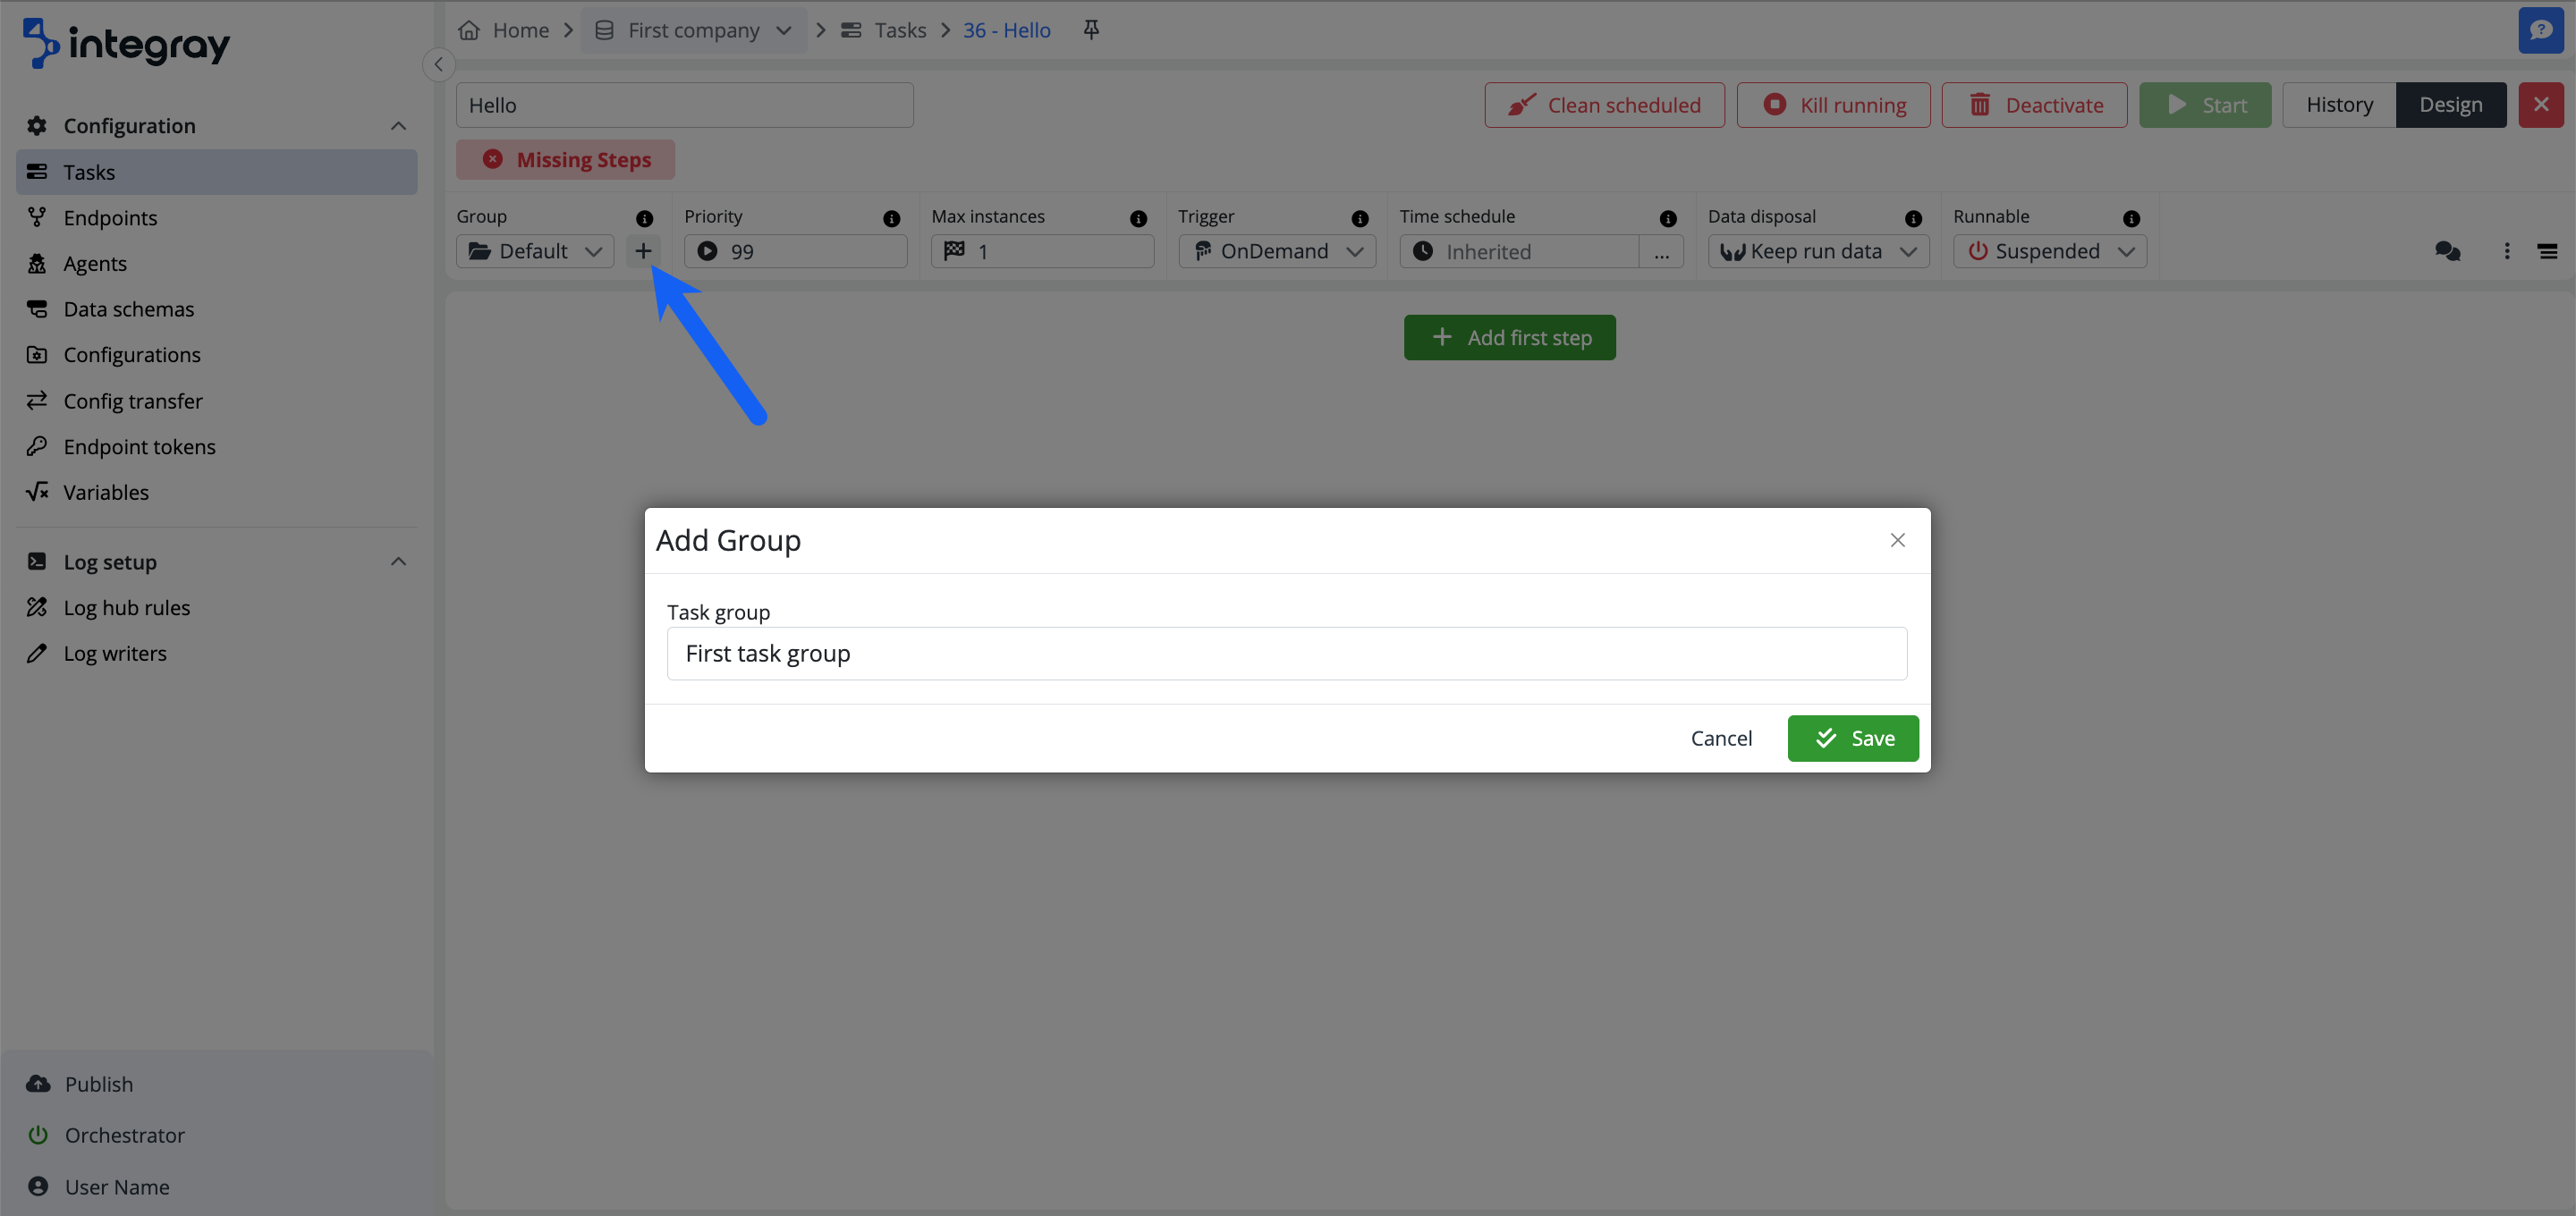
Create a new task group - Use the plus button next to the combo box Group to create a new group named First task group for the integration task Hello.
First task group
Add new task step
Click the + Add first step button to start creating the first task step.
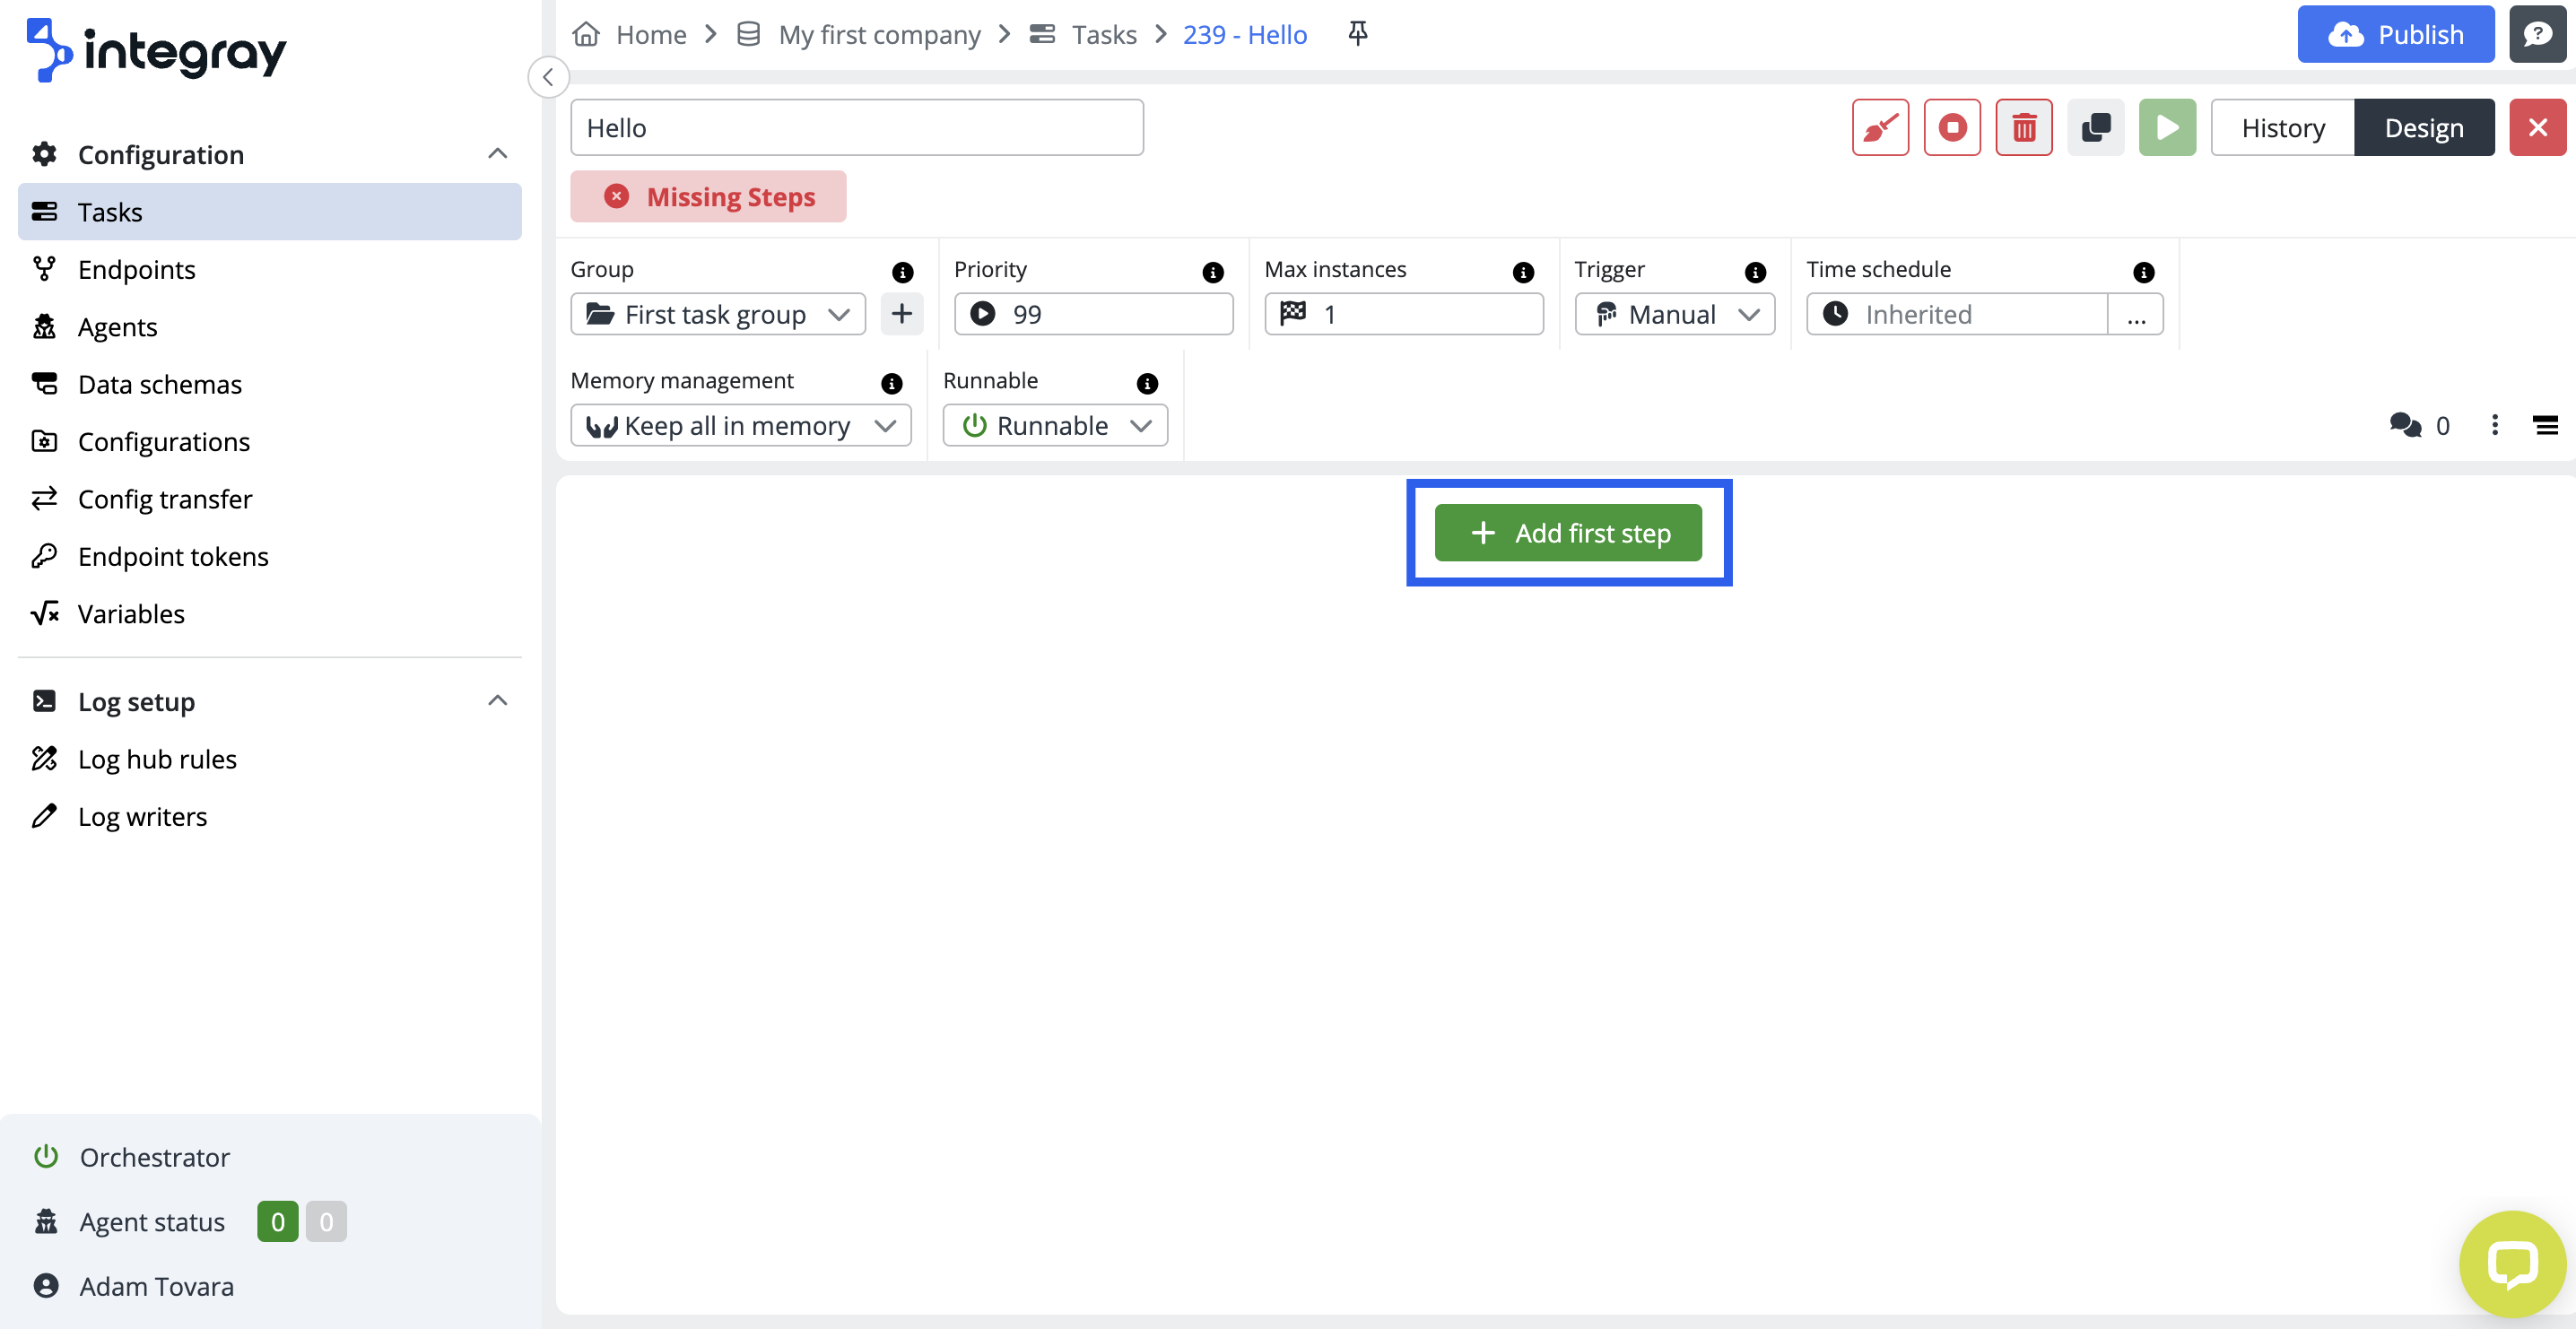
Leave the step name as Step #1. In your other future integrations, you can freely name your steps here for better orientation in the integration task.
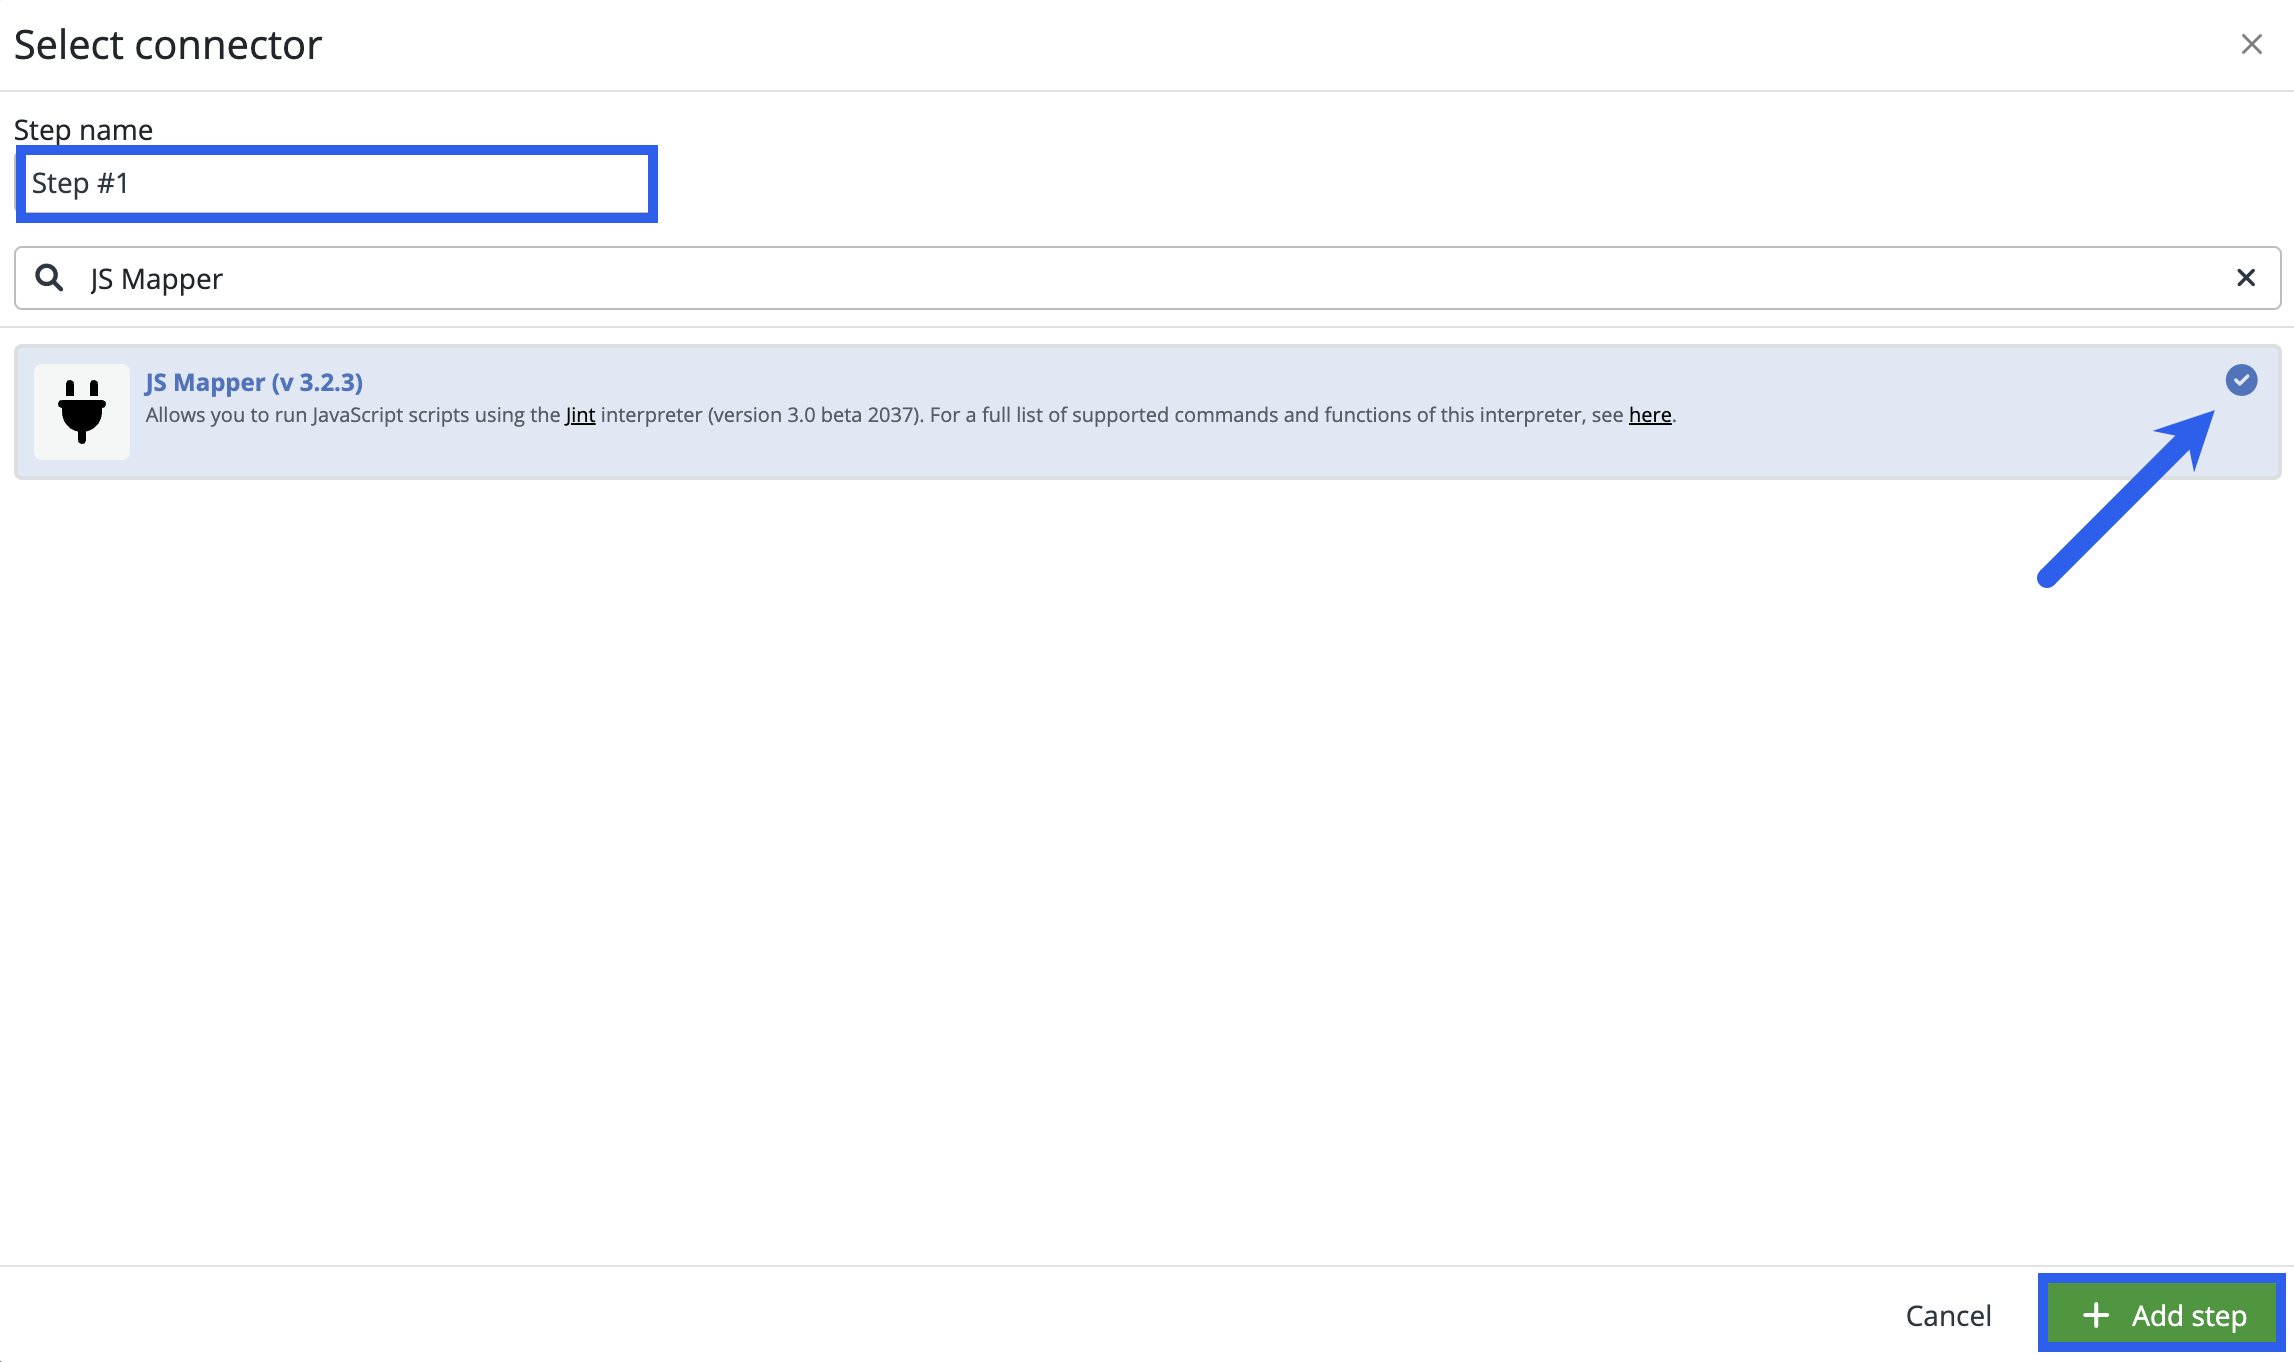
Look up, and select relevant connector for the integration step you are configuring now. For the exercise purposes you will need to use the JS Mapper connector. Type JS Mapper into the full text search field to look up the connector from the list displayed in the modal window.
JS Mapper
Select the connector and click + Add step to confirm and create the first task step.
The first task step is displayed in the Task editor. The task step is not configured yet, therefore red warning messages are displayed on the task header as well as on the task step.
Click on the pencil icon in the top right corner of the task step and start the configuration of the step.

Configure the task step
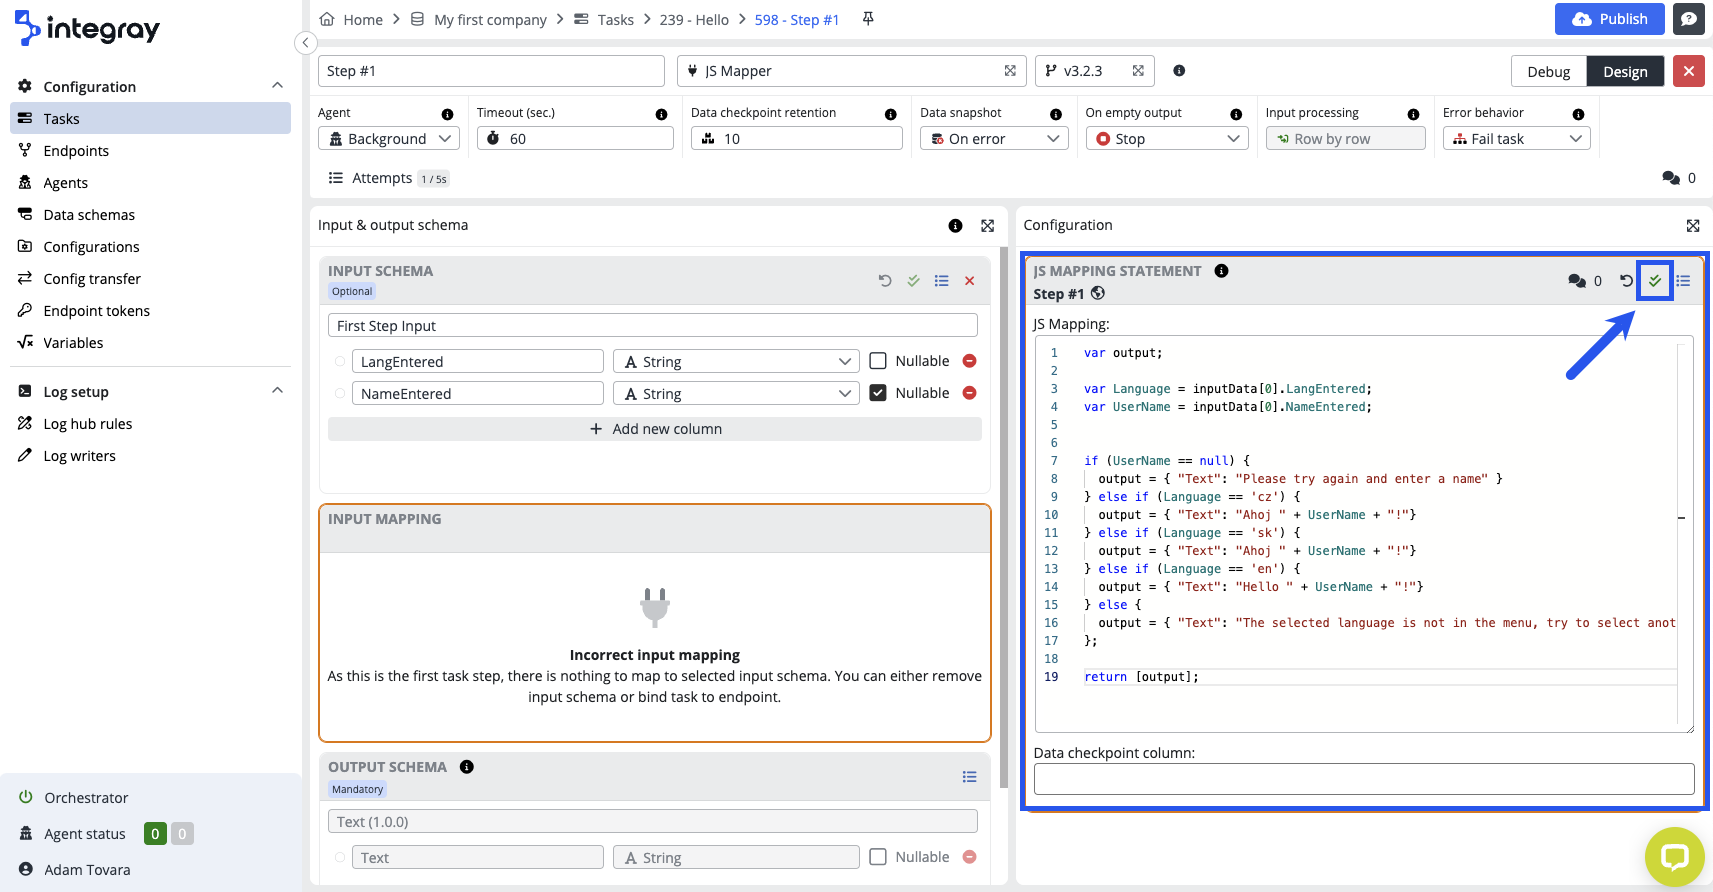
The task step configuration screen consists of Task step header on the top, Input and output schema part on the left side (including sections: Input schema, Input mapping, Output schema) and Configuration part on the right side.
In the Input Schema section, click the + Create New button to create a new Data schema.

Fill in the Schema name and name it "First step input".
First step input
Use the button + Add new column to add two new rows. In the Name field, write the LangEntered and NameEntered values. On the LangEntered line, uncheck the Nullable button. Save the Input schema.

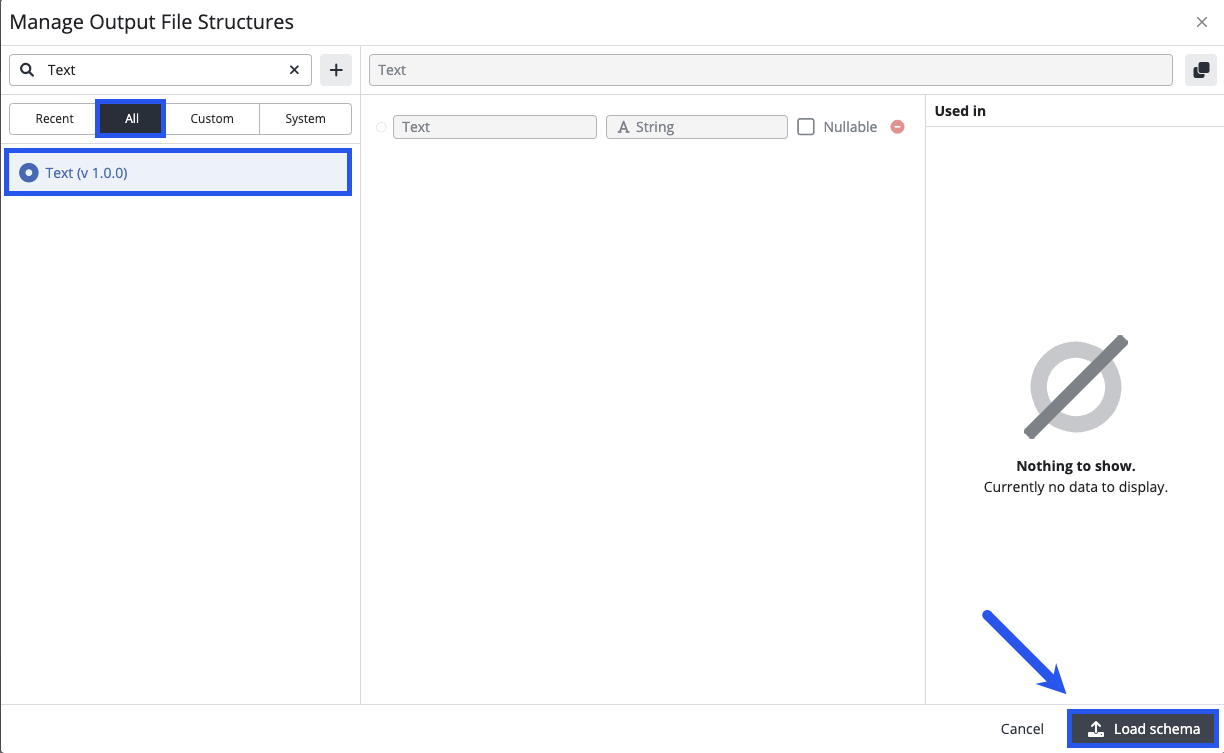
In the Output Schema section, click the + Select existing button to load existing schema.
In the modal, click on the All tab, and in the search field, search for a schema with the name Text. Select it and use the Load schema button.
Text
Paste the following JavaScript code into the JS Mapping Statement.
var output;

var Language = inputData[0].LangEntered;
var UserName = inputData[0].NameEntered;


if (UserName == null) {
  output = { "Text": "Please try again and enter a name" }
} else if (Language == 'cz') {
  output = { "Text": "Ahoj " + UserName + "!"}
} else if (Language == 'sk') {
  output = { "Text": "Ahoj " + UserName + "!"}
} else if (Language == 'en') {
  output = { "Text": "Hello " + UserName + "!"}
} else {
  output = { "Text": "The selected language is not in the menu, try to select another language (for example: en, cz or sk)" }
};

return [output];
The task still needs to be finished, but further preparations are required. We will return and complete the task step configuration later. Check that you have saved the Input schema and JS Mapping statement, close the Task step and The Task with the cross button.
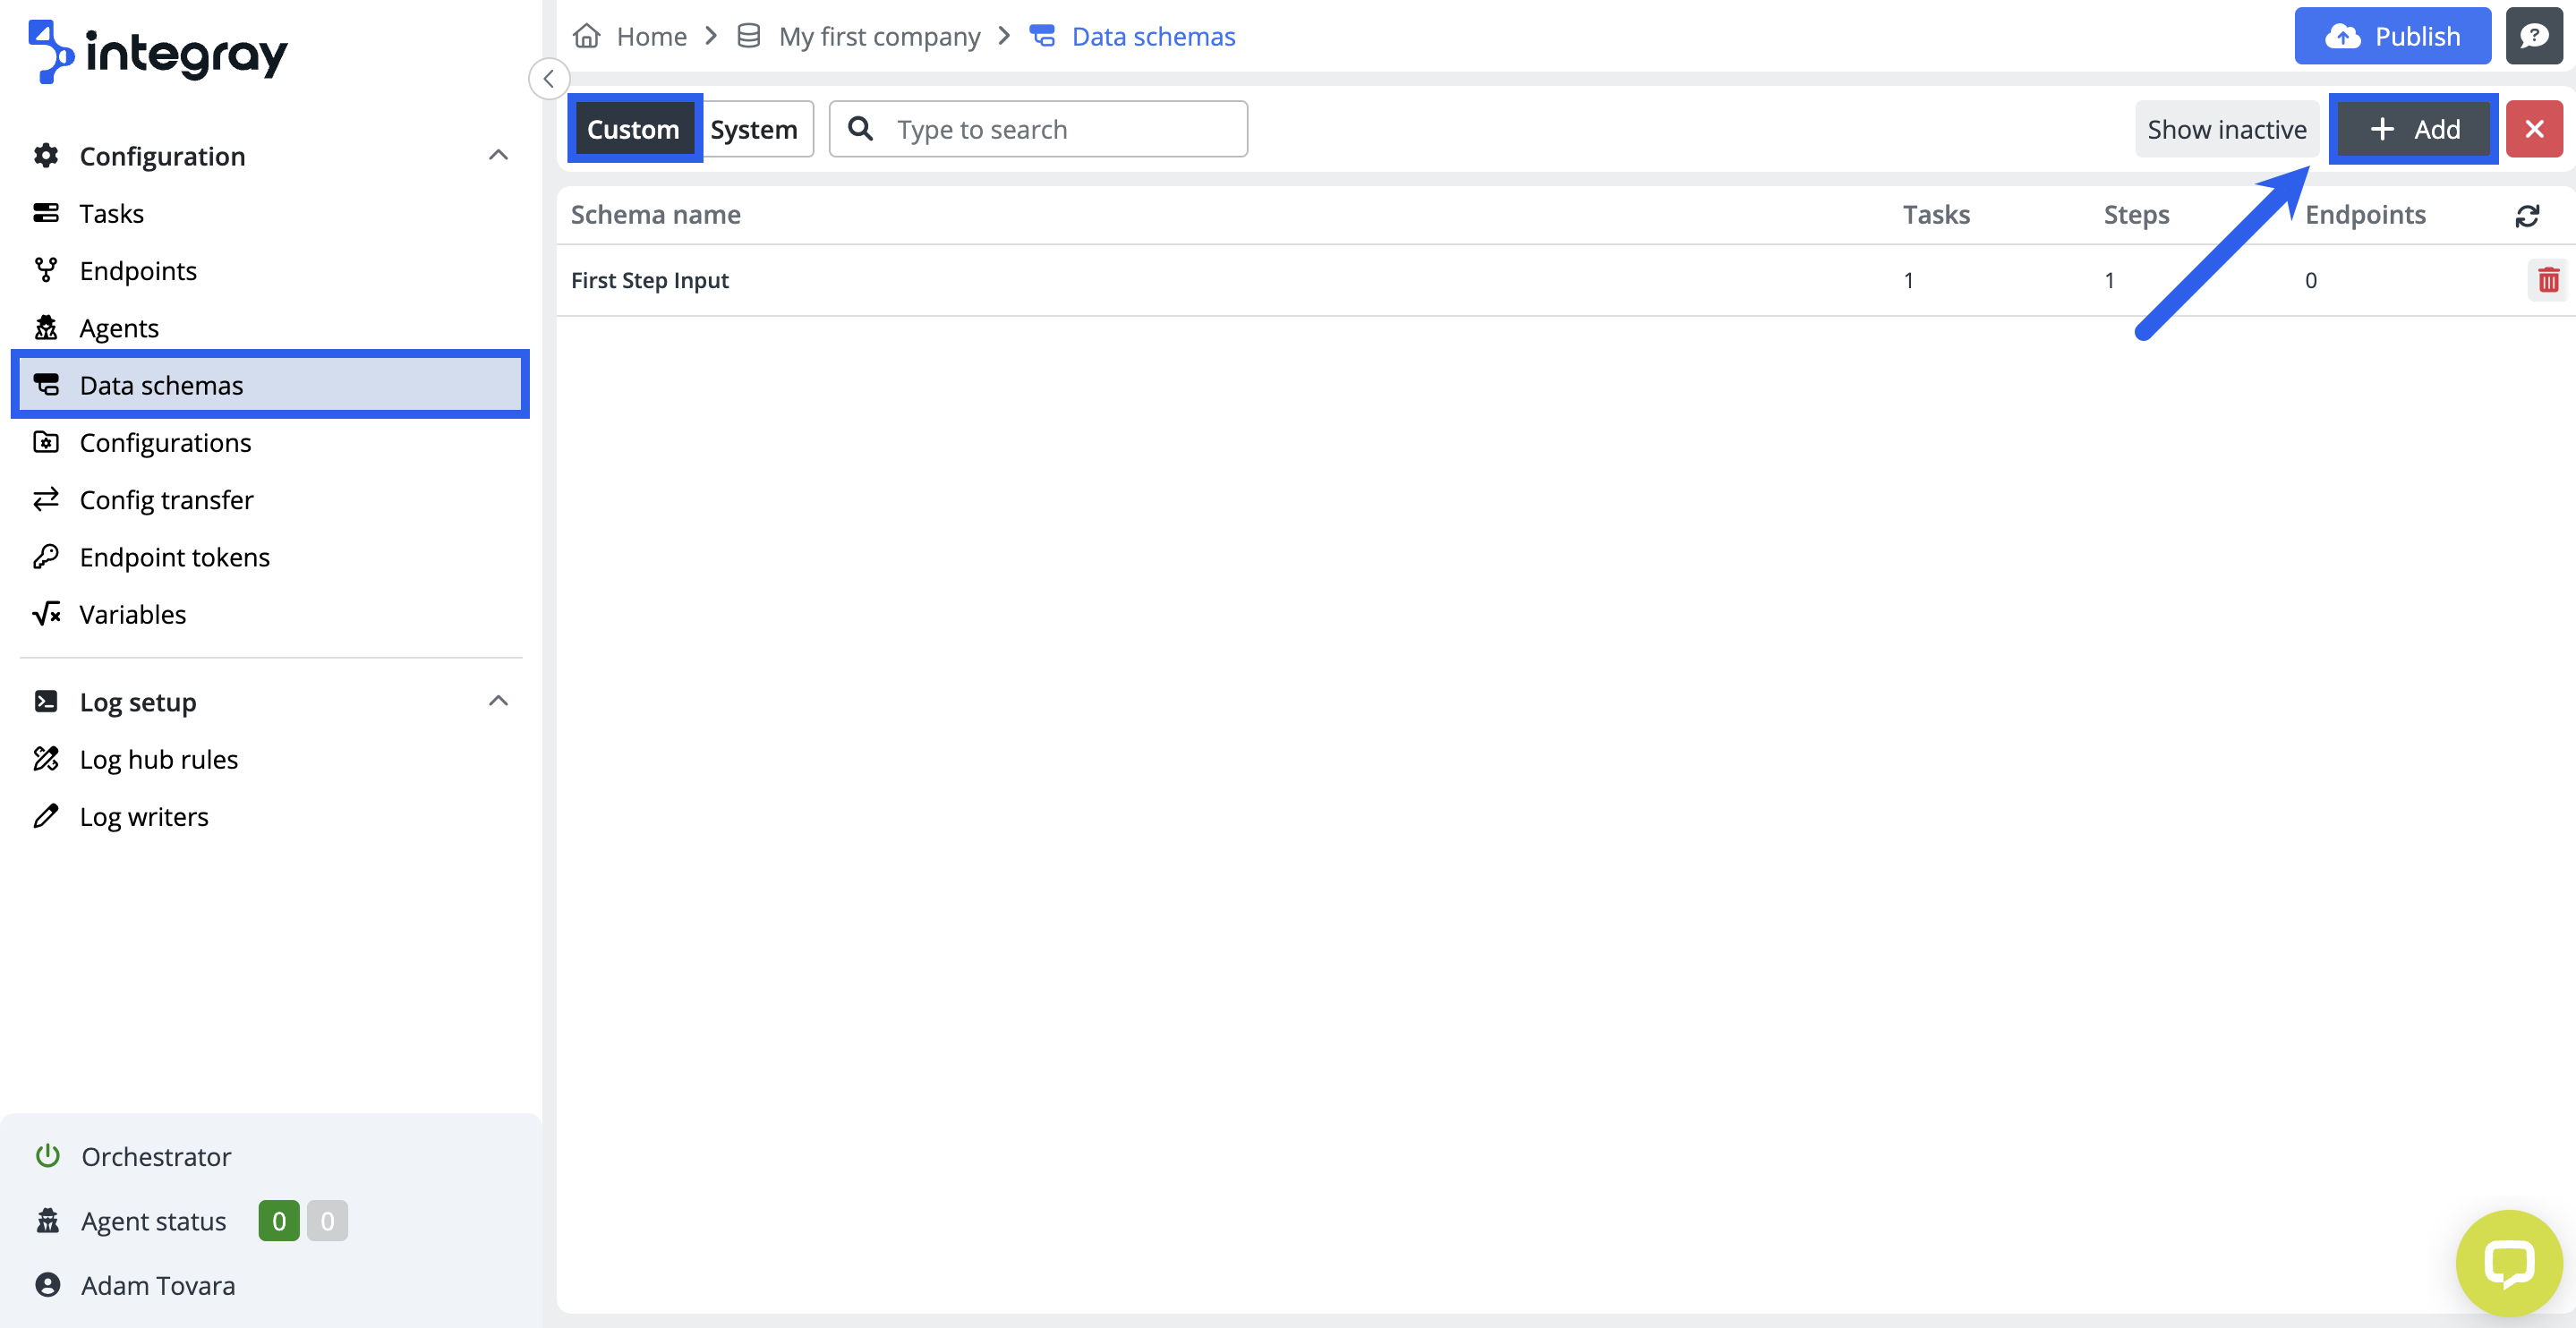
3. Create a new Data schemas
In the content navigation menu, go to the Data schemas section, the Custom tab and click the + Add button to add a new Data schema. This schema will be used as the Input schema for the Endpoint that we will create later.
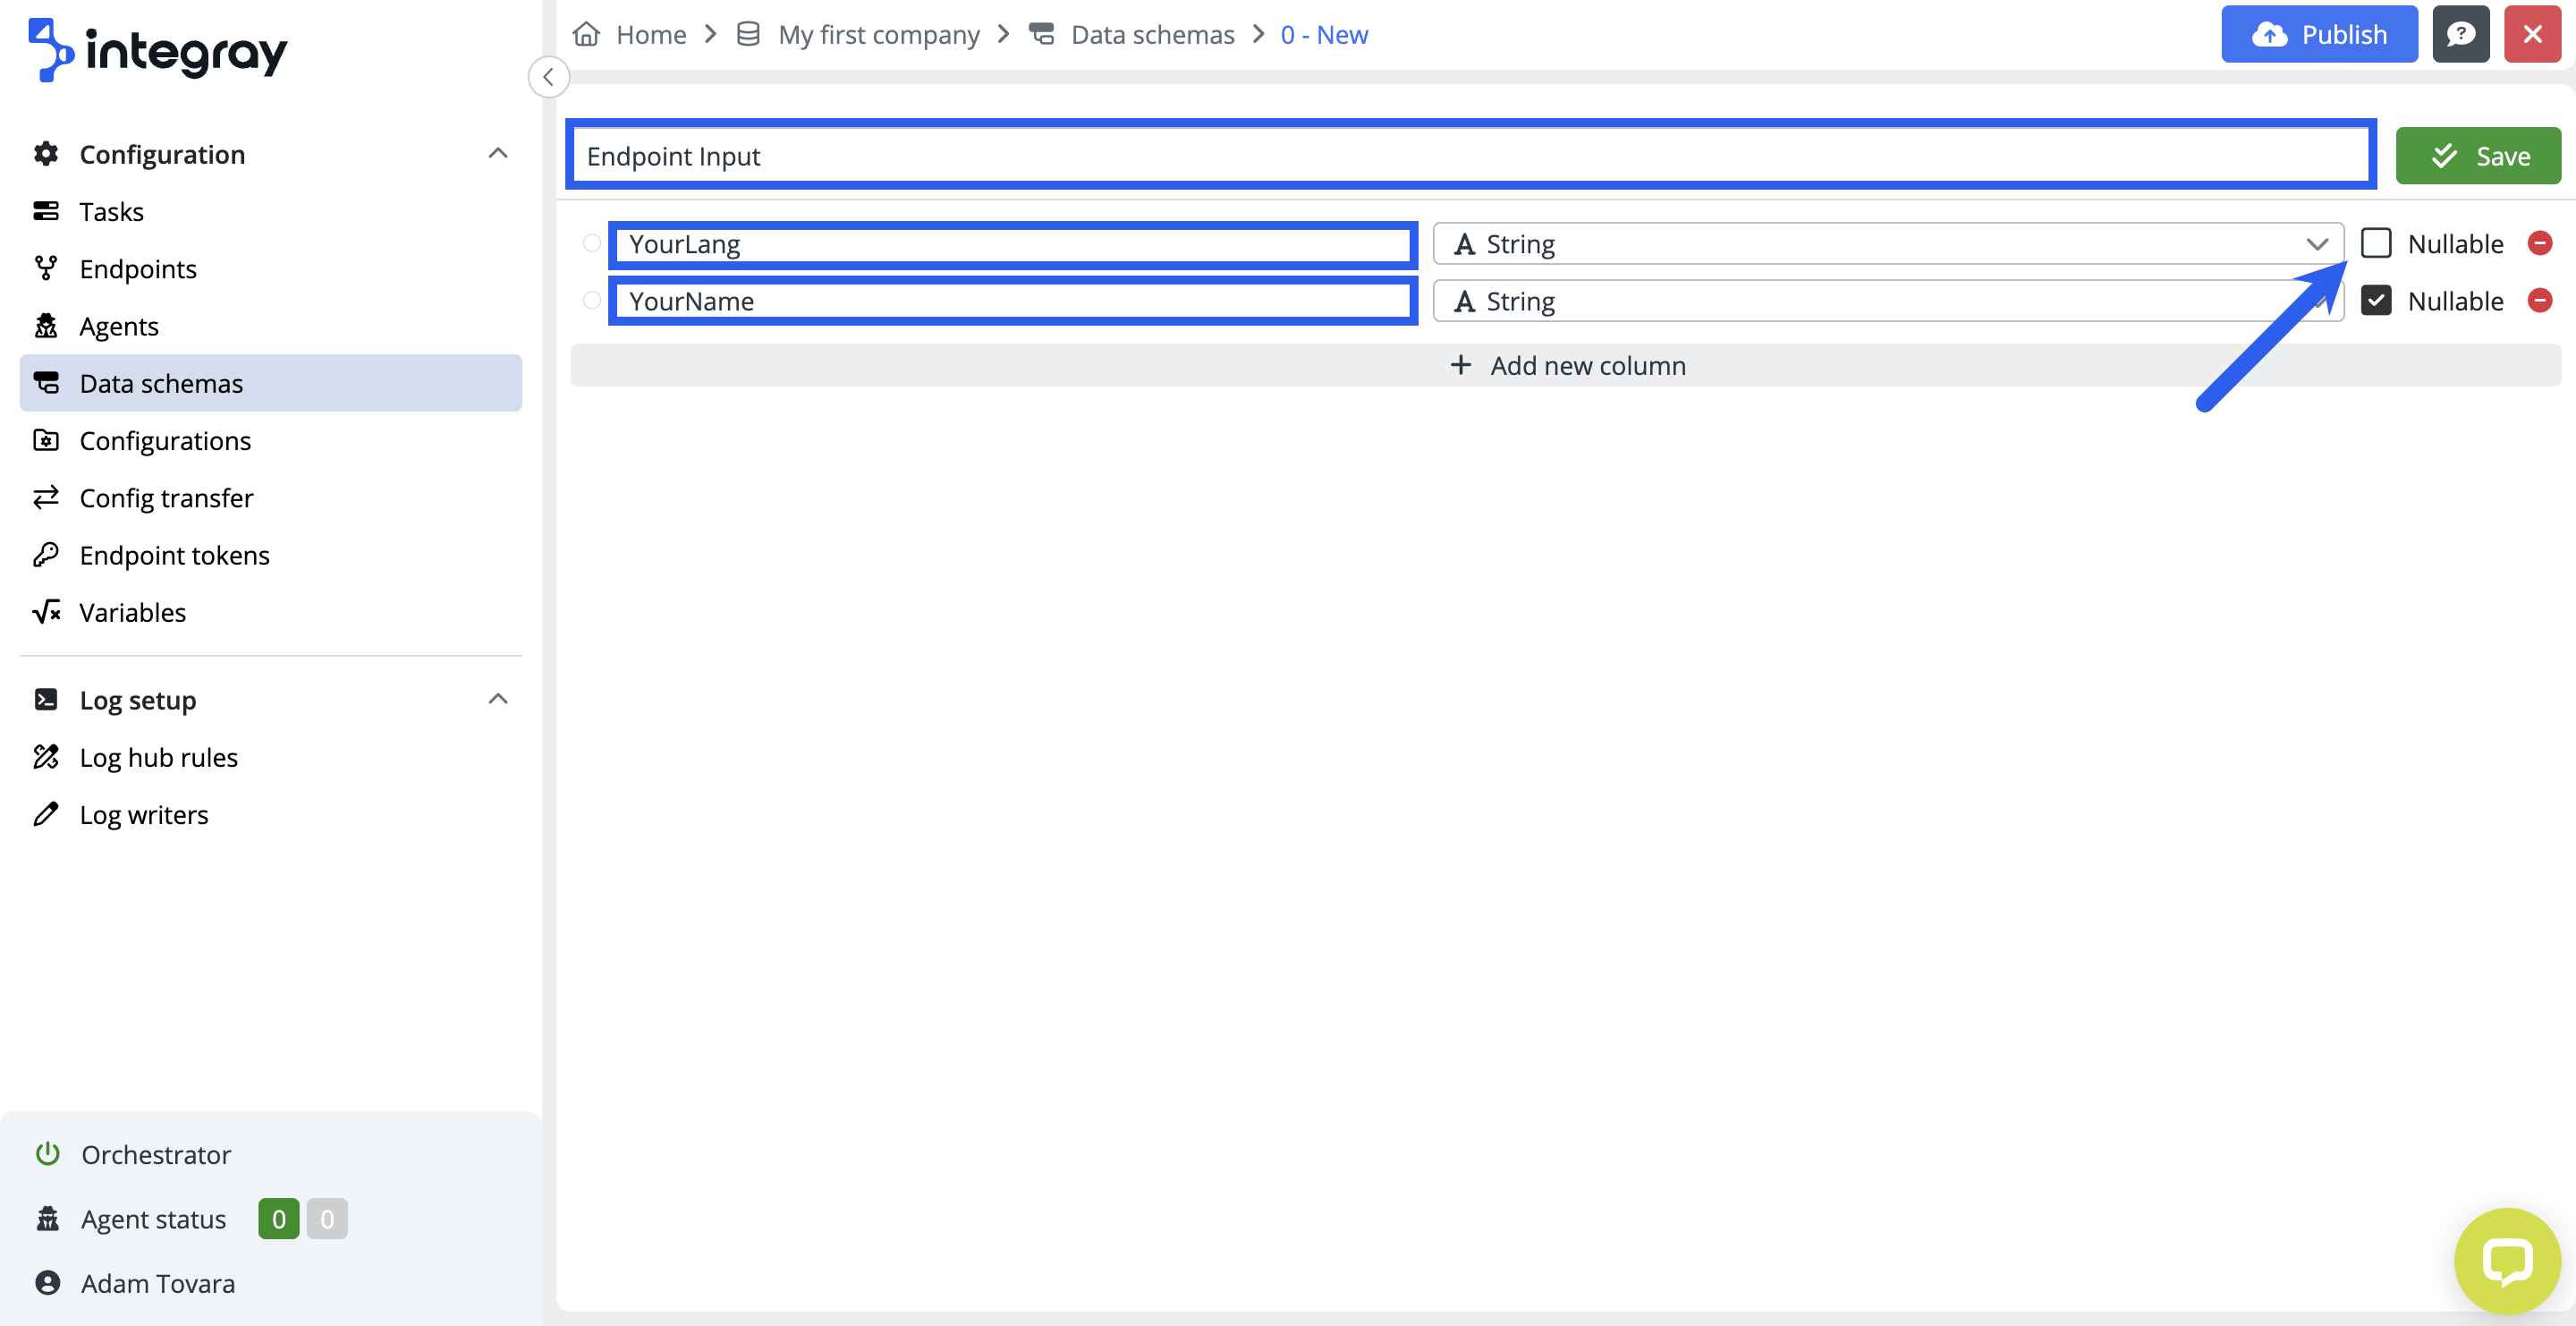
Name the schema Endpoint input and use the +Add new column button to add two new lines and name them YourLang and YourName (uncheck the Nullable button on the line with the value YourLang").
Enpoint input
YourLang
YourName
Save the new schema and close it using the cross button.
Now, we will create one more Data schema that will be used for output on the Endpoint.
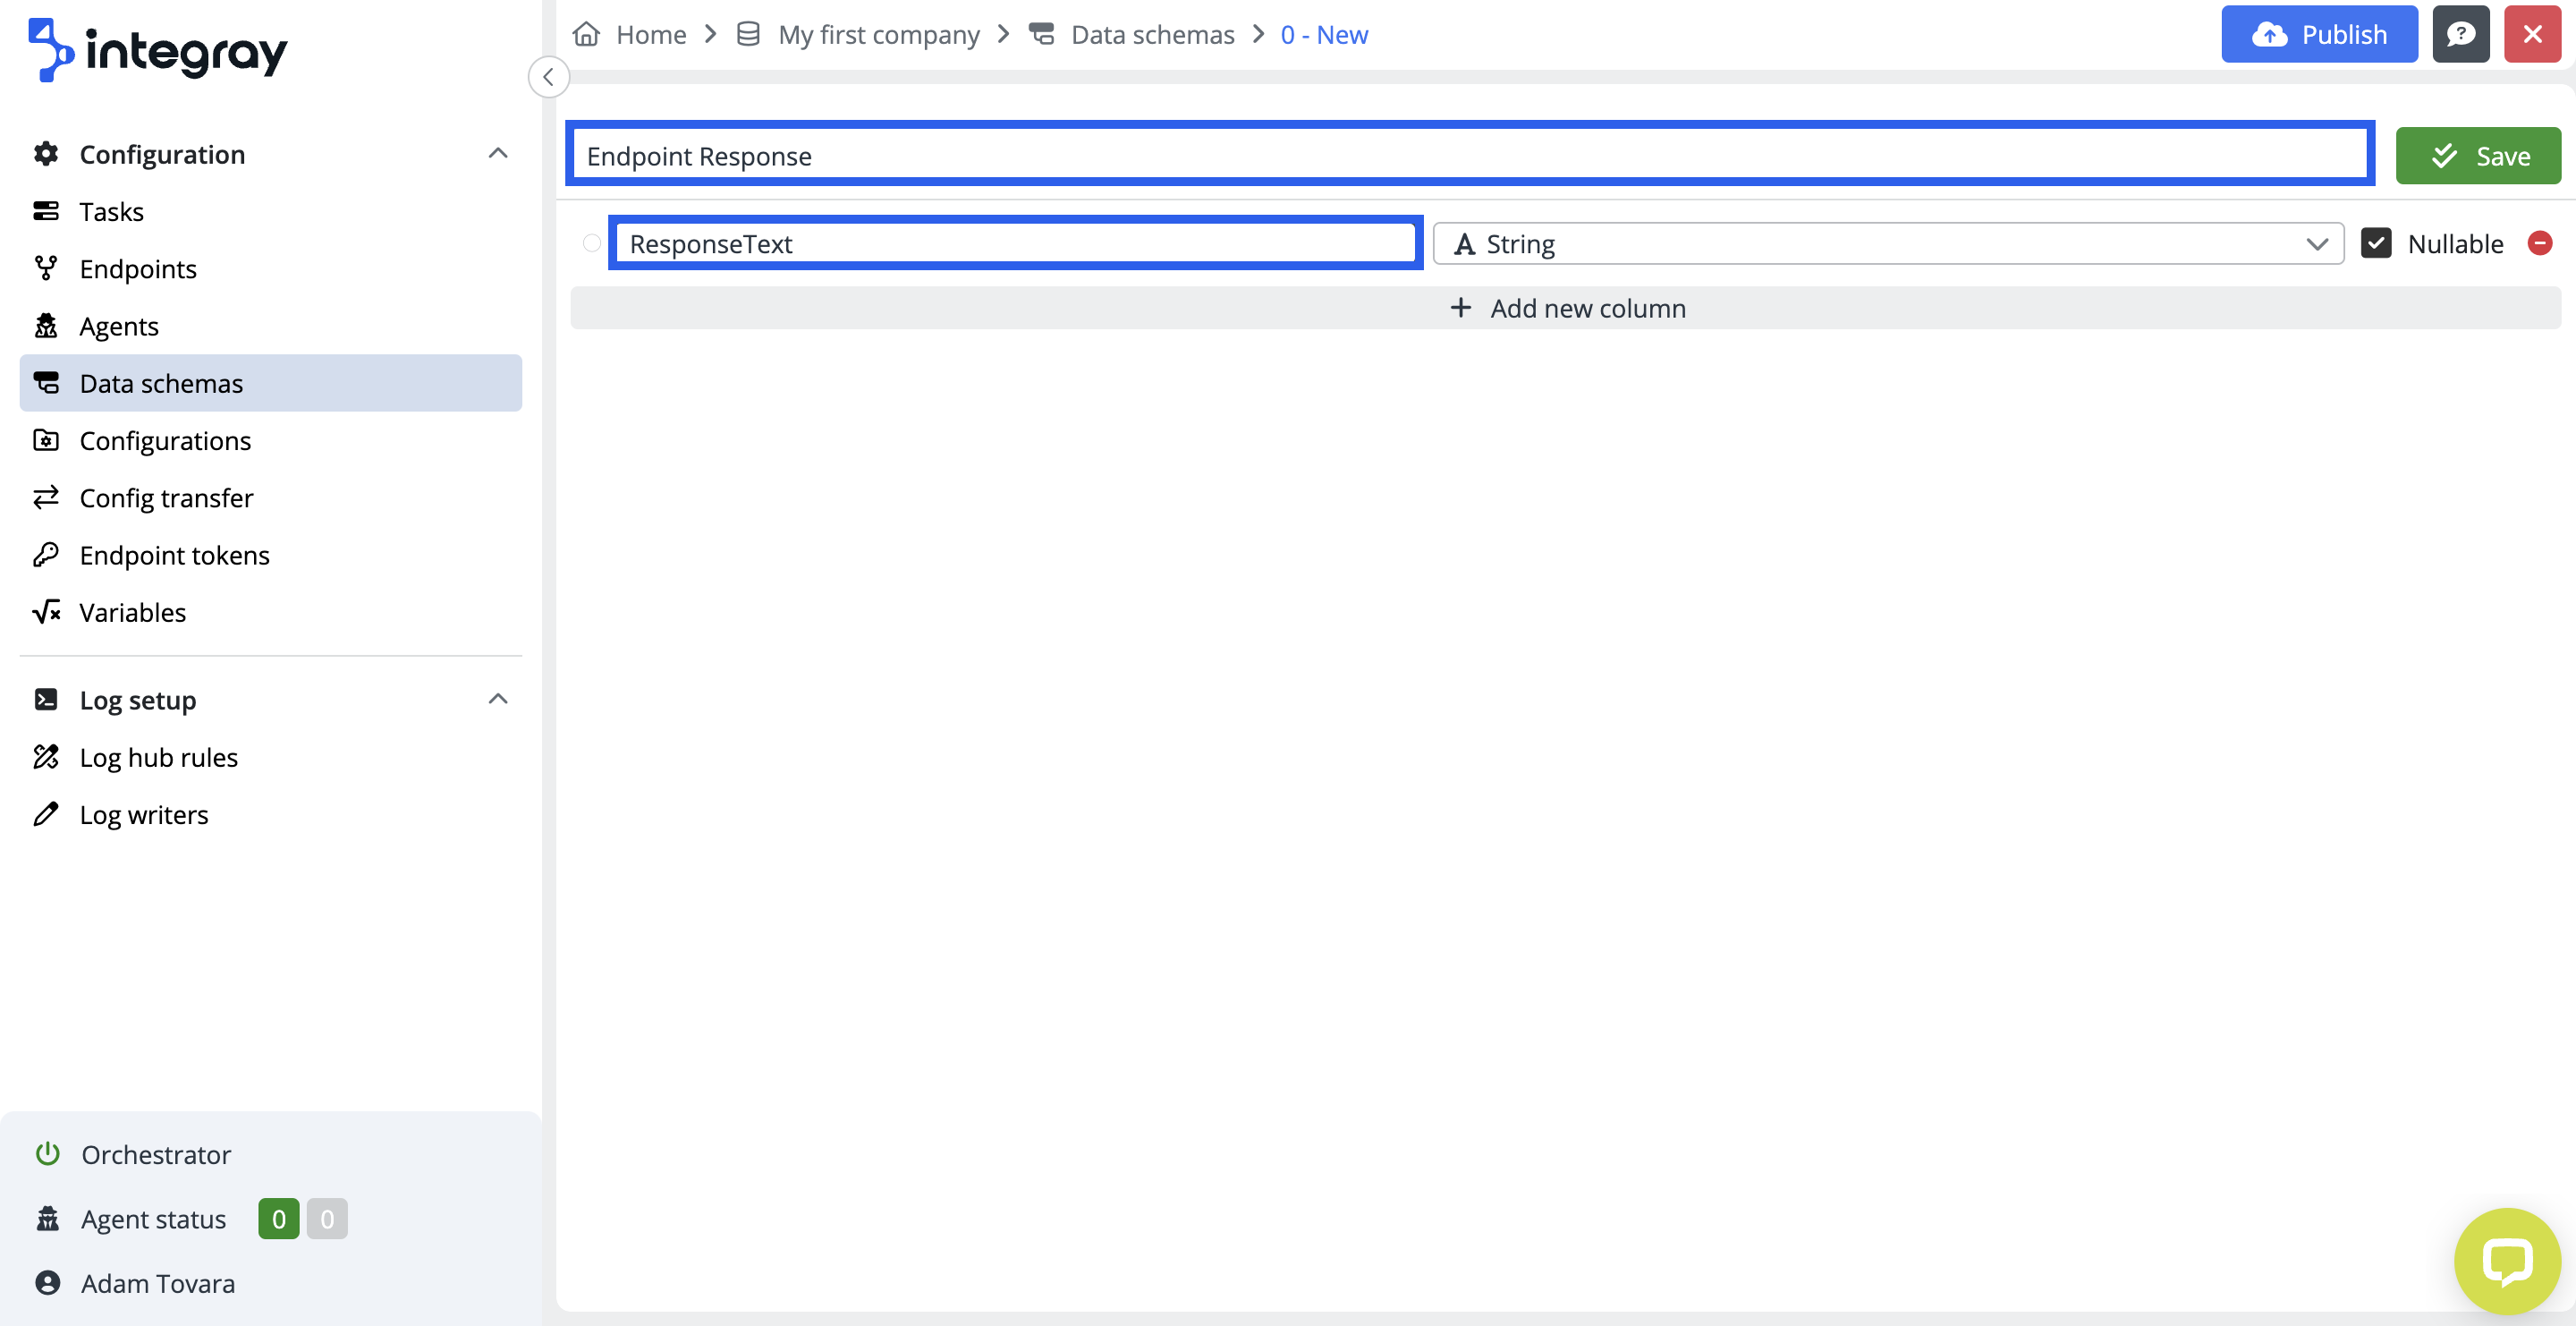
Click the + Add button to add a new schema, name it Endpoint response and add new column named ResponseText.
Endpoint response
ResponseText
Save the schema and close it with the cross button. Now, we have two new schemas and can move on to creating a new Endpoint.
4. Create a new Endpoint
The API endpoint is a specific digital location where requests for information are sent by one program to retrieve the digital resource that exists there. Endpoints specify where APIs can access resources and help guarantee the proper functioning of the incorporated software.
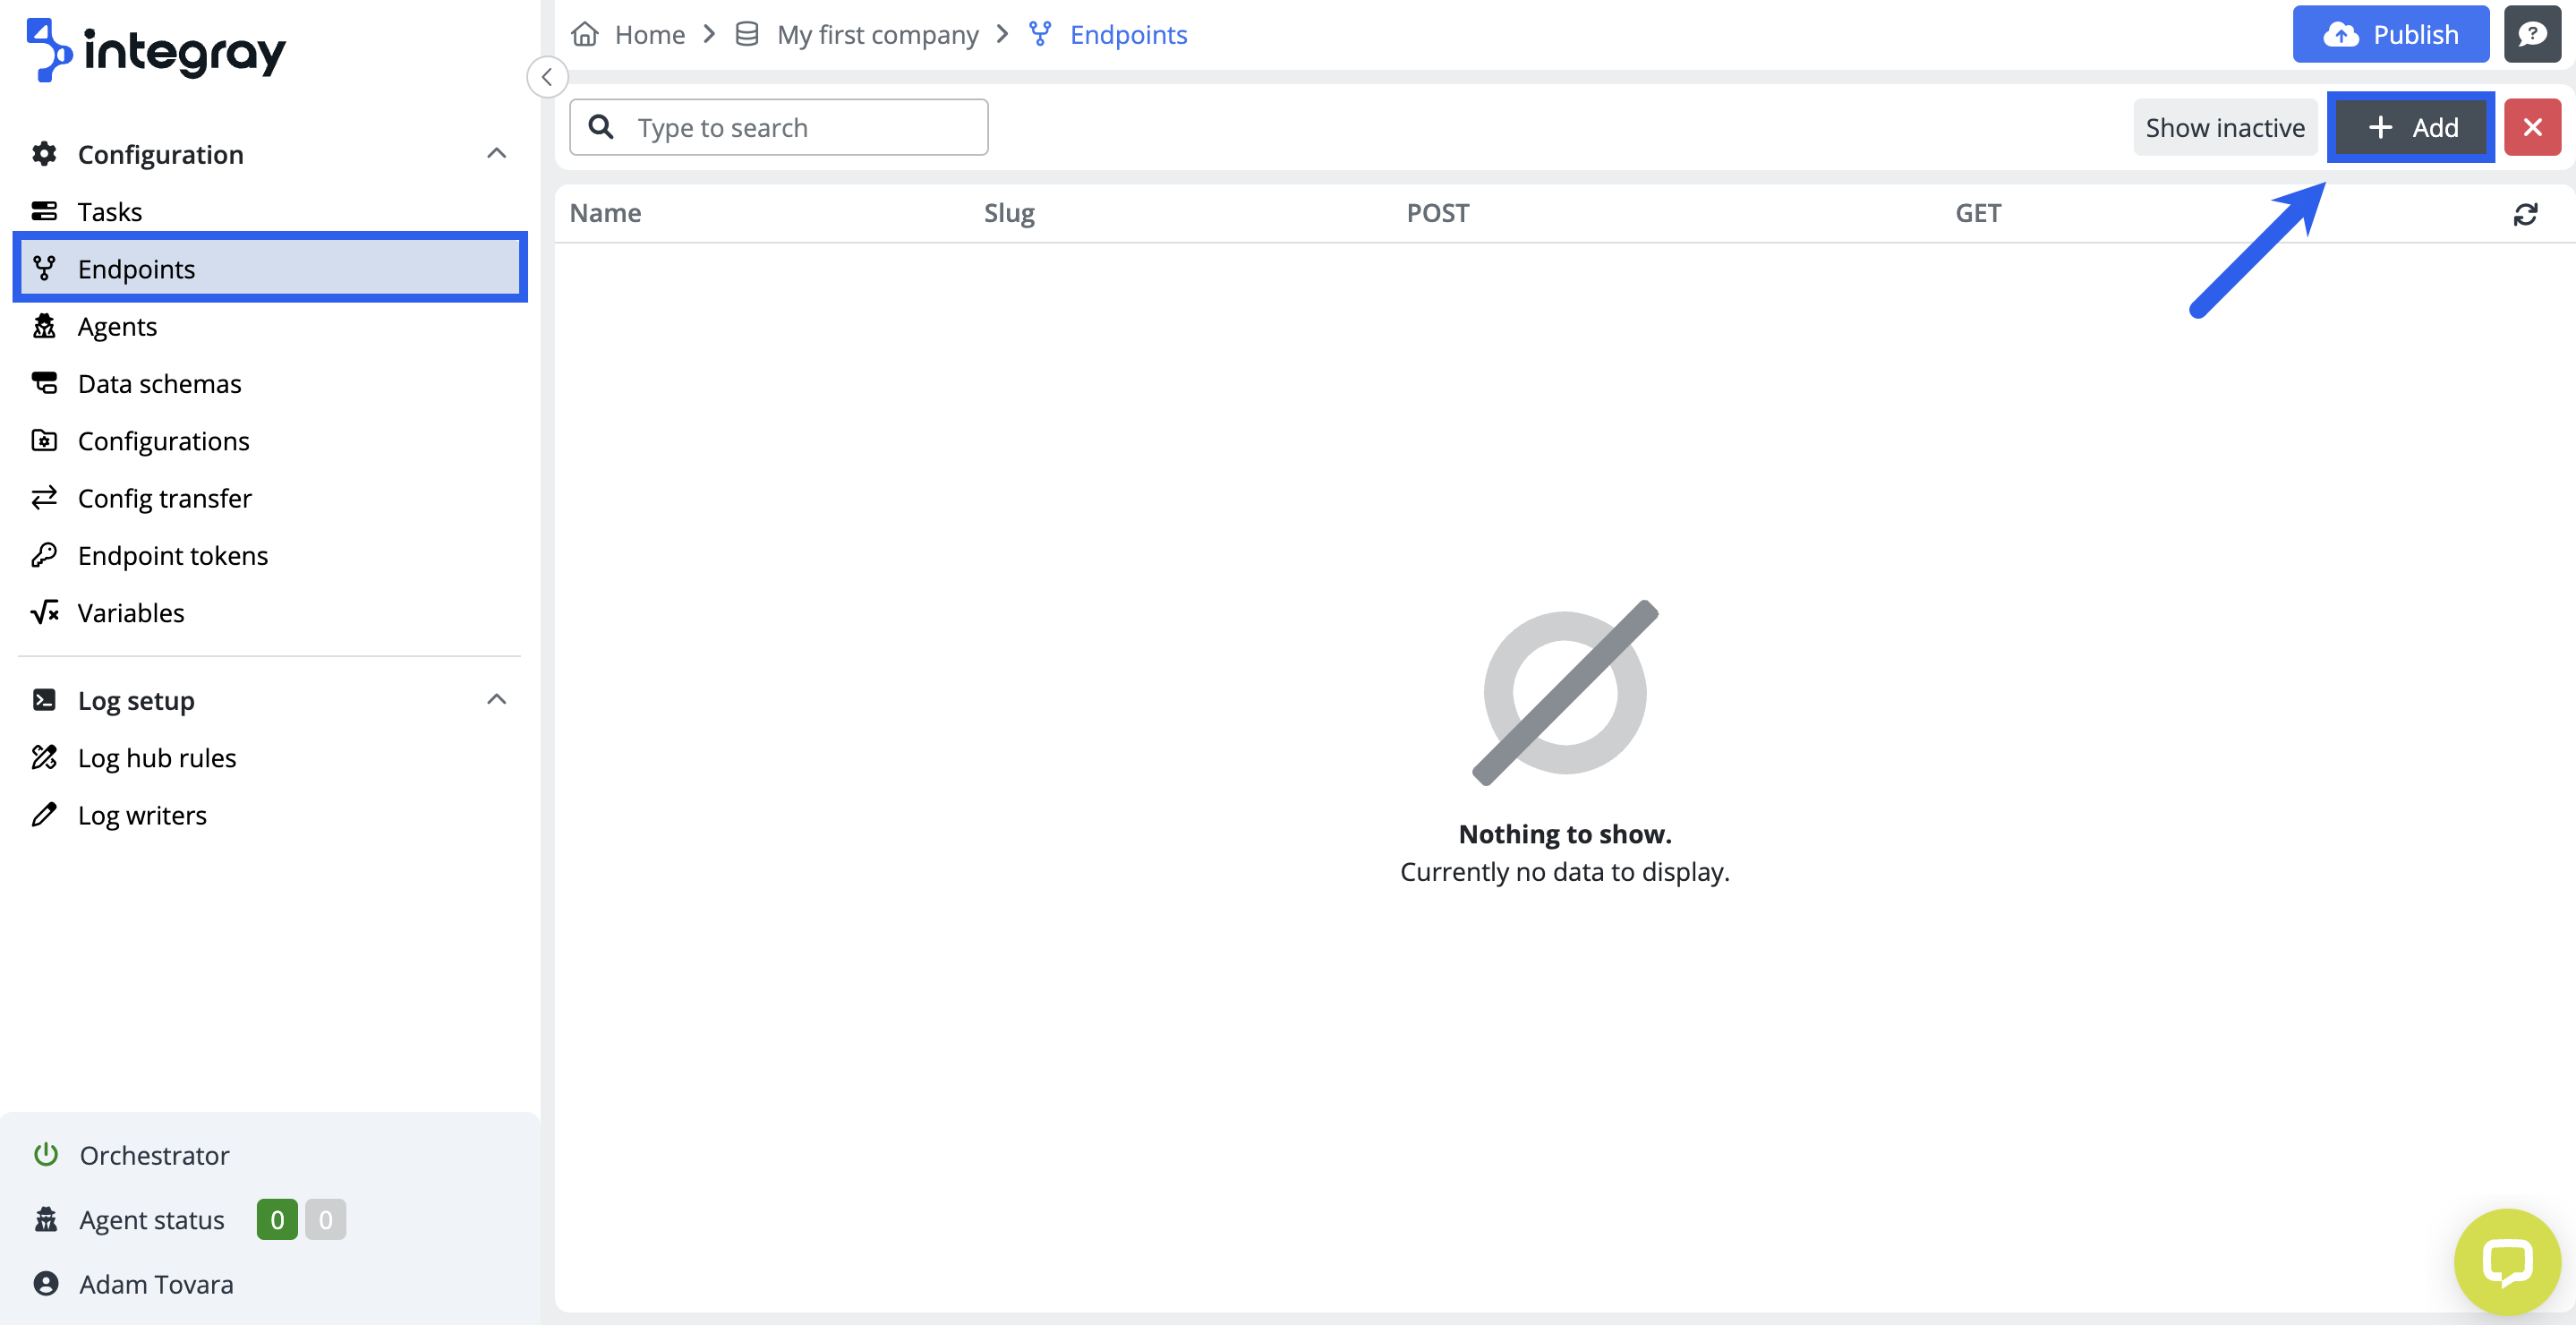
In the content navigation menu, go to the Endpoints section and click the + Add button to add a new Endpoint.
On the General tab, enter the name First endpoint and press the button to generate Slug.
First endpoint
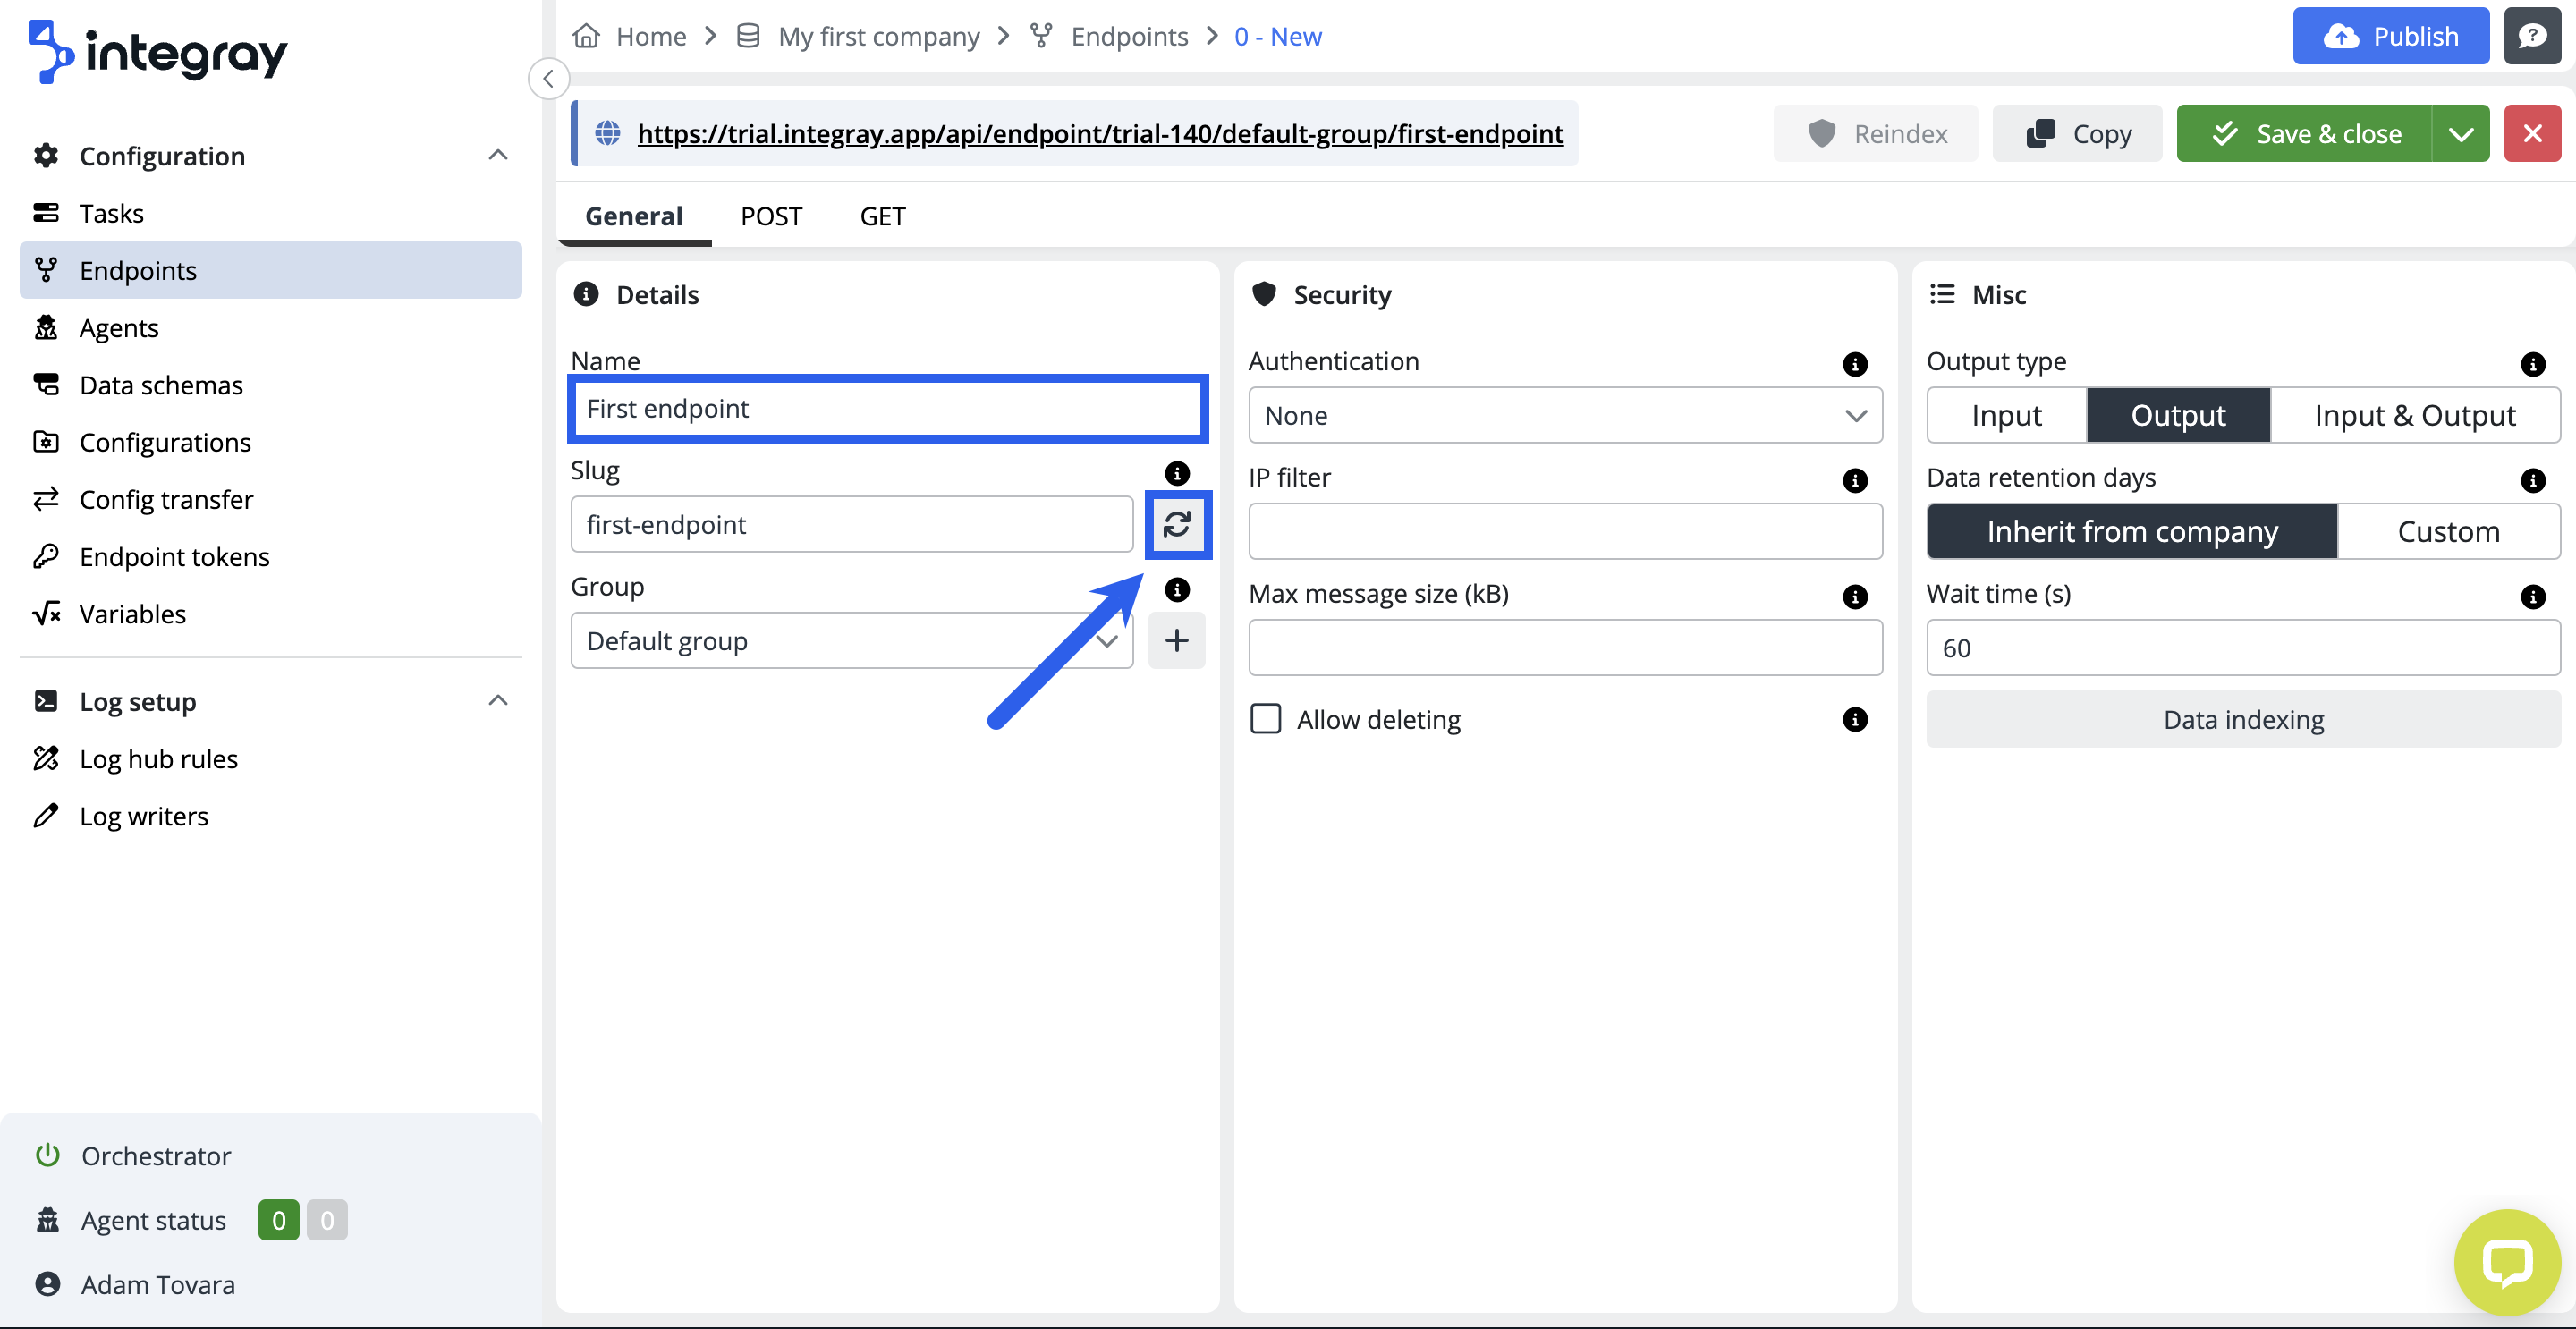
Go to the GET tab, and in Input schema, select your created Endpoint input schema. After selecting a schema, the Query params mapping will be displayed based on our created Data schema.
Endpoint input

In the Task section, select your Hello task from the combo box.

Save and close the Endpoint.
5. Task and Endpoint mapping
To complete the configuration as a whole, the Task and the Endpoint must be mapped.
In the content navigation menu, go to the Task section, open the Hello task and click the pencil button to edit Step #1.

In the Input mapping section, after moving the cursor to YourLang, a small plus button will appear. Click on it and select LangEntered.
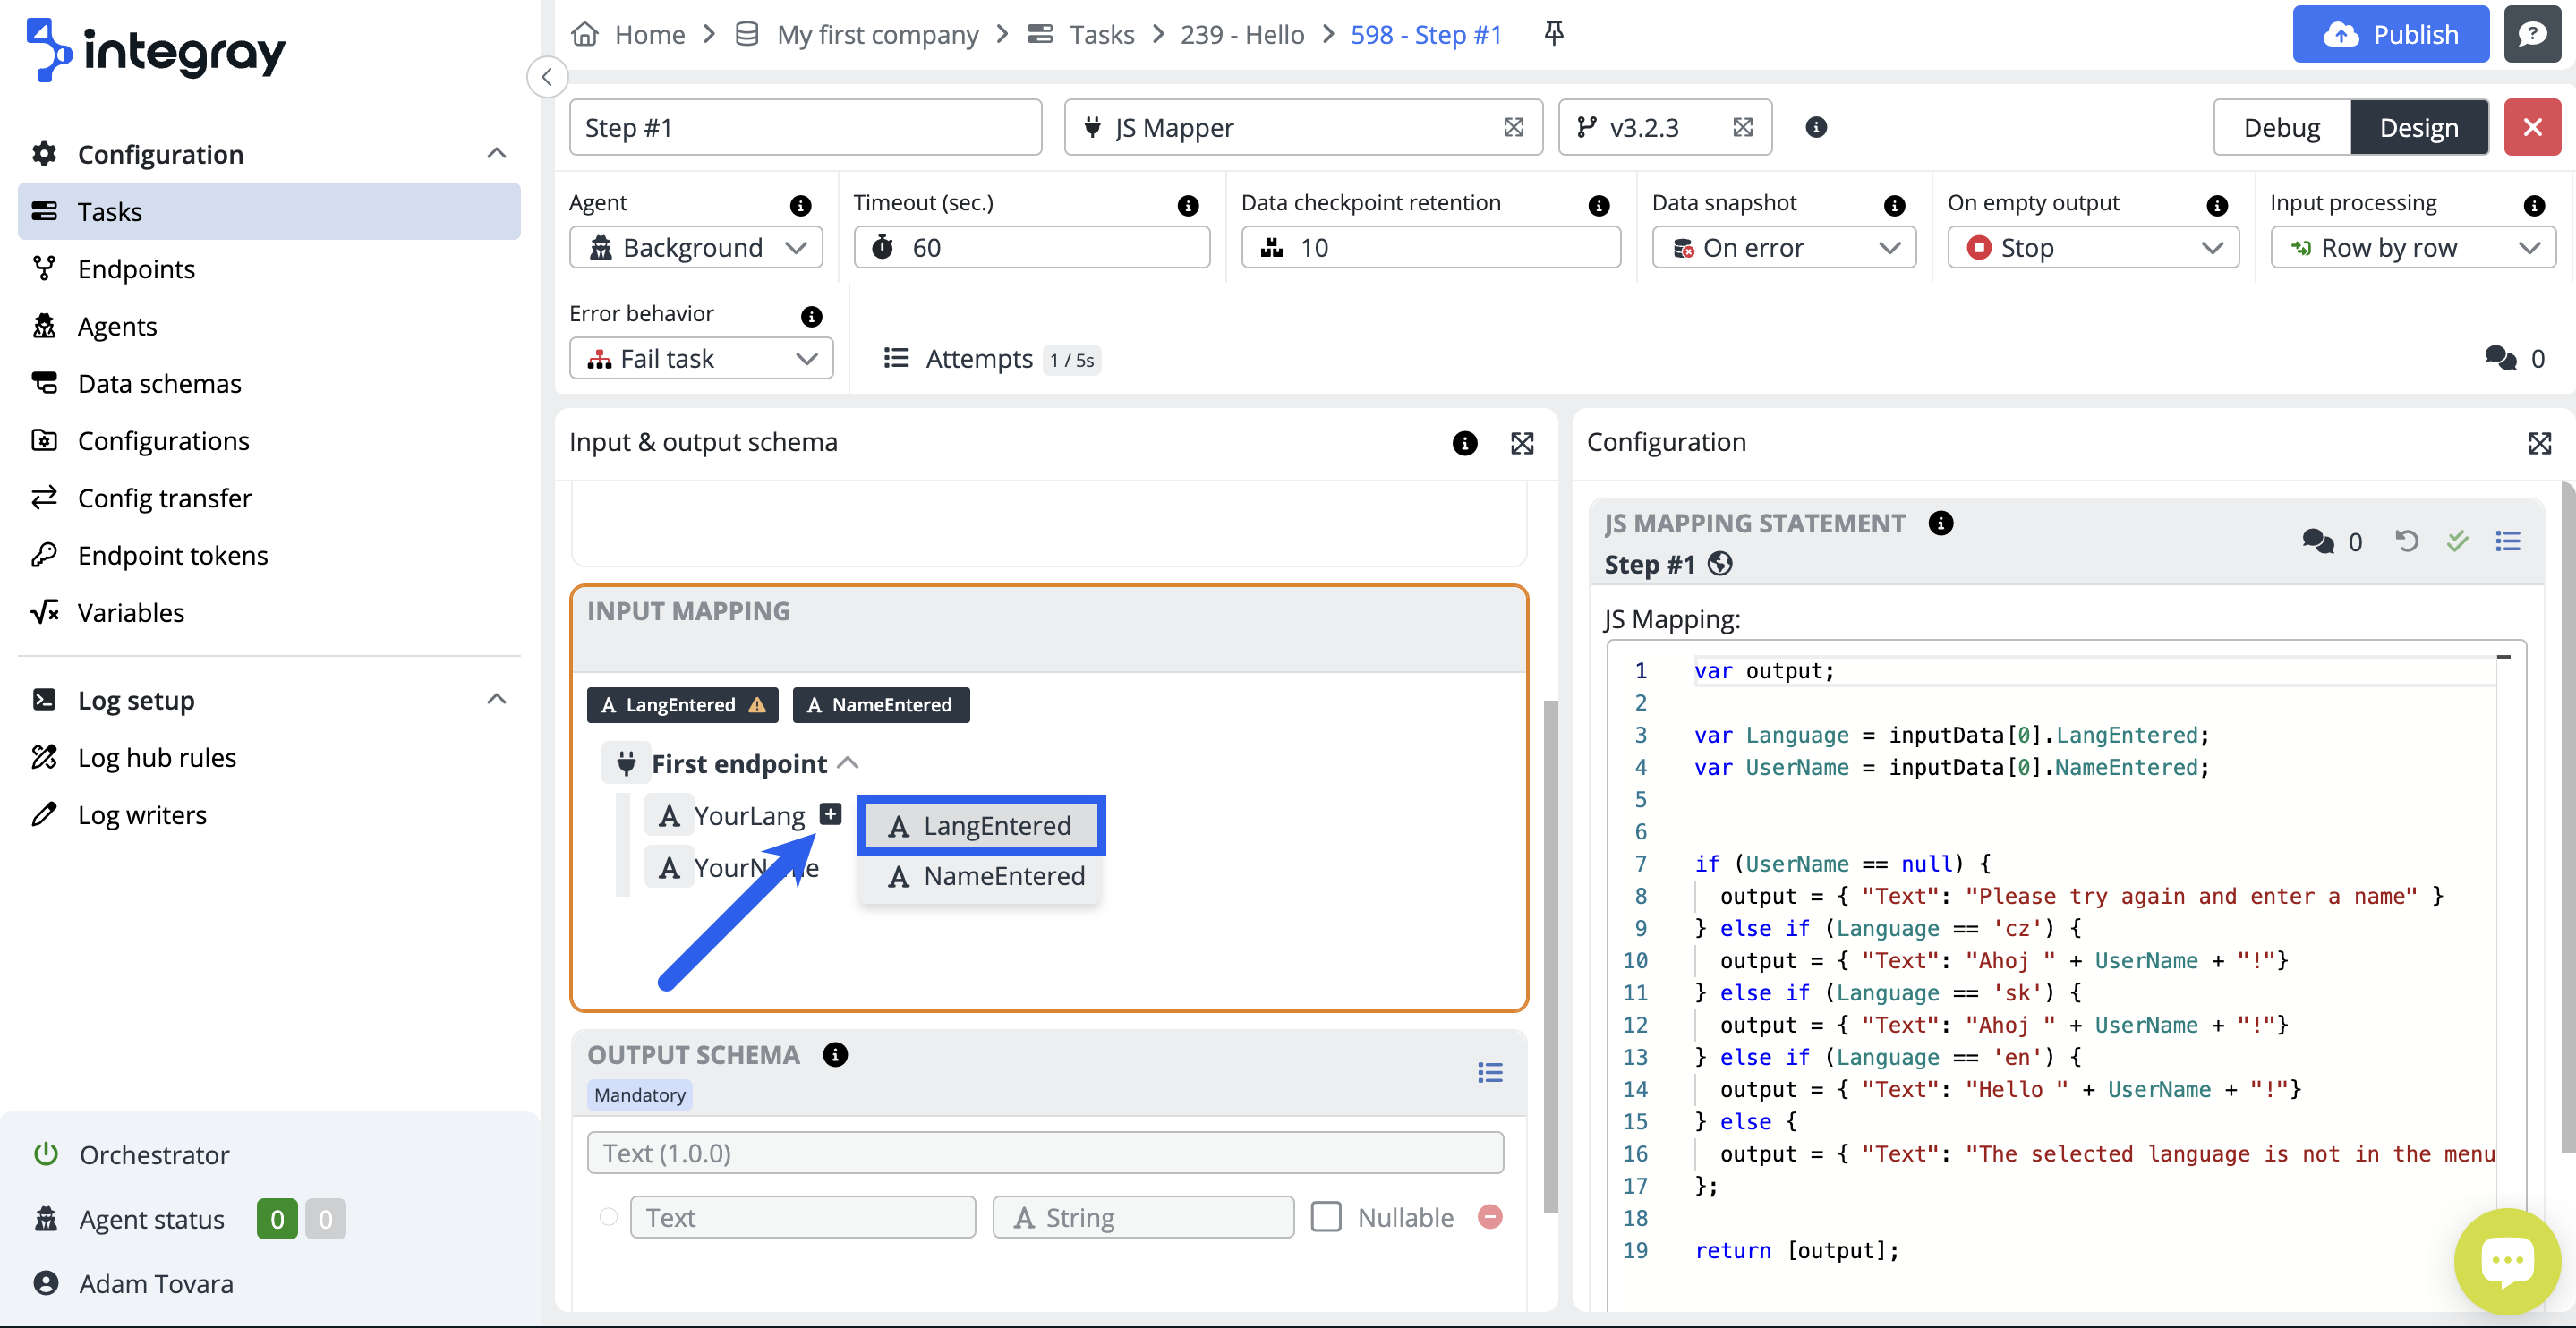
After moving the cursor to YourName, a small plus button will appear. Click on it and select NameEntered.

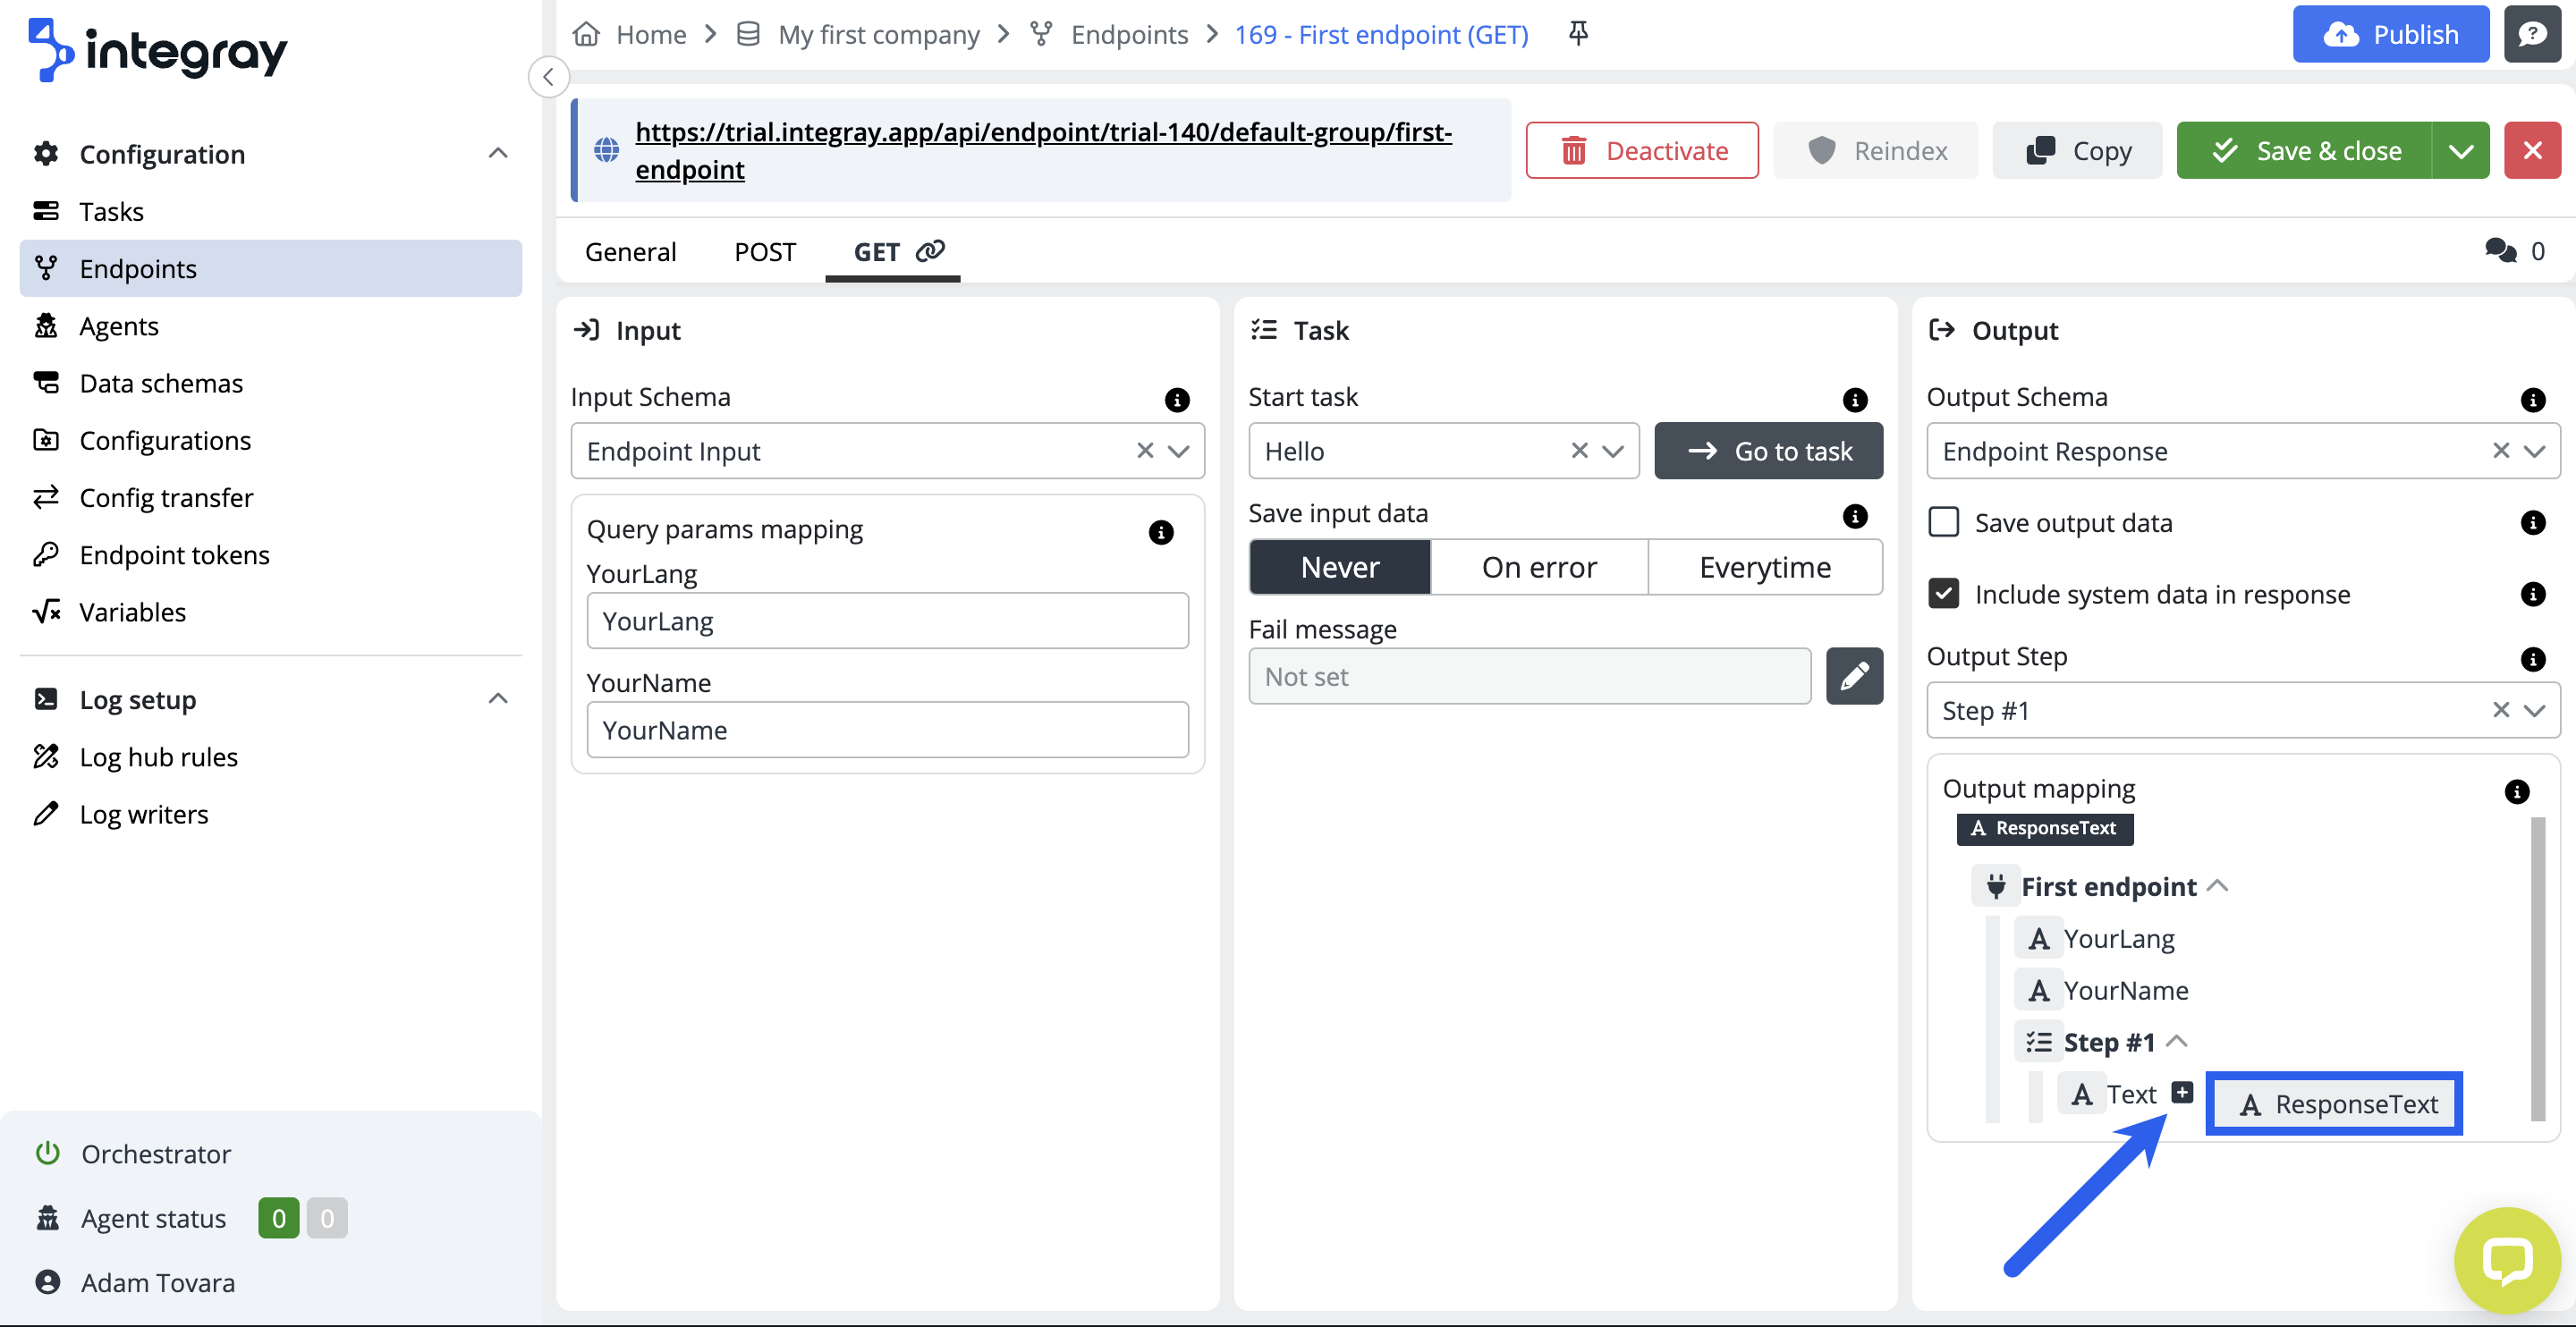
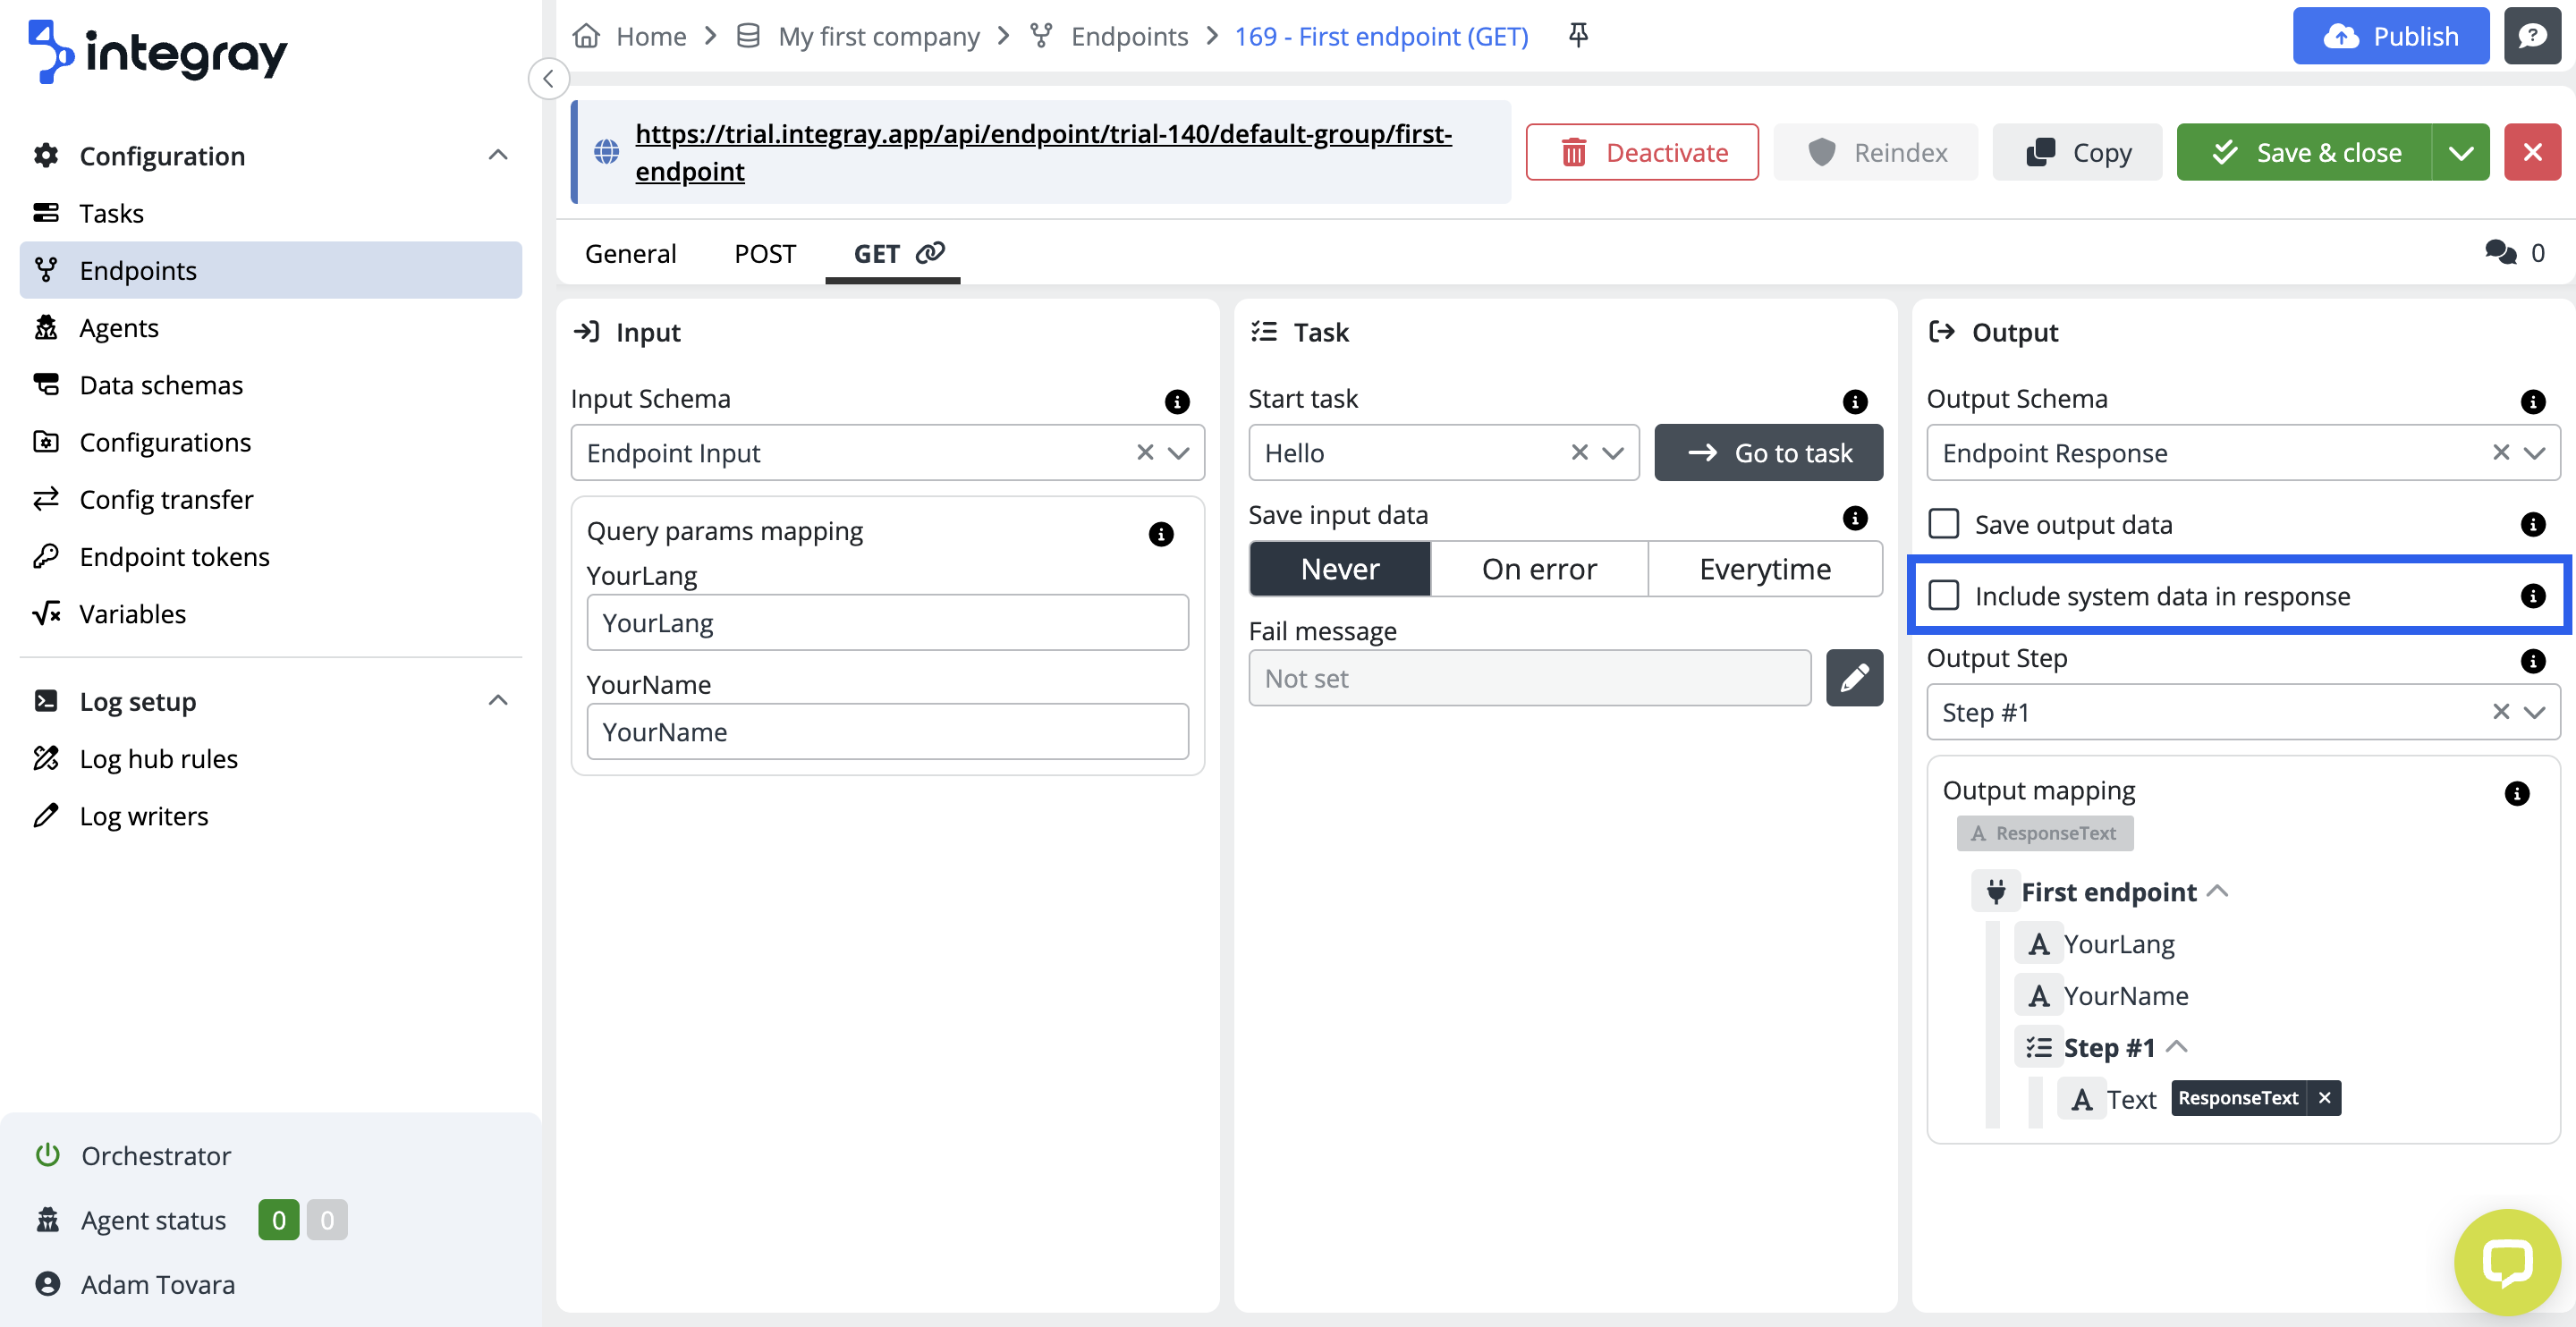
Close the Task, return to the Endpoints sections, and open the First endpoint on the GET tab.
In the Output, select the Endpoint response schema and Output step select Step #1.
Endpoint response

In the Output mapping section after hovering over the word "Text," a small plus sign will appear. Click the plus and then click ResponseText.
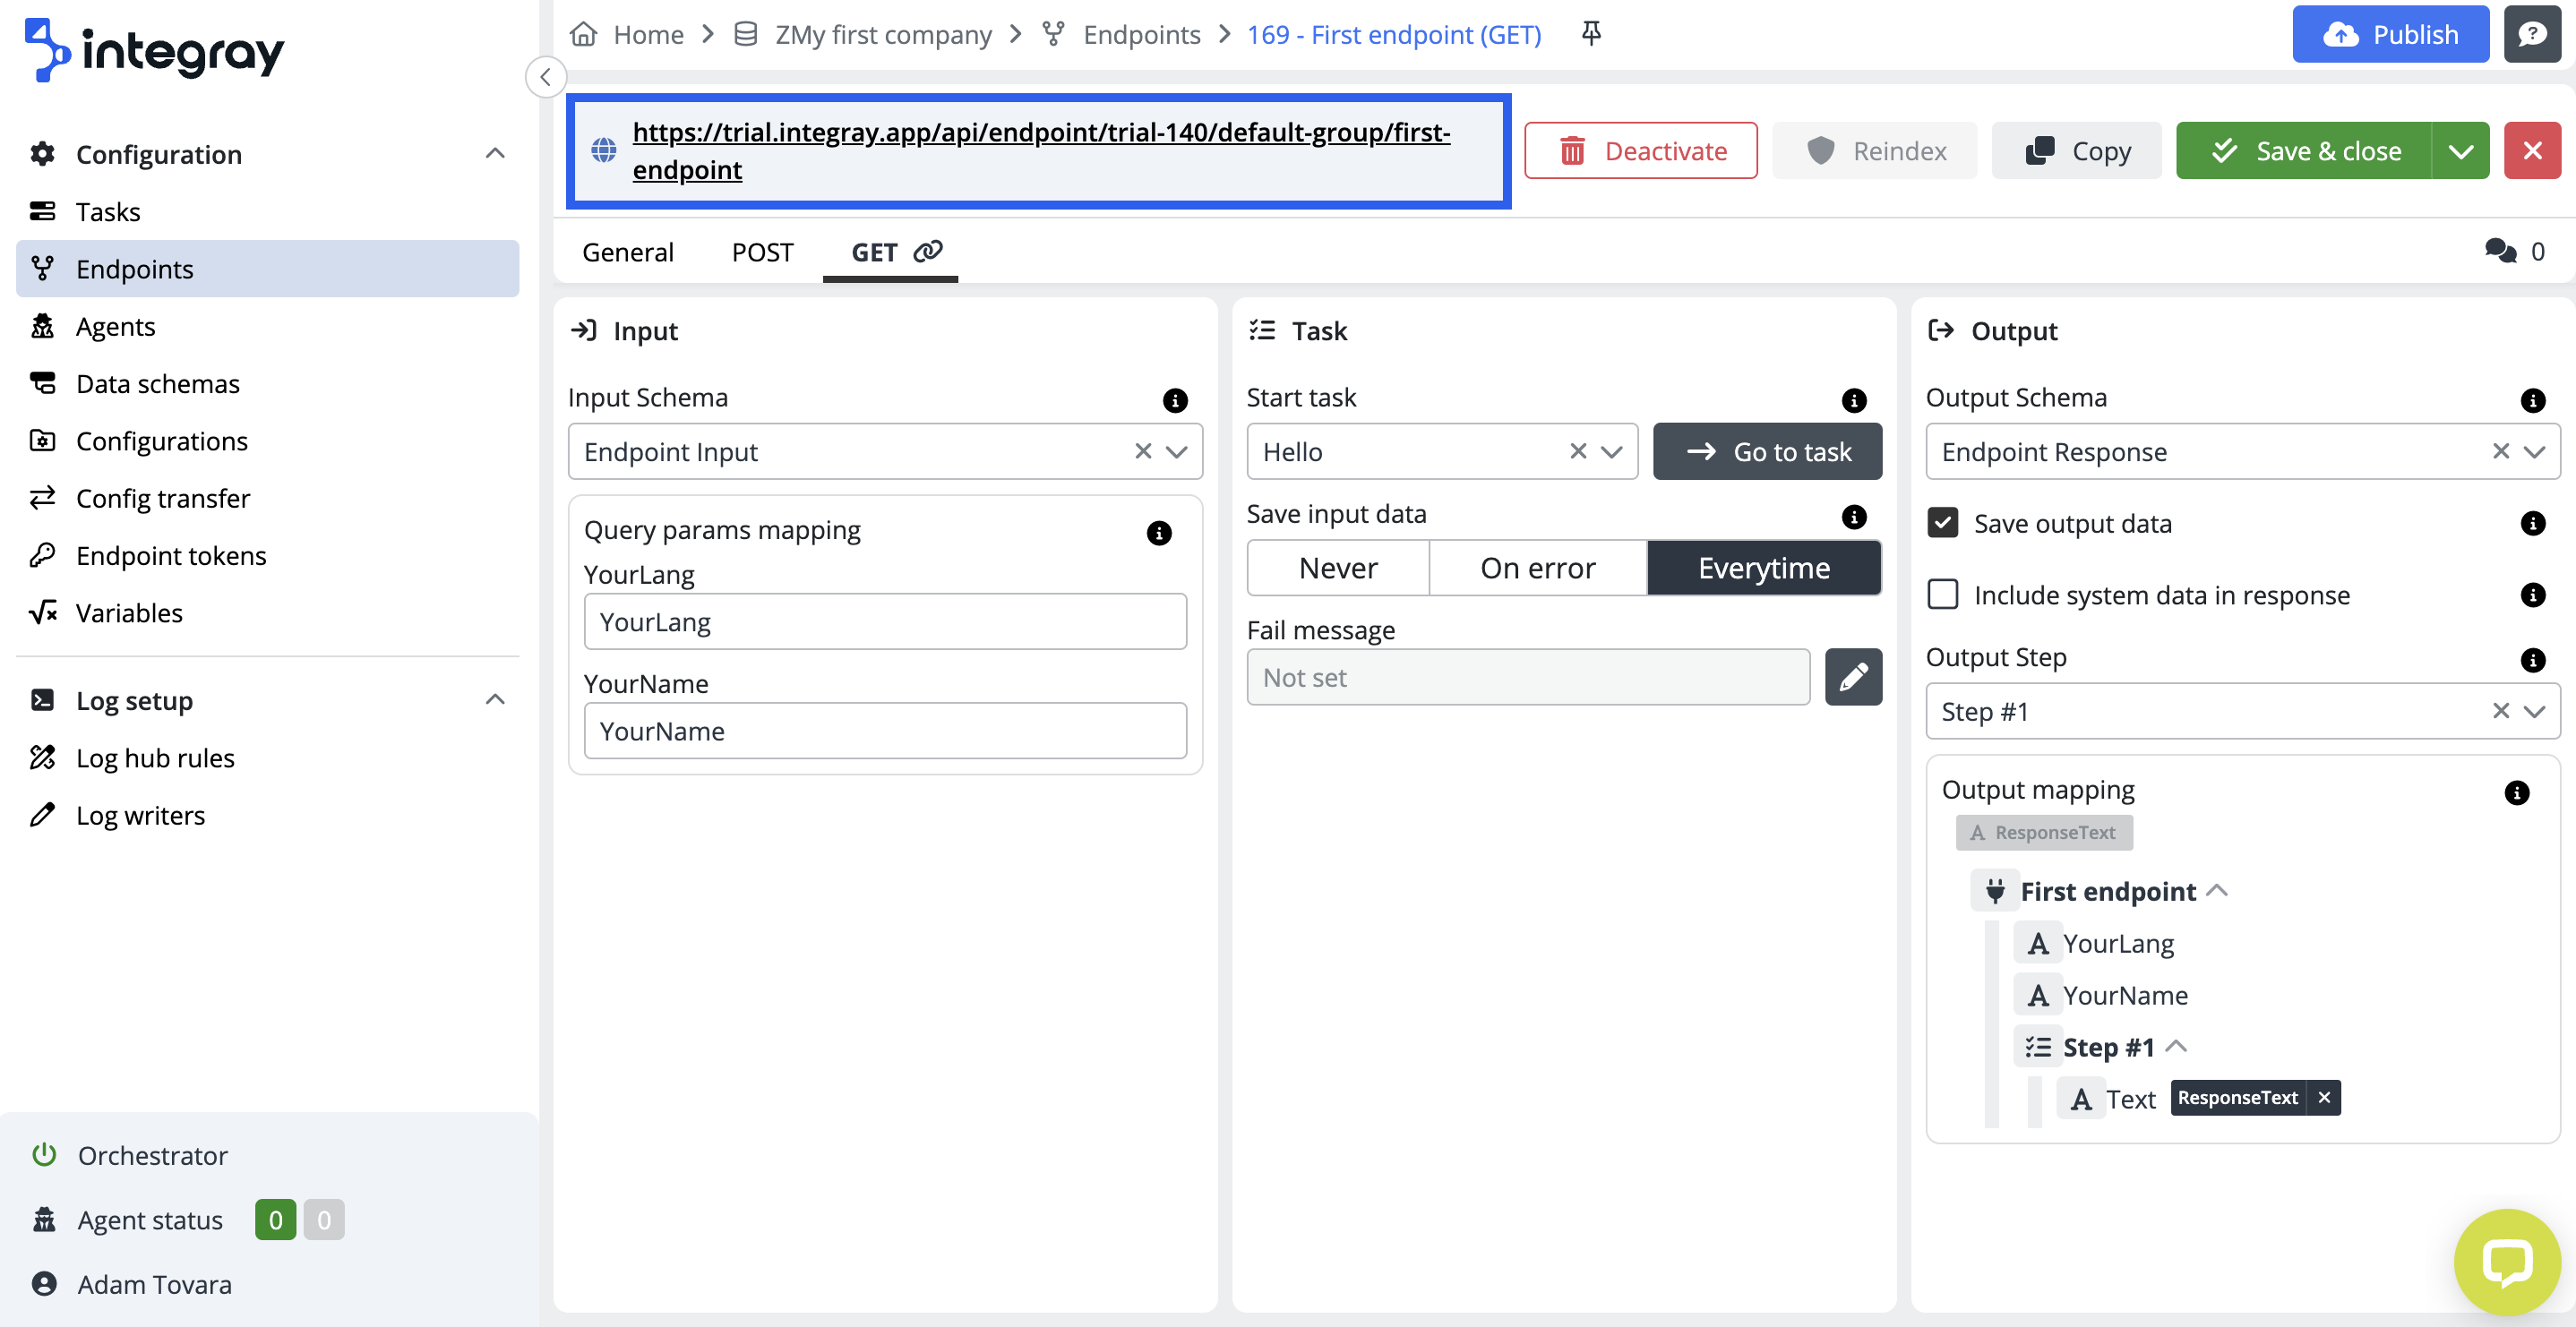
Save the Endpoint and click the Publish button for the changes to be applied to the platform.
6. Run the integration task
Run tasks to check for correct configuration and setup.
Open the First endpoint, copy the link from the top of the screen, open a new browser window, and paste the copied URL.
Append the query parameters Language and Name to the end of the Endpoint URL. Copy and pase the example below.
?YourLang=en&YourName=John
The final URL might look like this:
https://trial.integray.app/api/endpoint/trial-123/first-group/first-endpoint?YourLang=en&YourName=John
Confirm the URL in the address bar of your web browser and let Integray do its work. The result is a running Task called by the Endpoint and the outcome might look like as follows:
{
    ID: "b3ed293a-3d82-4ff5-b119-18e73352eff7",
    Status: "FinishedSuccess",
    Link: "https://trial.integray.app/home/company/123/task/220?taskRunID=60791",
    Message: null,
    Result: [
        {
            ResponseText: "Hello John!"
        }
    ]
}
Now we will make a small adjustments.
1) Open the First endpoint on the GET tab and uncheck the Include system data in response button. Save the changes and click the Publish button. This will cause the system data will not be displayed in the resulting outcome.
Copy the endpoint URL, paste it to the new browser window, add the Language and Name parameters in the form for example:
?YourLang=en&YourName=John
The final URL might look like this:
https://trial.integray.app/api/endpoint/trial-123/first-group/first-endpoint?YourLang=en&YourName=John
The outcome will look as follows:
[{"ResponseText":"Hello John!"}]
2) Change the Language and Name parameters. Instead of "en" use "cz" (for the Czech language) and choose another name instead of "John".
The final version of the parameters may look like this:
?YourLang=cz&YourName=Adam
The final URL might look like this:
https://trial.integray.app/api/endpoint/trial-123/first-group/first-endpoint?YourLang=cz&YourName=Adam
The outcome will look as follows:
[{"ResponseText":"Ahoj Adam!"}]
3) Now, copy the endpoint link, open a new browser window, and paste the copied URL. At the end of the inserted URL, add only the Language parameter in the form, for example:
?YourLang=en
The final URL might look like this:
https://trial.integray.app/api/endpoint/trial-123/first-group/first-endpoint?YourLang=en
The outcome will look as follows:
[{"ResponseText":"Please try again and enter a name"}]
4) Now copy the endpoint link and paste it to the new browser window. At the end of the inserted URL, add the Language (use a value that is not in the input parameters - for example de) and Name parameters in the form, for example:
?YourLang=de&YourName=Peter
The final URL may look like this:
https://trial.integray.app/api/endpoint/trial-123/first-group/first-endpoint?YourLang=de&YourName=Peter
The outcome will look as follows:
[{"ResponseText":"The selected language is not in the menu, try to select another language (for example: en, cz or sk)"}]
7. Check the Runtime overviews
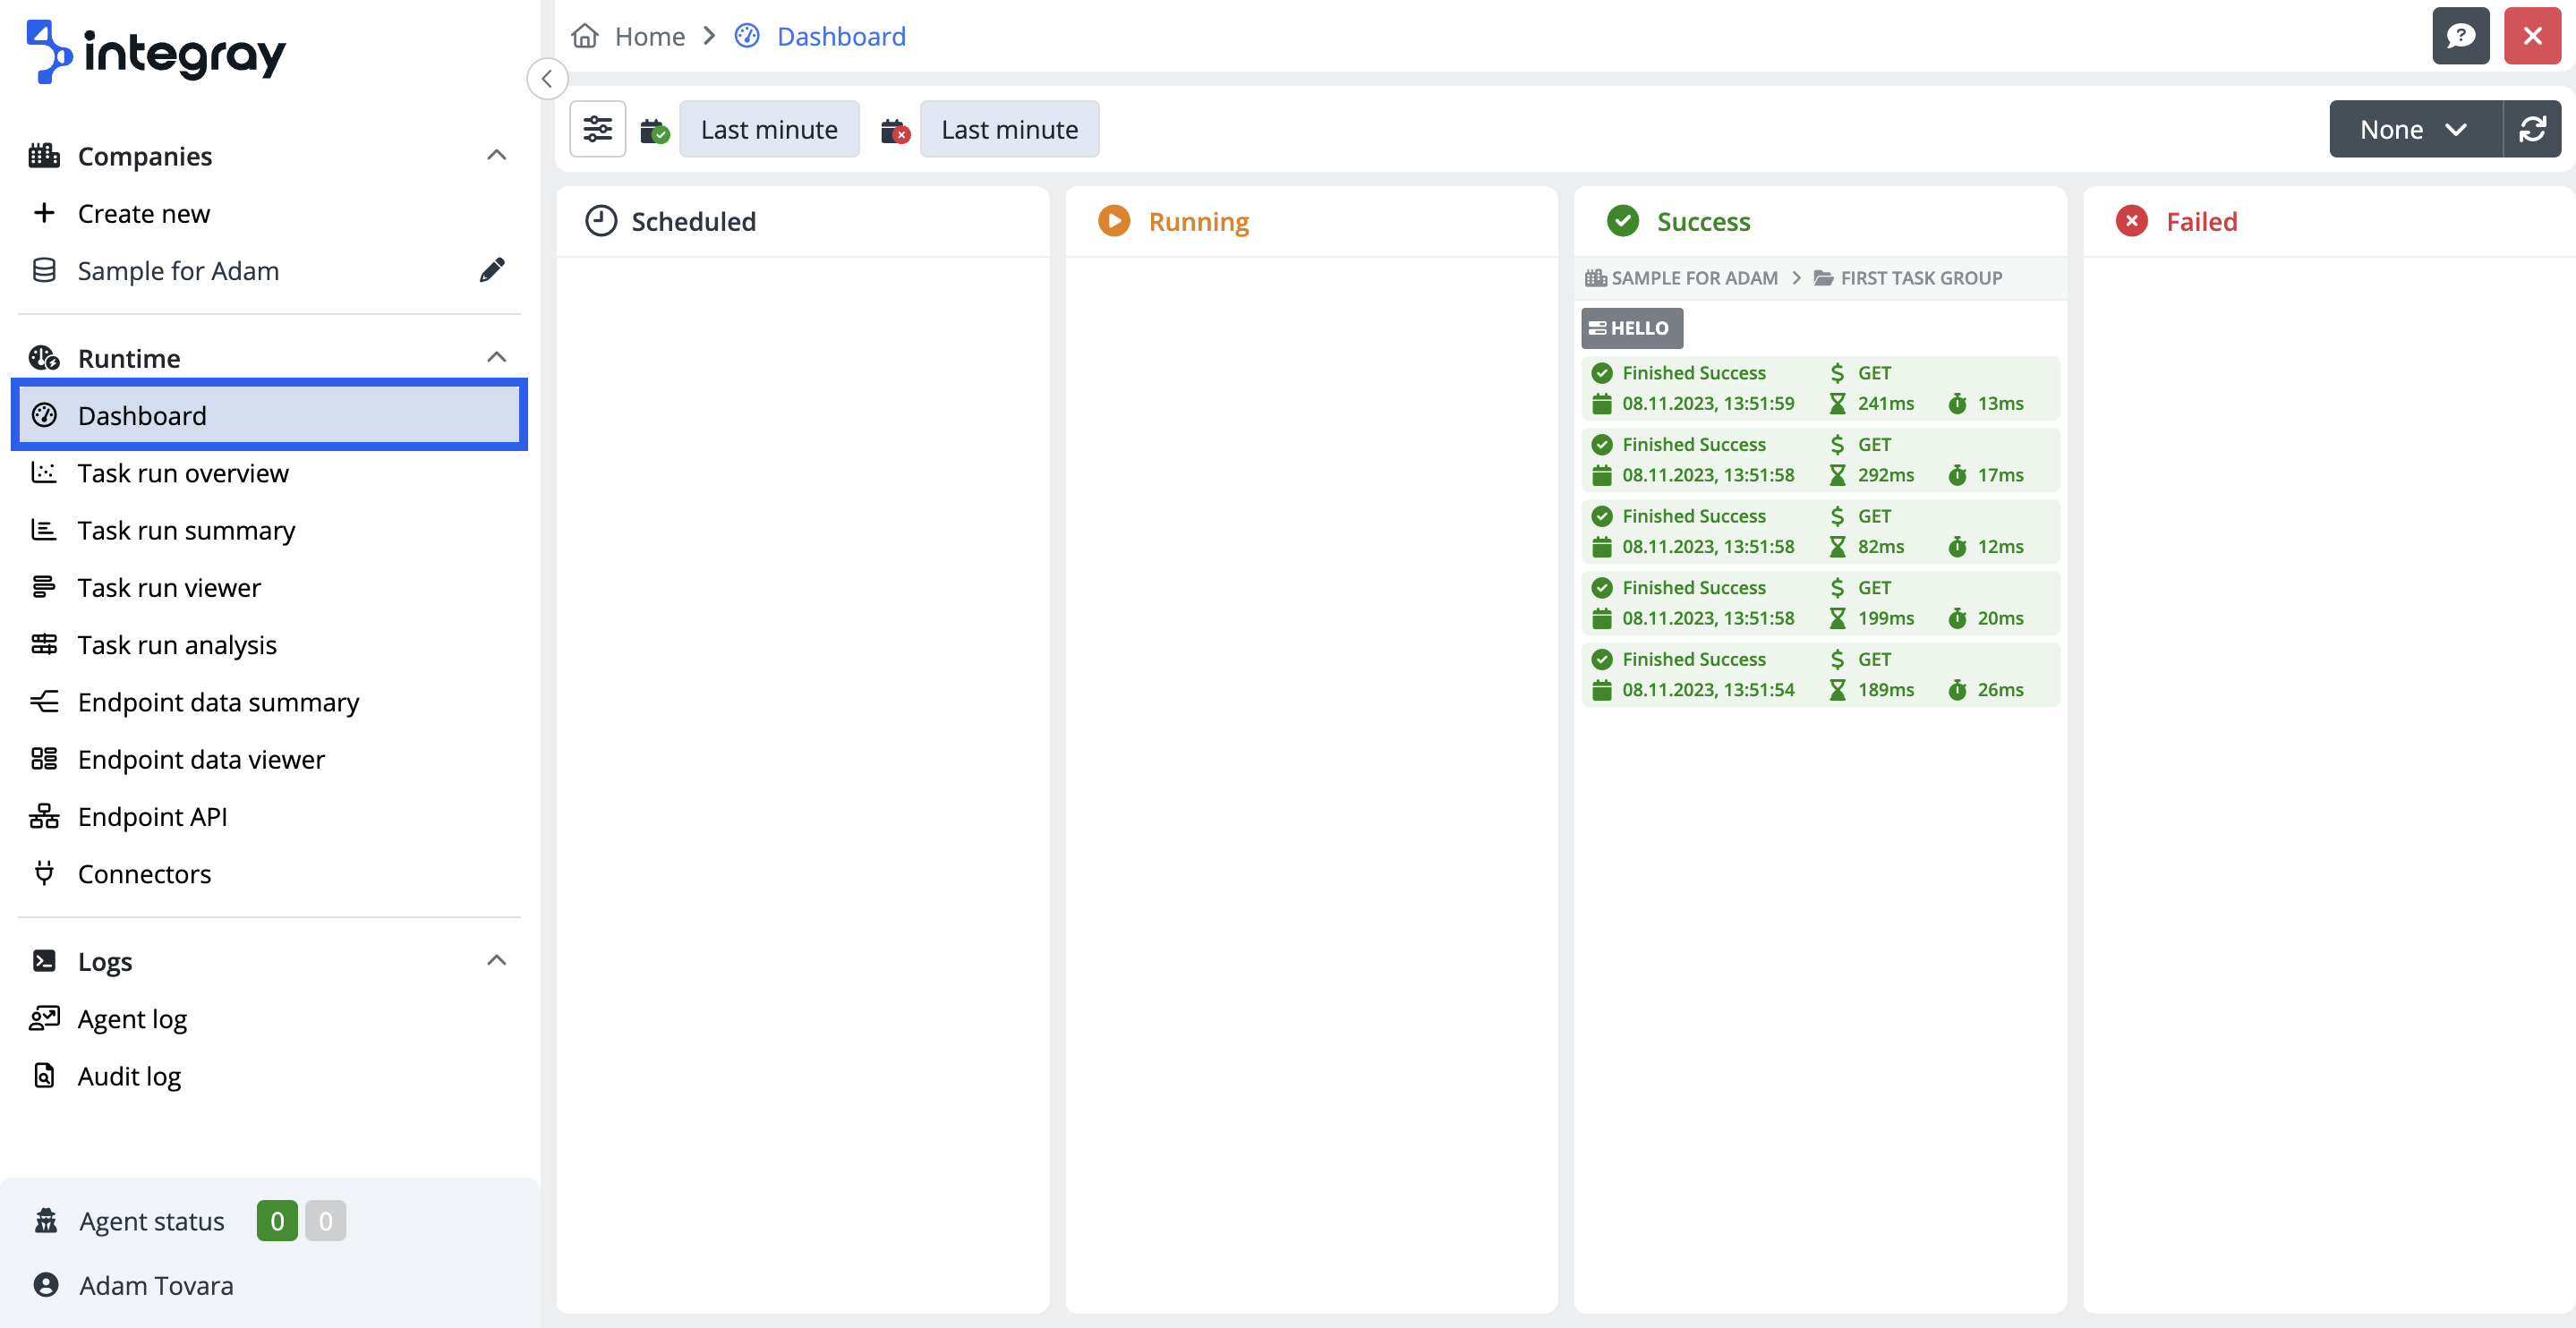
Go to the Home screen, wherein the Runtime section, you have overviews regarding Task runs and Endpoints. Use built-in filters to display required set of data.

- The Dashboard provides you with details on the status of your Task runs.
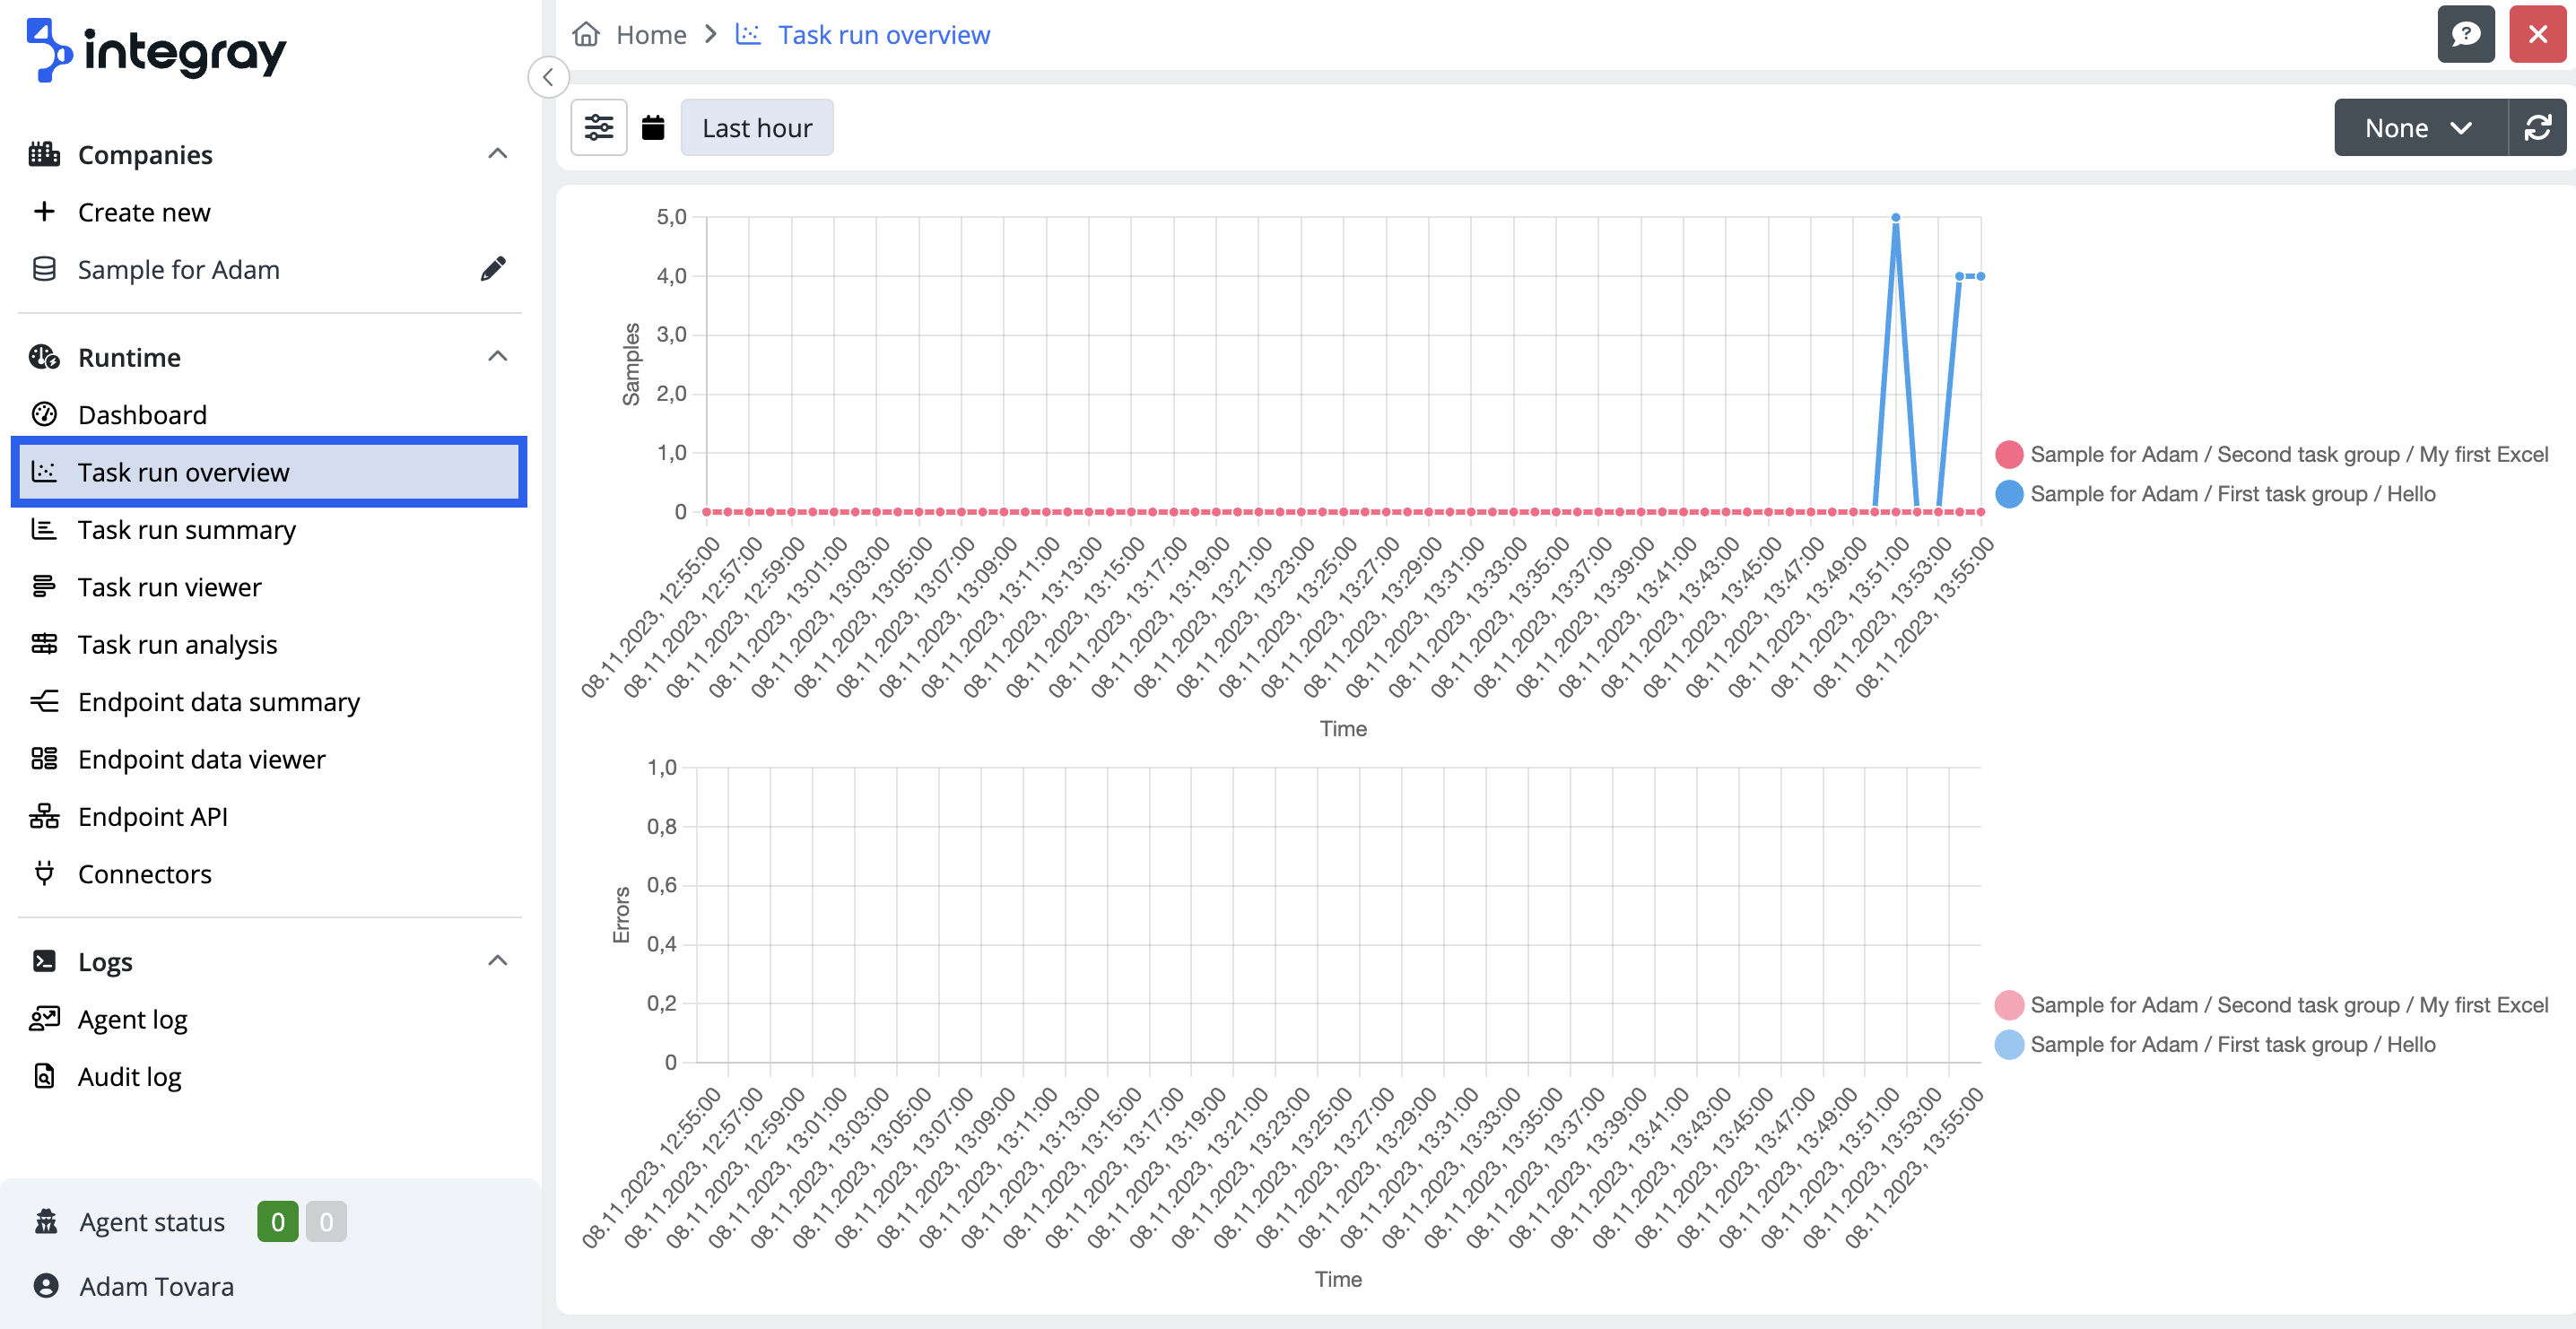
- The Task run overview provides you with 2 charts where counts of Task runs processed per minute are displayed.
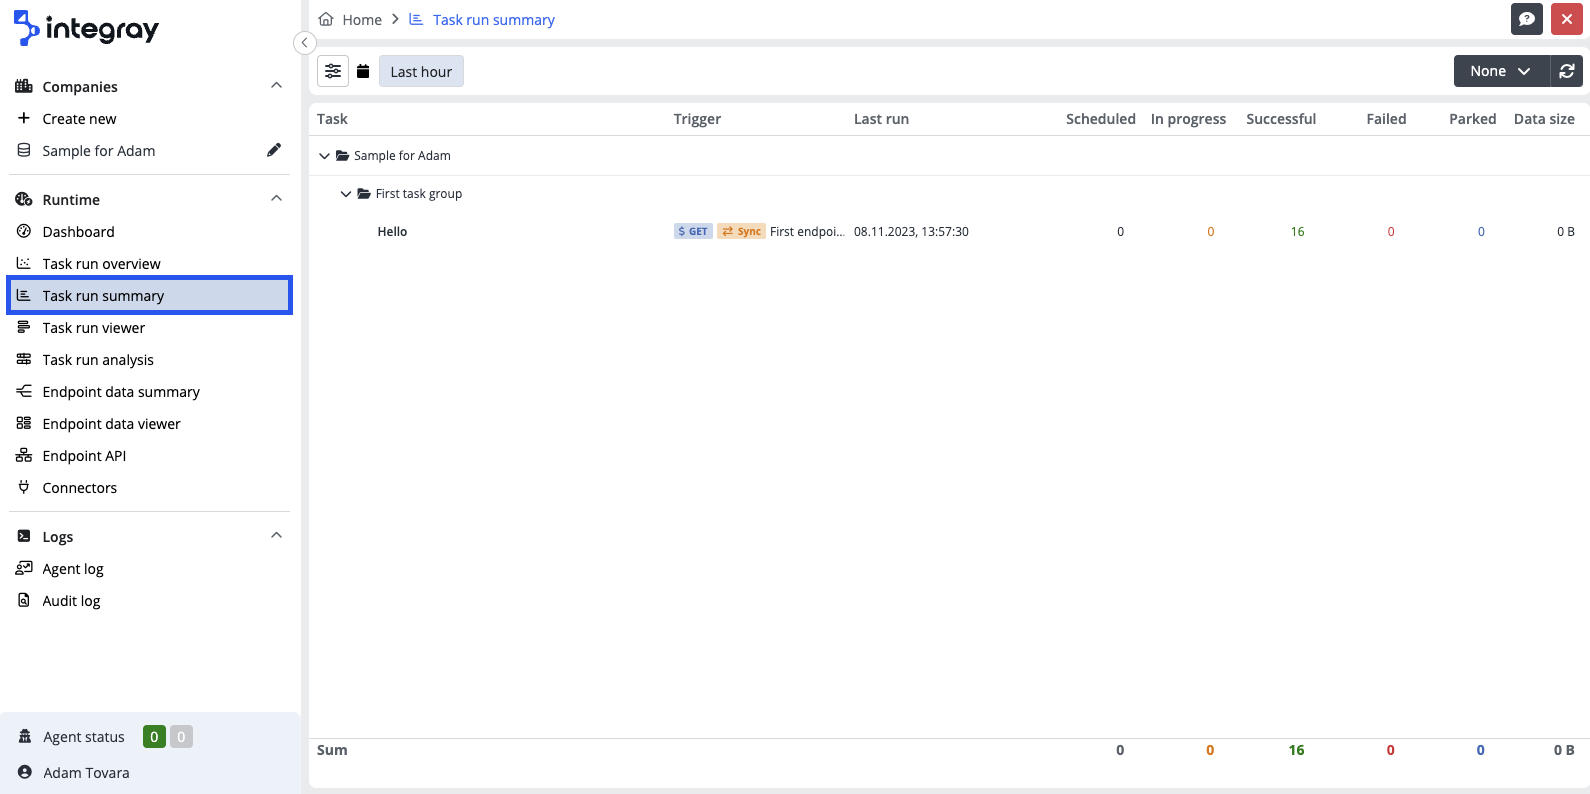
- The Task run summary provides you with an overview of the aggregated counts of your task runs.
- The Task run viewer provides you an overview of your individual task runs.

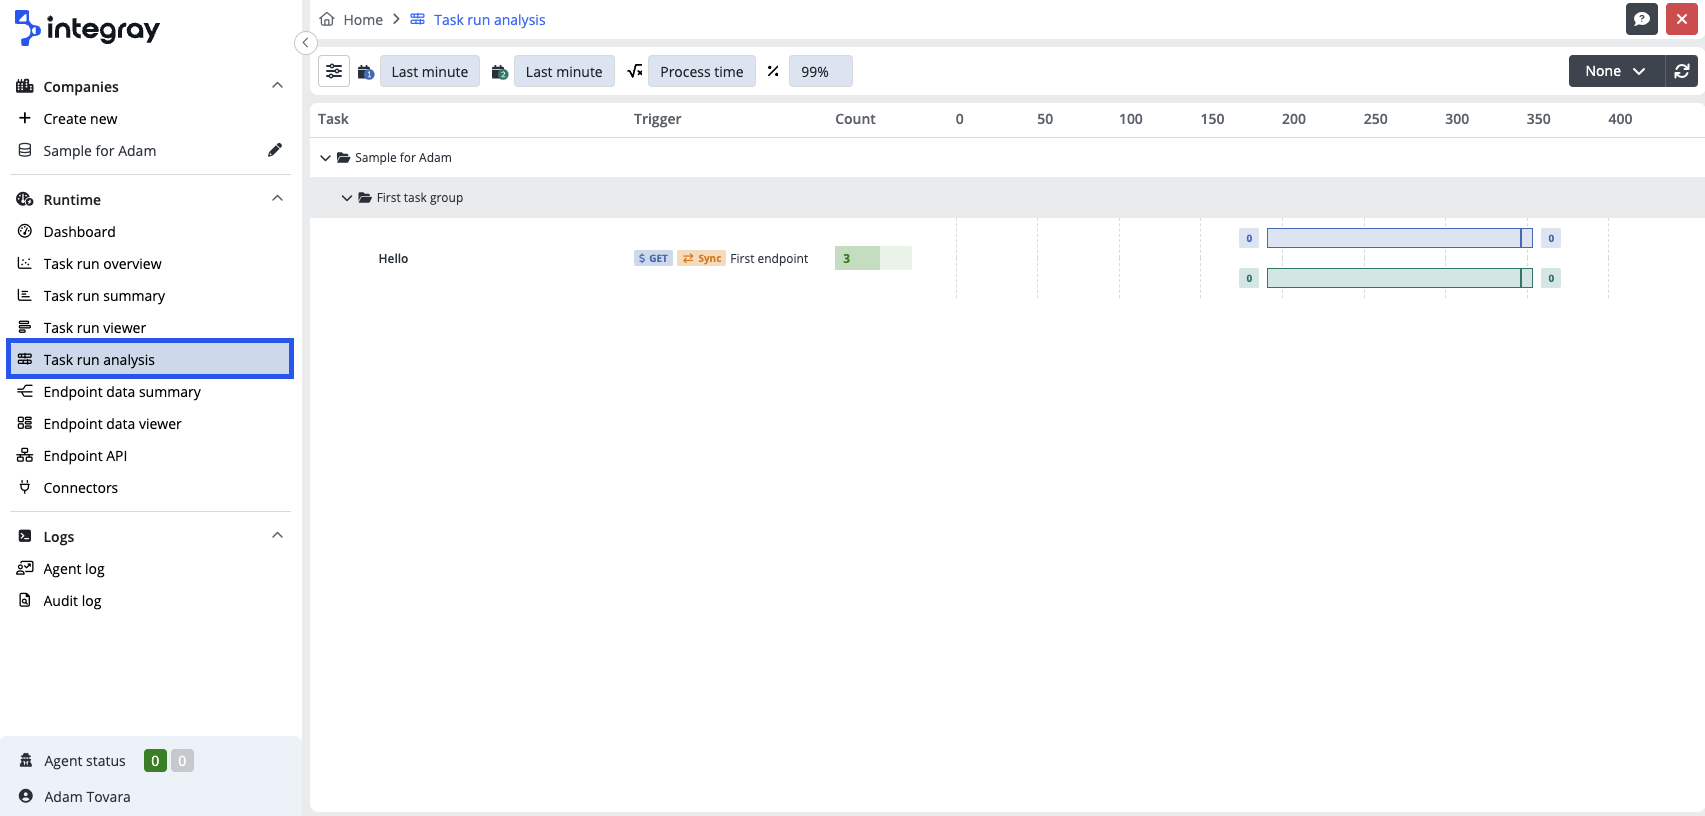
- The Task run analysis is the tool using the Box & whiskers plot for convenient display of your task run data distribution through their quartiles.
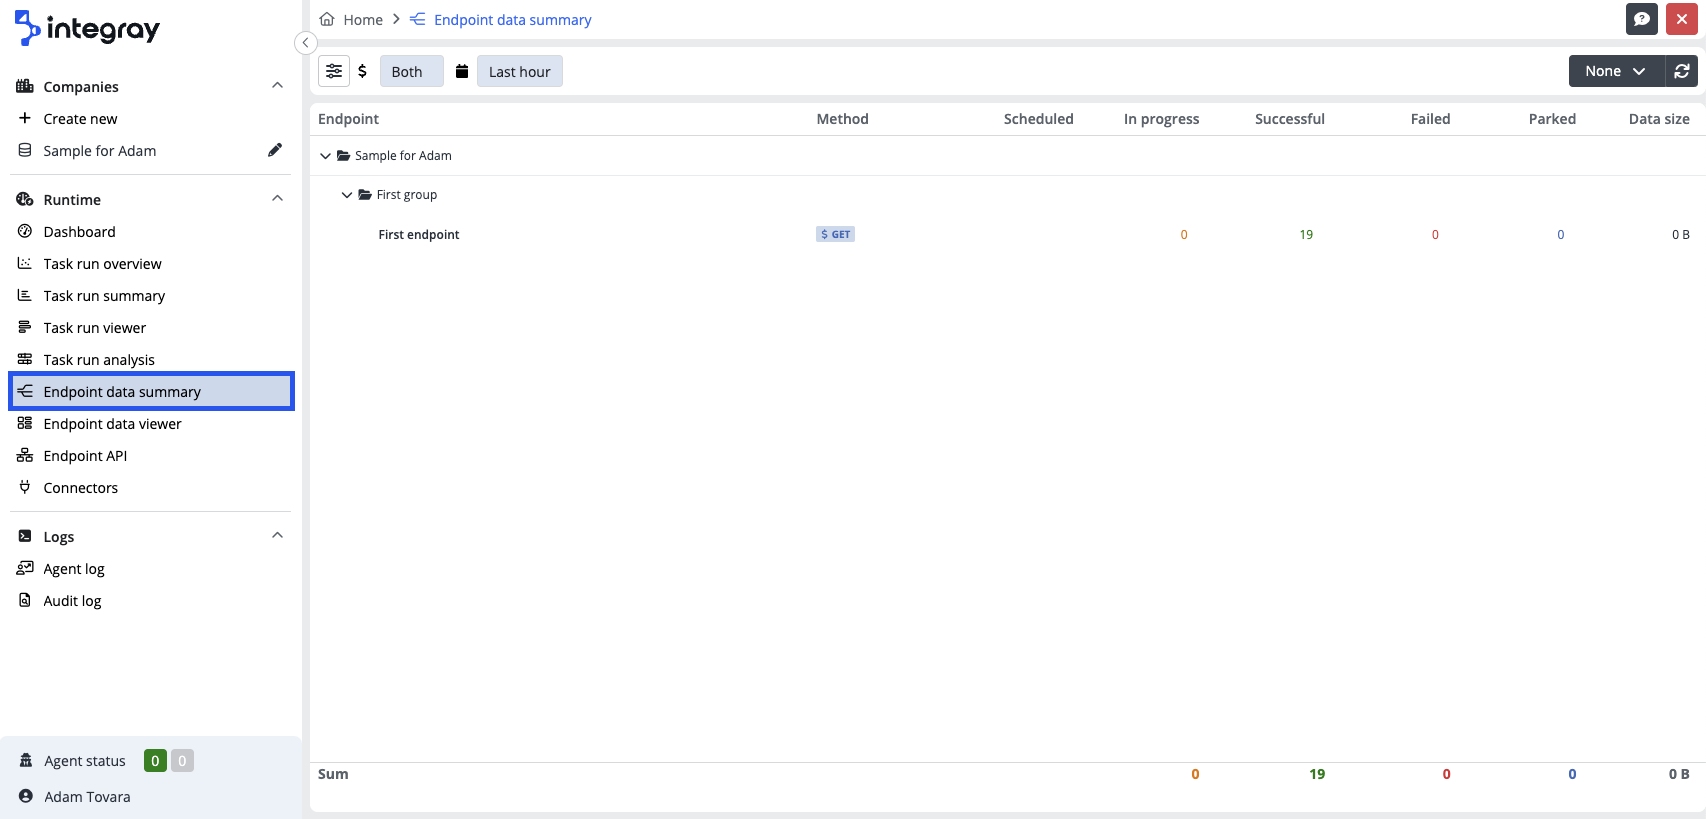
The Endpoint data summary provides you with an overview of the aggregated data counts for your configured, active endpoints.
- The Endpoint data viewer provides you with an overview of data processed on your configured, active endpoints.

- The Enpoint API provides you with the option of remote management and maintenance of the platform.

Congratulations, you have now successfully completed your first configuration. To explore the other topics, features, and functionalities and build knowledge about the configuration and setup of the integrations, please visit the following parts of the Help Center.