

Tasks
The Tasks section represents an essential workspace for creating and managing integration processes. In this workspace, bind and connect various building blocks i.e. connectors, endpoints, data schemas, agents, tokens, and variables, that have to work together in the Tasks and Task steps to execute effective and working integration.
In this documentation section, we will introduce you to the Task List, a comprehensive resource housing all integration tasks, and the individual Task as the elemental building block, collectively forming the whole integration process.
Task list
The content navigation menu option Tasks navigates you to the Task list, where all the configured integration tasks are listed. The default view displays the active integration tasks grouped by user defined groups.
By default, the Task list displays tasks that any users have configured. If you want to view tasks based on an applied Template, look to the upper right corner, next to the Publish button, where you'll find the Template selector. You can choose a specific template, and based on that selection, tasks from the applied template will be displayed in the task list. This feature lets you quickly switch between different sets of tasks, streamlining the process of managing and analyzing your integration tasks according to the templates you've applied.

In the upper section of the Task List, you will find a search field for quick and efficient task filtering. This search functionality enables you to locate specific tasks swiftly. Additionally, a prominently placed button labeled Only not executable allows you to filter and display tasks that are currently not executable for various reasons, such as missing configurations.
In the right part, you can see the Show in/active button, which switches between active and inactive tasks views, and the + Add button, which starts the configuration of a new task and opens the task editor.

Task list view provides you with essential information about the Tasks:
-
Group/Task - The group name and the Task name.
-
Trigger - The trigger starting the task.
-
Max instances - Maximum instances allowed for the task.
-
Priority - Integration priority set for the task.
-
Runnability - The task status from runnability perspective.
-
Executability - The task status from executability perspective.

The task line contains two more controls (dependent on the completeness of the configuration):
-
De-activate/Activate buttons (trash bin and recycle triangle icons) - This will deactivate or activate again the selected task.
-
Play button (play icon) - This will start immediatelly the task.

Click the + Add button, enter the task editor and configure the new integration Task.
Task
The Task is the fundamental building block that constitute the whole integration process. The Task can consists of one or more Task steps connected to each other. The individual task steps are using the platform available connectors to execute the part of the integration process.
Task header menu
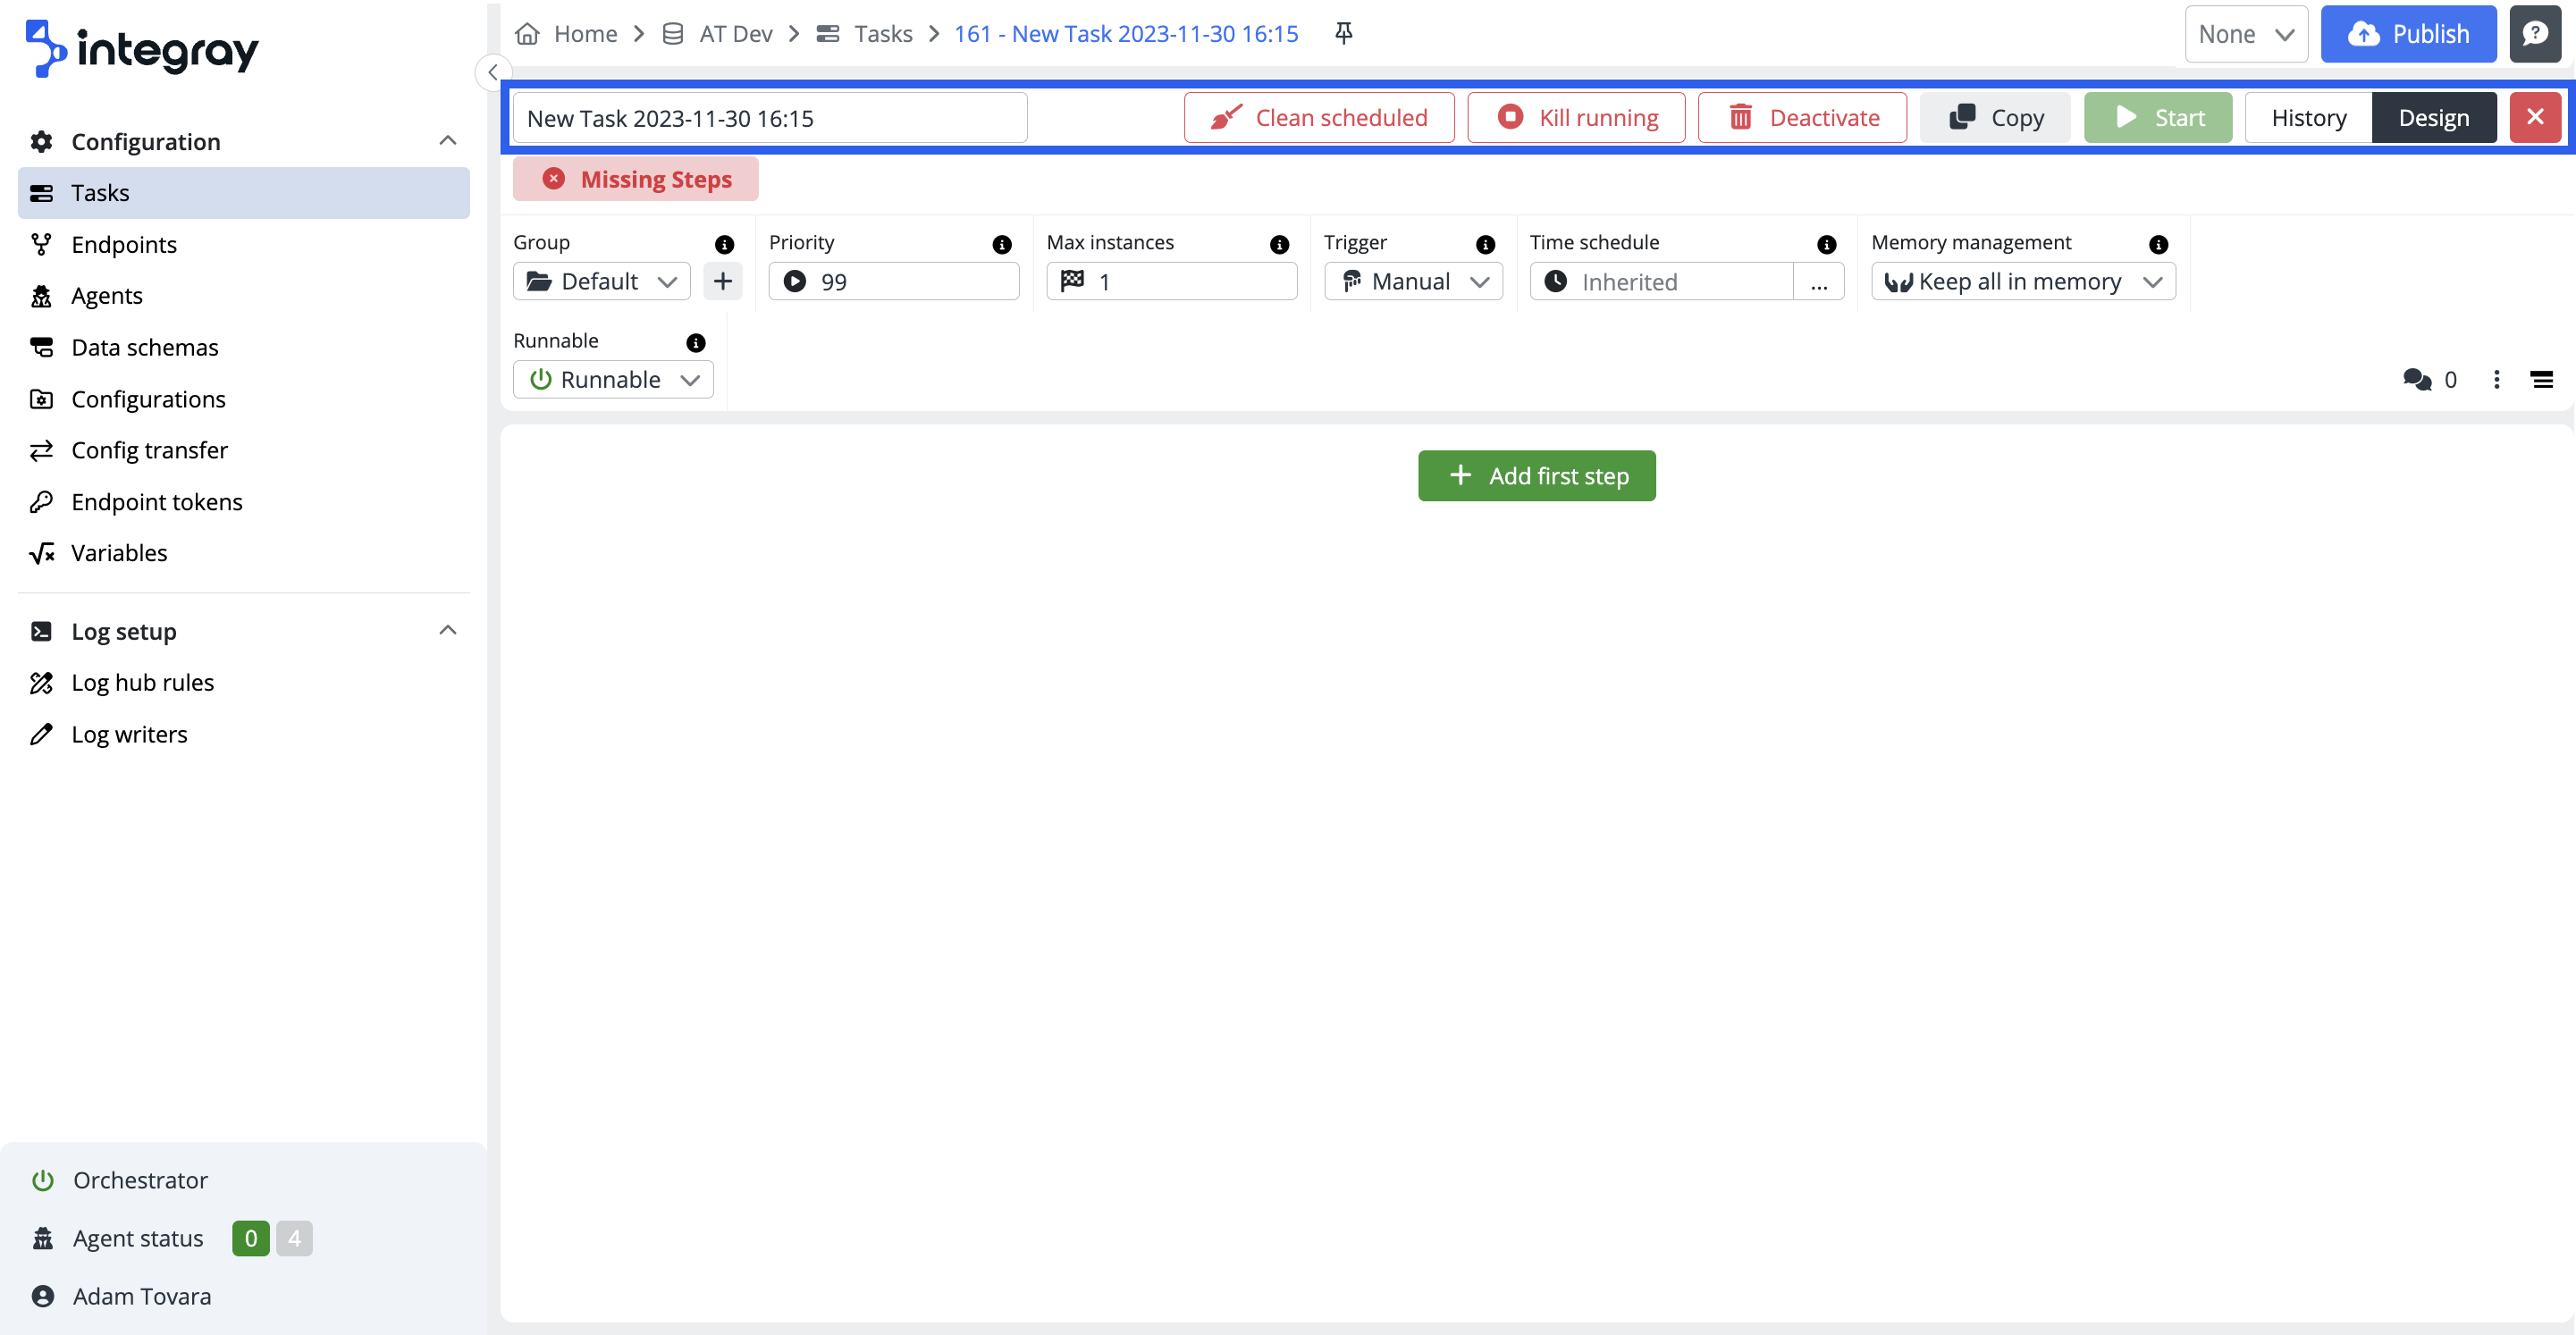
Task name field
The name for the entire task. Under this name, the task will appear in the task list. The default task name generated by the system is always in the format "New Task YYYY-MM-DD HH:MM".
The selected task name does not necessarily have to be unique. When creating a new task, it is possible to choose the same name as that of any previously created tasks, whether they are active, inactive, or deleted.
Executability status
-
Missing steps - No task steps are defined for the task. This is the default warning message when starting to create a new task.
-
Incorrect mapping - Mapping of the output schema of the preceding step to the input schema of the following step does not match and the handover of the data between steps is not in line with the set rules.
-
Plugin disabled - Plugin is disabled.
-
Connector disabled - The connector is disabled.
-
Incorrect endpoint output mapping - Mapping for outgoing data between the task step and the endpoint does not match.
-
Incorrect endpoint output mapping - Mapping for incoming data between the endpoint and the bound task does not match.
-
Executable - The task is correctly configured from an executability perspective.
Executability warning messages
The status "Executable" is only displayed on the Task list, not on the Task header menu. On the Task header menu only the negative warning messages are displayed. It can be one or combination of more warnings.
Clean scheduled button
Click the Clean scheduled button to remove all scheduled task runs for the respective task. There is additional modal dialog window asking you to confirm the action. Hit the button continue to proceed.
Kill running button
Click the Kill running button to kill all the running task runs for the respective task. There is additional modal dialog window asking you to confirm the action. Hit the button continue to proceed.
Deactivate
Click the Deactivate button to deactivate the respective task. There is additional modal dialog window asking you to confirm the action. Hit the button continue to proceed.
Activate
Click the Activate button to Activate again the respective task. There is additional modal dialog window asking you to confirm the action. Hit the button continue to proceed.
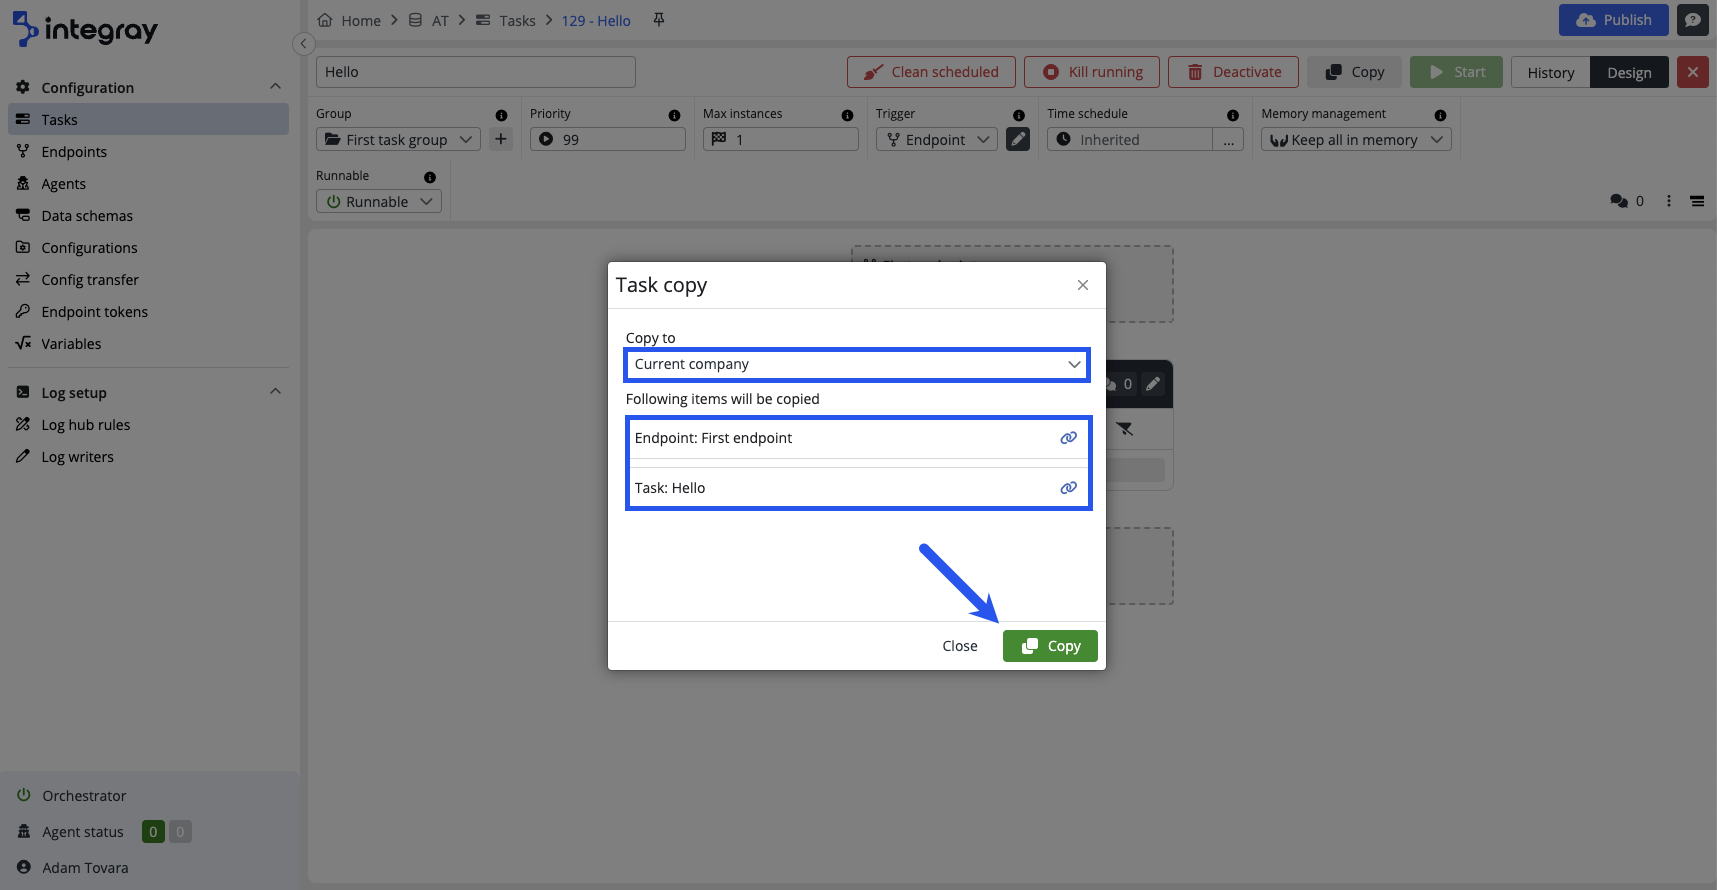
Copy
The copy button is available in the Design view and the History view.
Click the Copy button to copy the task and its active task steps to the same or another company within the installation.
The Copy button ensures the duplication of tasks, whether connected or not, to an endpoint.
In the modal dialog window Task copy you will see which items will be copied. Select the destination company from the list of available companies. The default is the current company.
Click the Copy button to proceed and finish the copy of the task.
Warning
Make sure you understand the following specific related to task copy:
-
The Copy task is copied into the same task group as the original task.
-
The Copy task will have the same name as the original unless it is copied into the same company. In such a case suffix "copy" will be added.
-
If the steps involve private configurations, those will also be copied. The copied configuration names will be suffixed with "copy."
-
The Copy task will be set to the "Not runnable" state.
-
In the case of a copy to the current company, no connector storage data, data schemas, or agents are as part of the process.
-
If you copy a task to another company, data schemas, configurations, endpoitns, agents, task groups and endpoint groups will also be part of the copy.
-
Publish the changes after you complete the copying process.
Start button
Click the Start button to manually start the integration task.
History view button
Click the History button to switch to the History view, where the task run history is displayed based on the selected period.
Design view button
Click the Design button to switch to Design view, where the task can be configured.
Close button
Click the red square with cross button to exit the workspace of the task and return back to the Task list.
In the Task section, users are provided with a versatile interface that comprises two distinct views: Design view and History view. These views offer unique functionalities tailored to different aspects of task management and analysis. The Design view serves as the default perspective, guiding users through the configuration of both the task and individual task steps during the creation process. On the other hand, the History view provides an insightful retrospective, allowing users to explore the details of past task runs within a specified date range. For more detailed information, refer to the Design view chapter, and for insights into the History view, consult the History view chapter.