Configuration transfer
Configuration transfer is a tool enabling the transfer of the configuration settings between environments.
This platform functionality provides for the transfer of the following configurations and setups:
-
Agents
-
Endpoints
-
Endpoint groups
-
Tasks
-
Task groups
-
Data schemas
-
Configurations
-
Variables
-
Tags
-
Secondary comments
-
Entity comments
-
Connectors (to compare and evaluate available connectors in thetarget environment)
The config transfer process consists of the following steps:
flowchart LR
A[Download configuration in environment X] --> B[Upload configuration in environment Y]
B --> C[Adjust uploaded configuration]
C --> D[Import configuration]
classDef someclass fill:#ebf5eb
Config transfer list
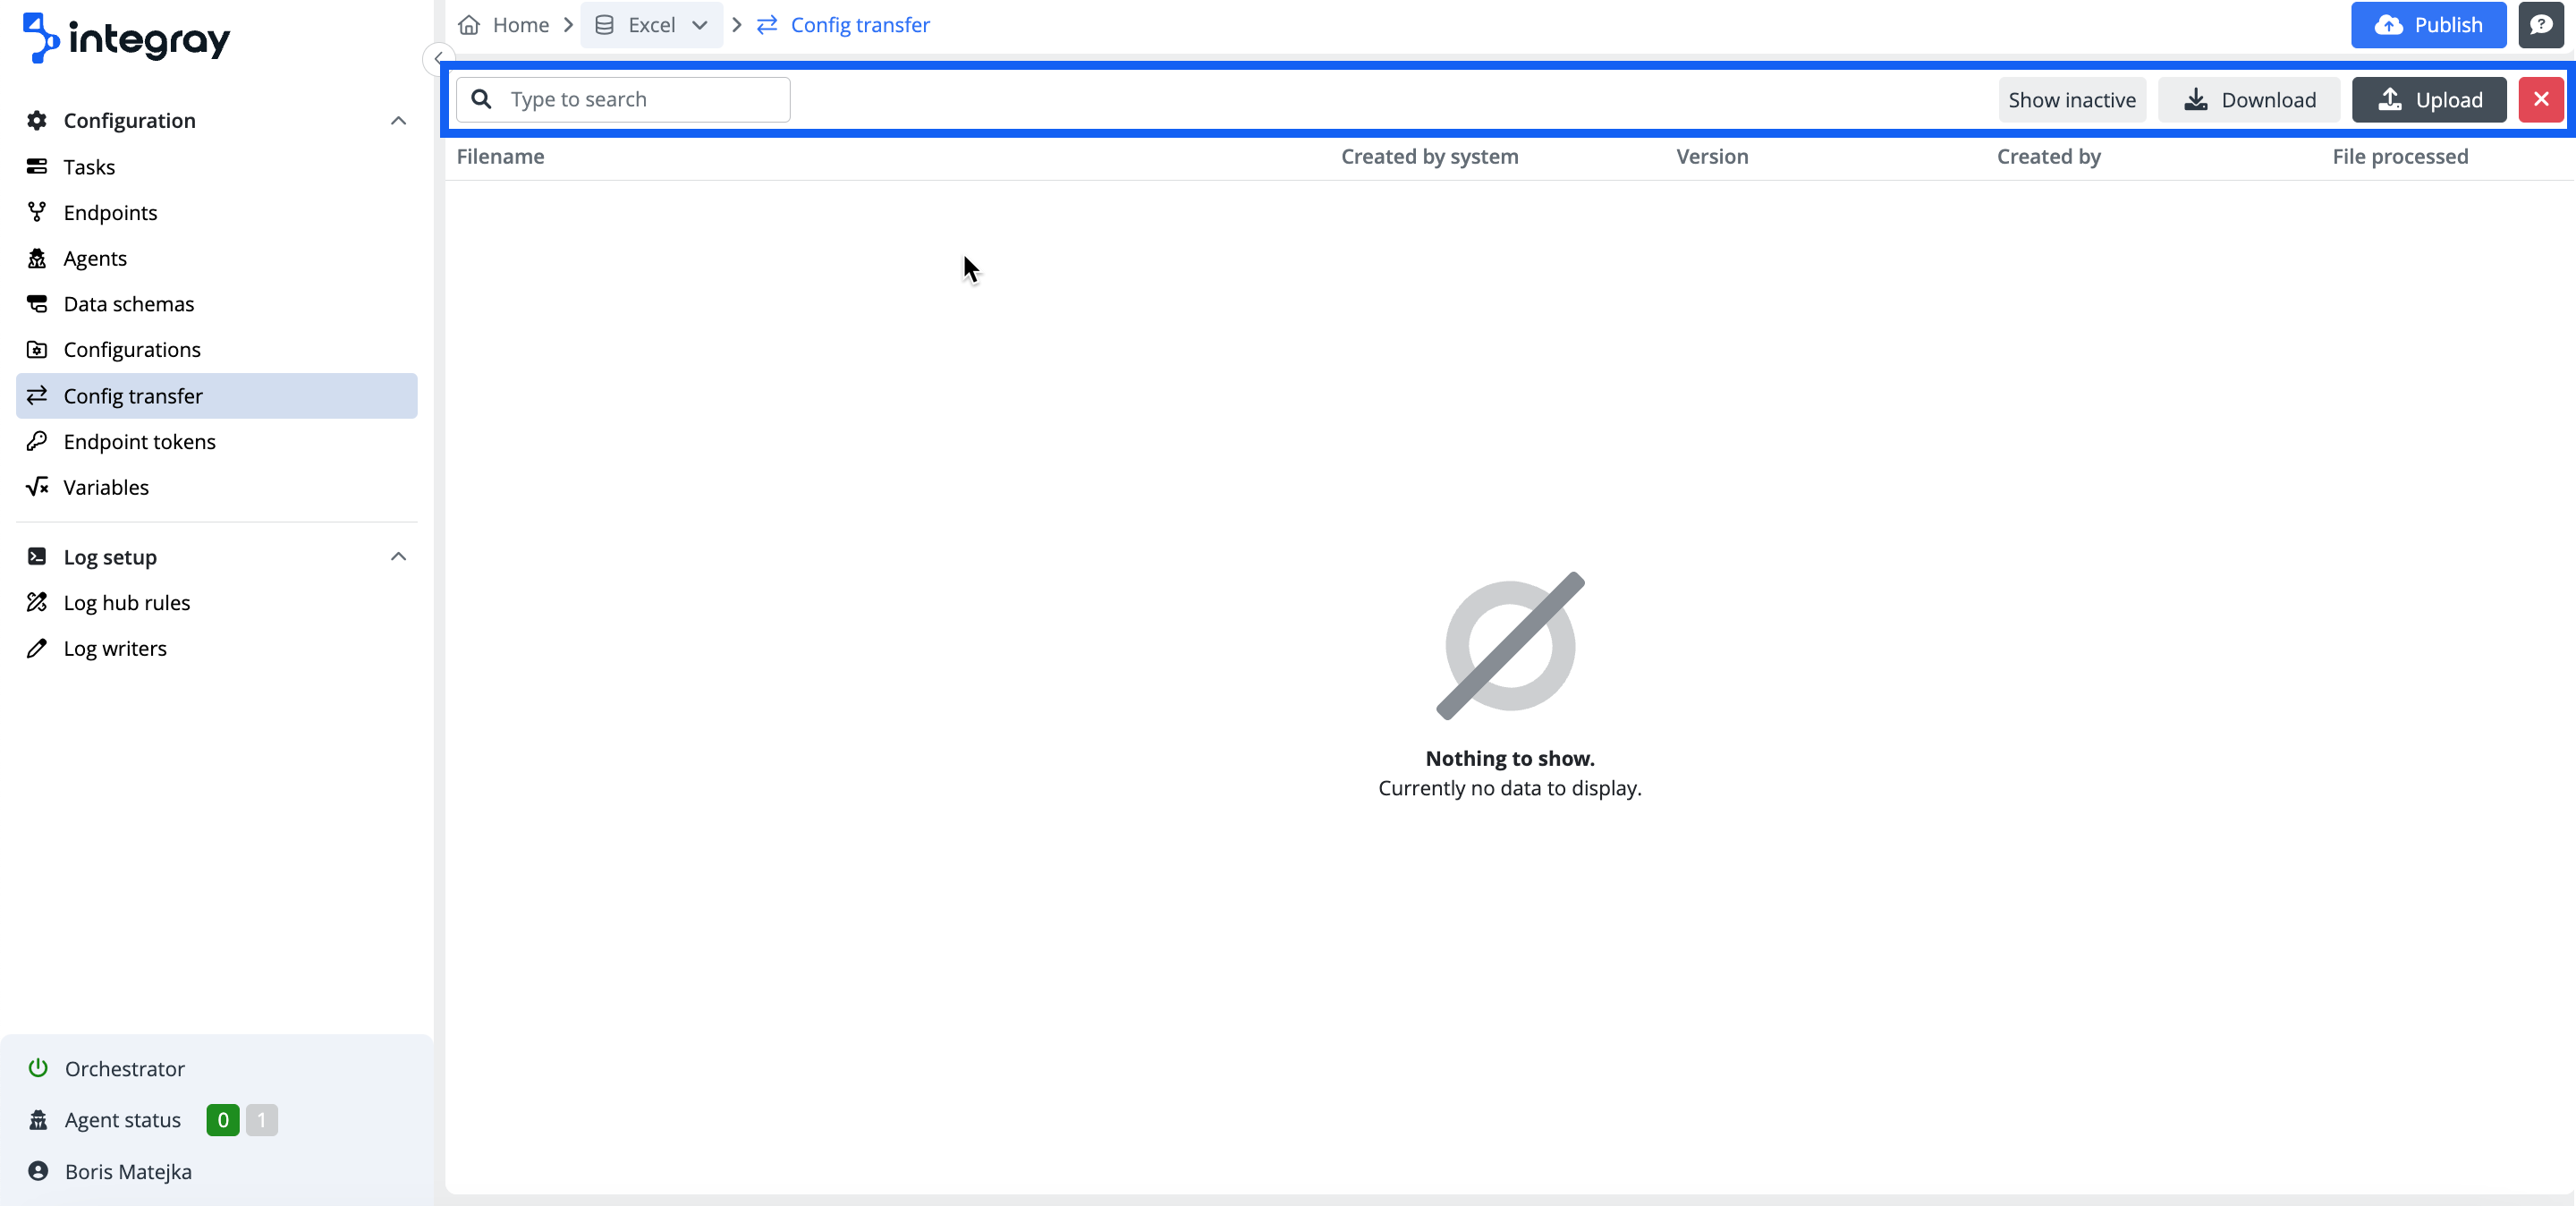
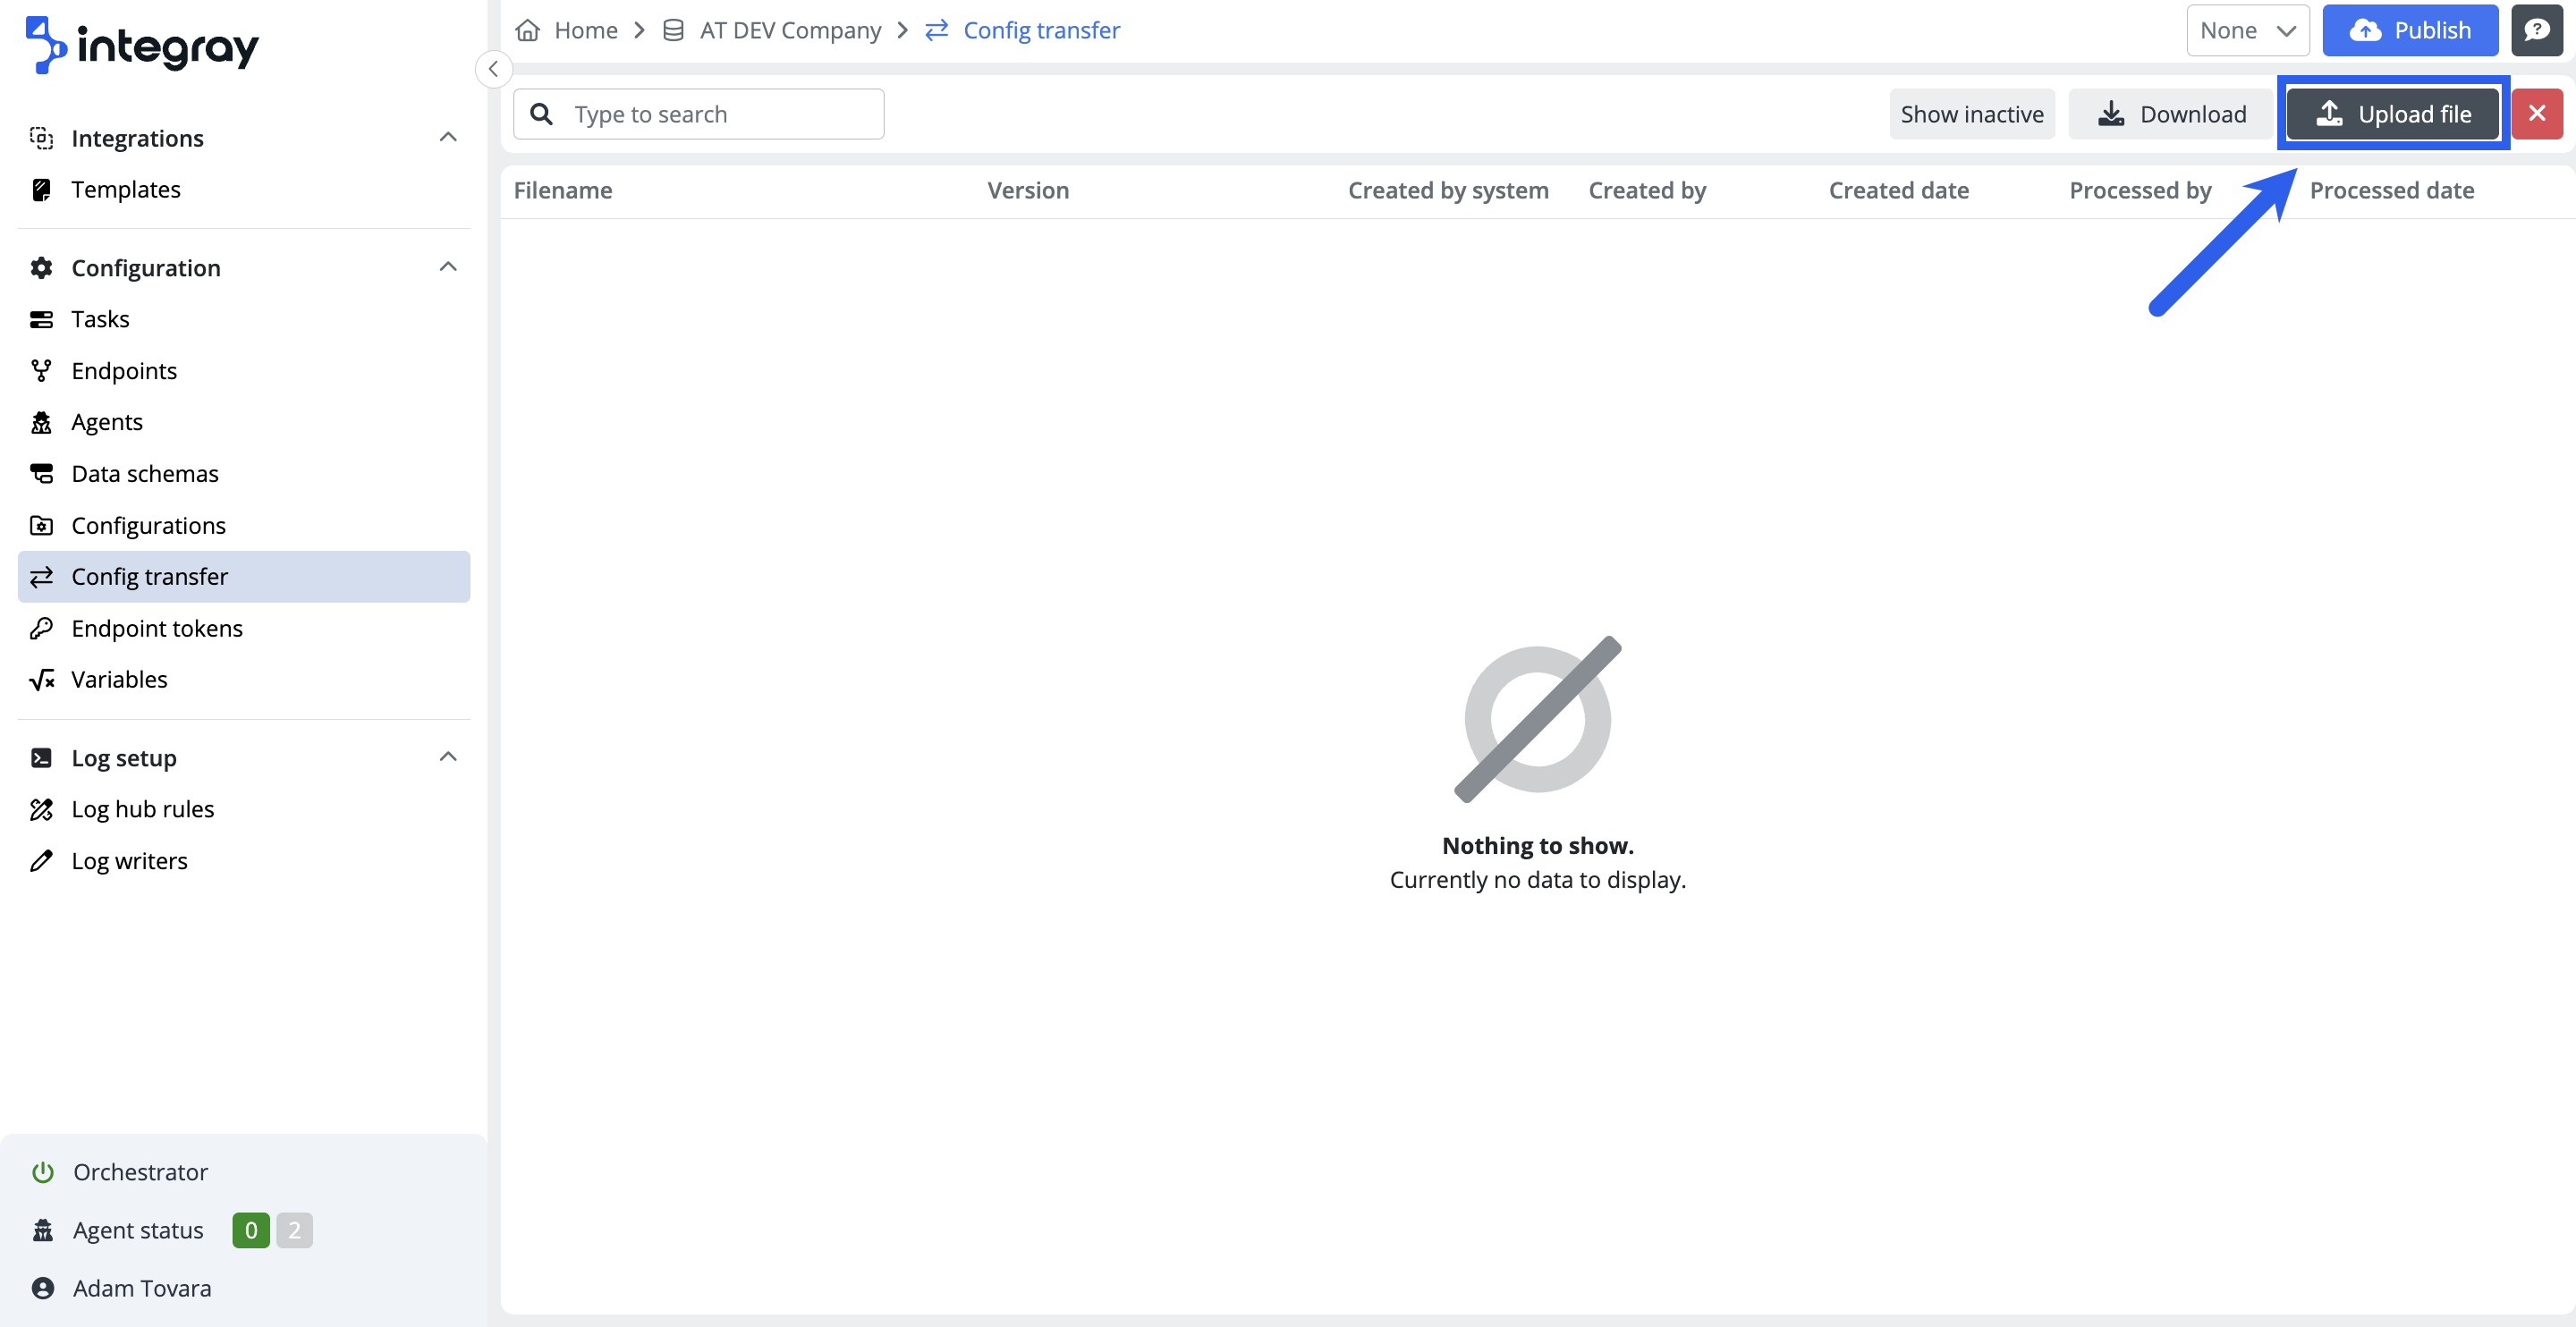
The initial config transfer list is empty. The records on the list are shown only after the upload of your transfer file. The config transfer list provides the user with relevant information about the single transfer in tabular (grid) format.
The config transfer list screen consists of a header and columns.
Header row
The header contains:
-
Search field - This facilitates the finding of the required config transfer. The search is looking into values of the Filename, Created by system, Version, and Created by columns.
-
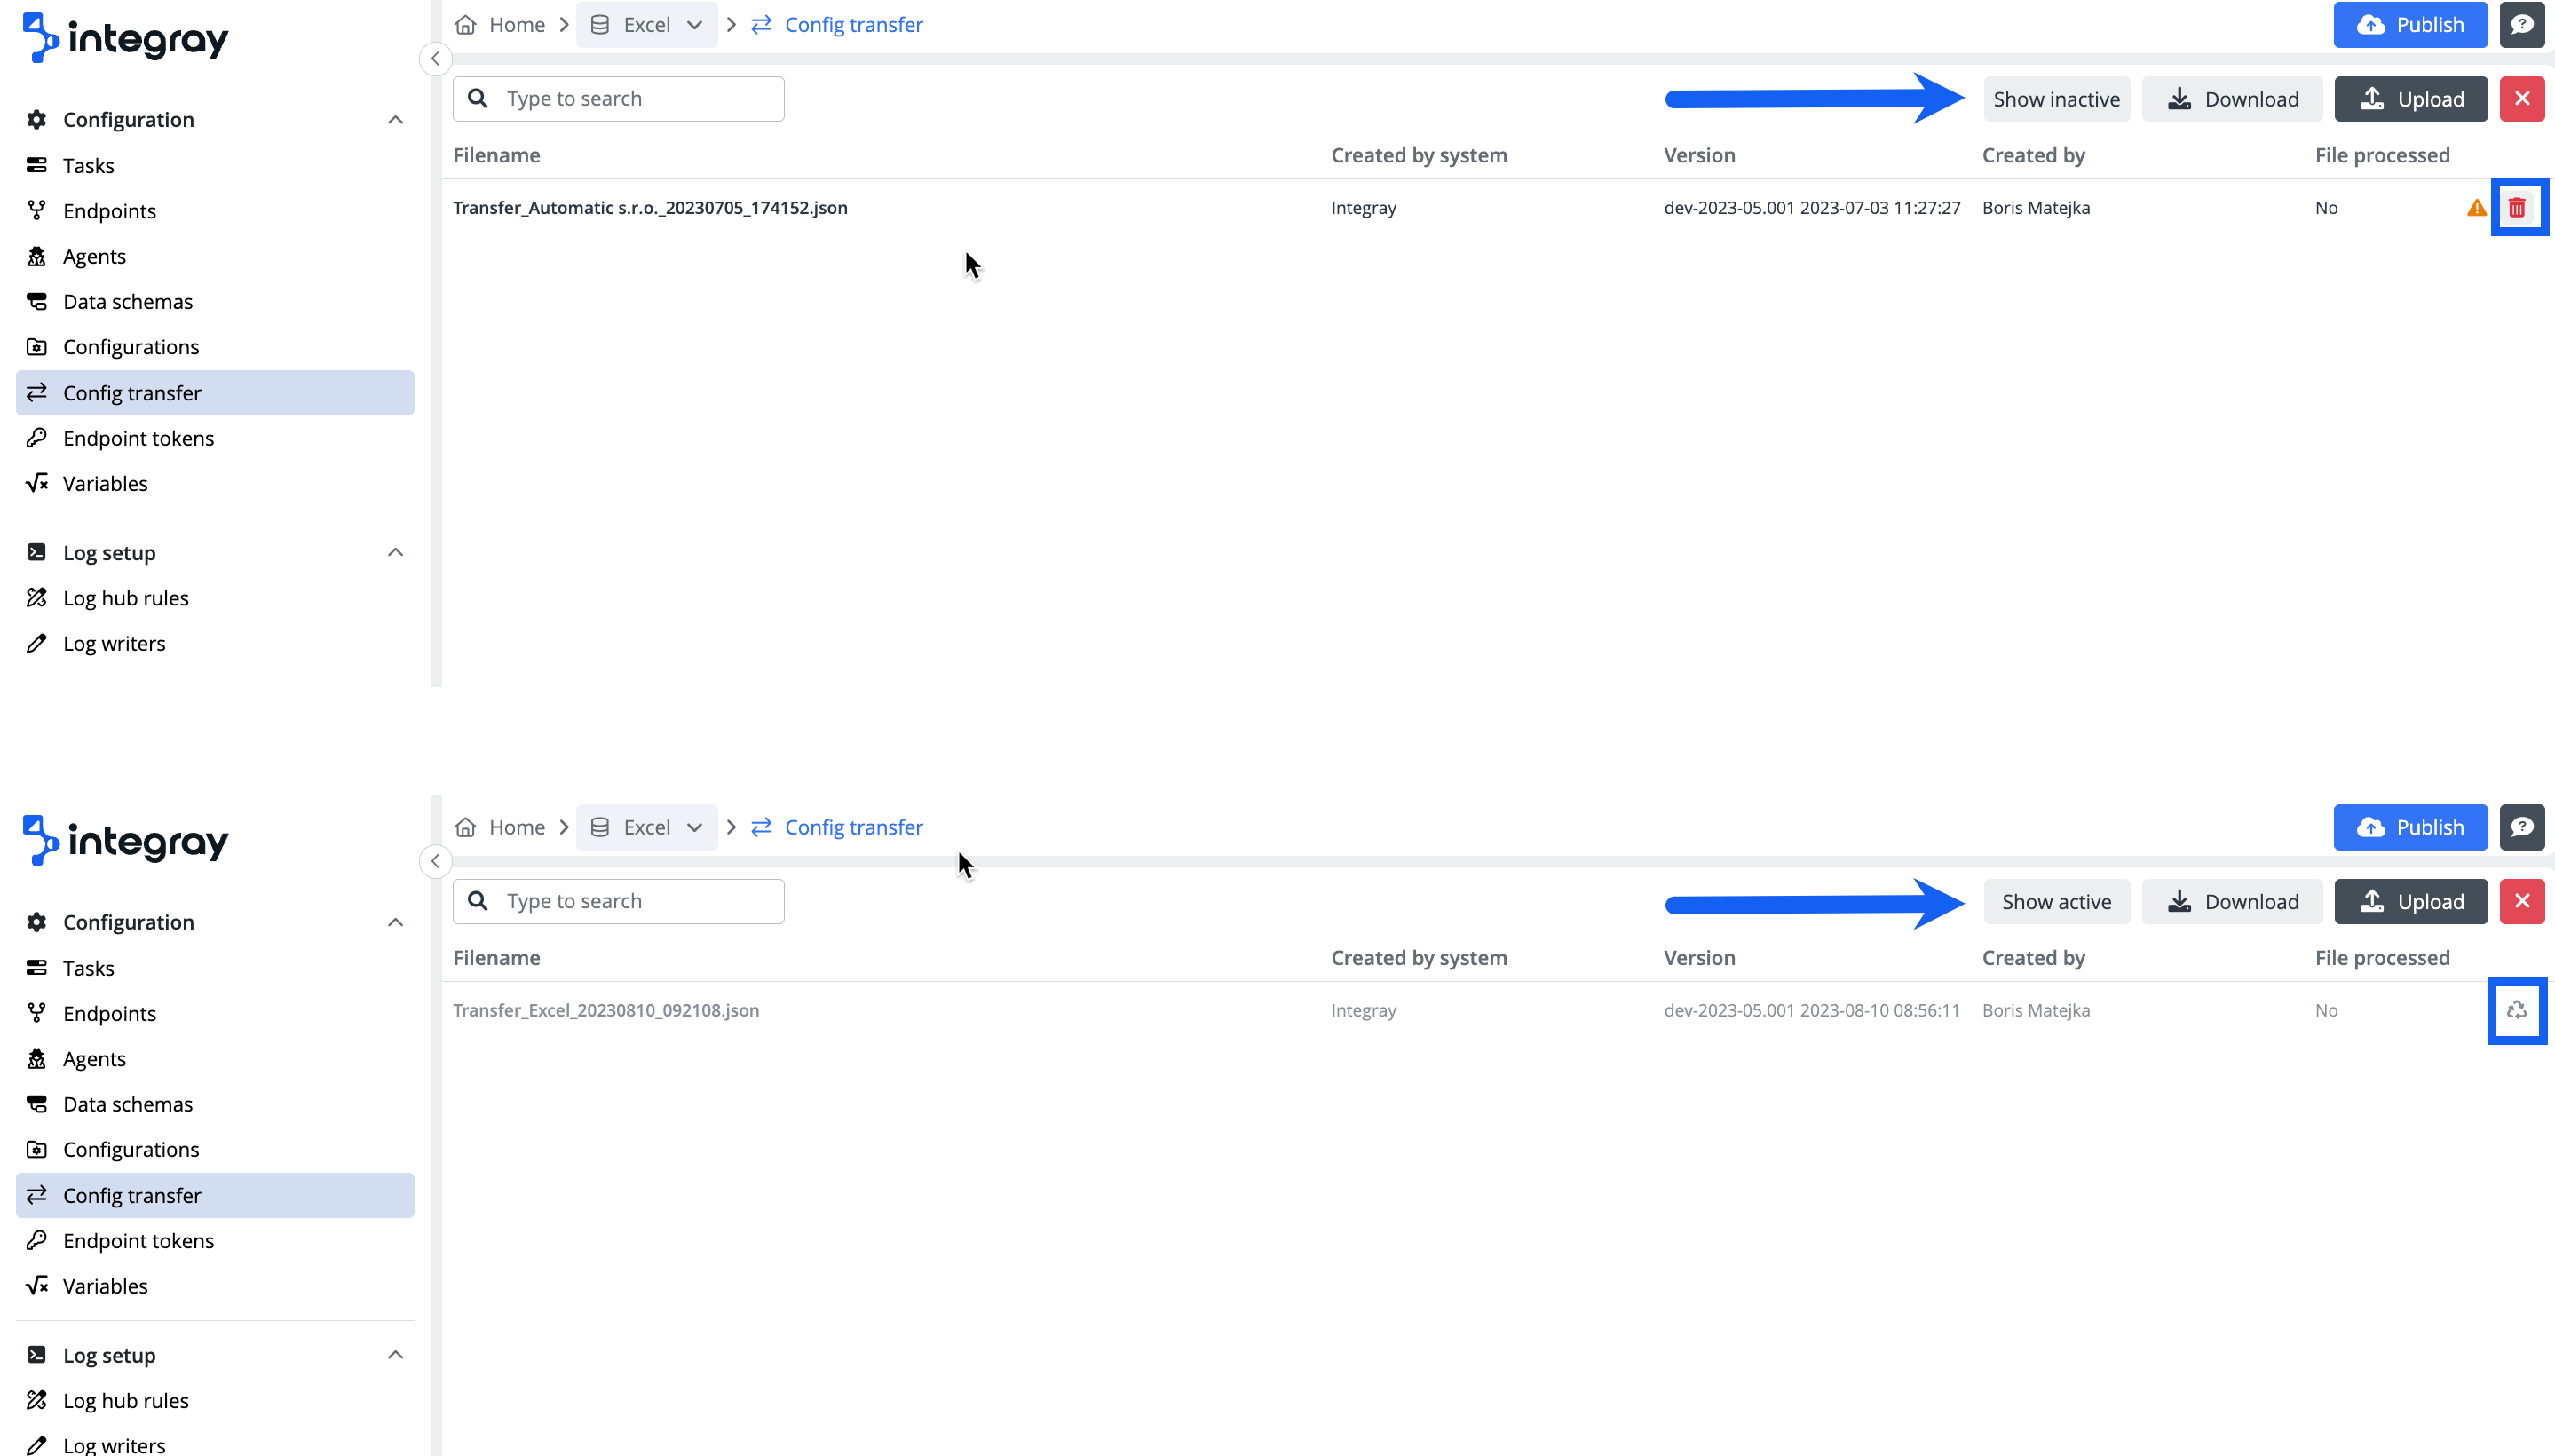
Show inactive button - The switch to inactive config transfers view. In case you are in the inactive transfers view, the Show active button will be displayed. Click the button to return to the active transfers view.
-
Download button - This executes the configuration download of the current company.
-
Upload button - This enables the selection of the config transfer file and upload of the file into the target company.
-
Exit button - This exits the Config transfer list.
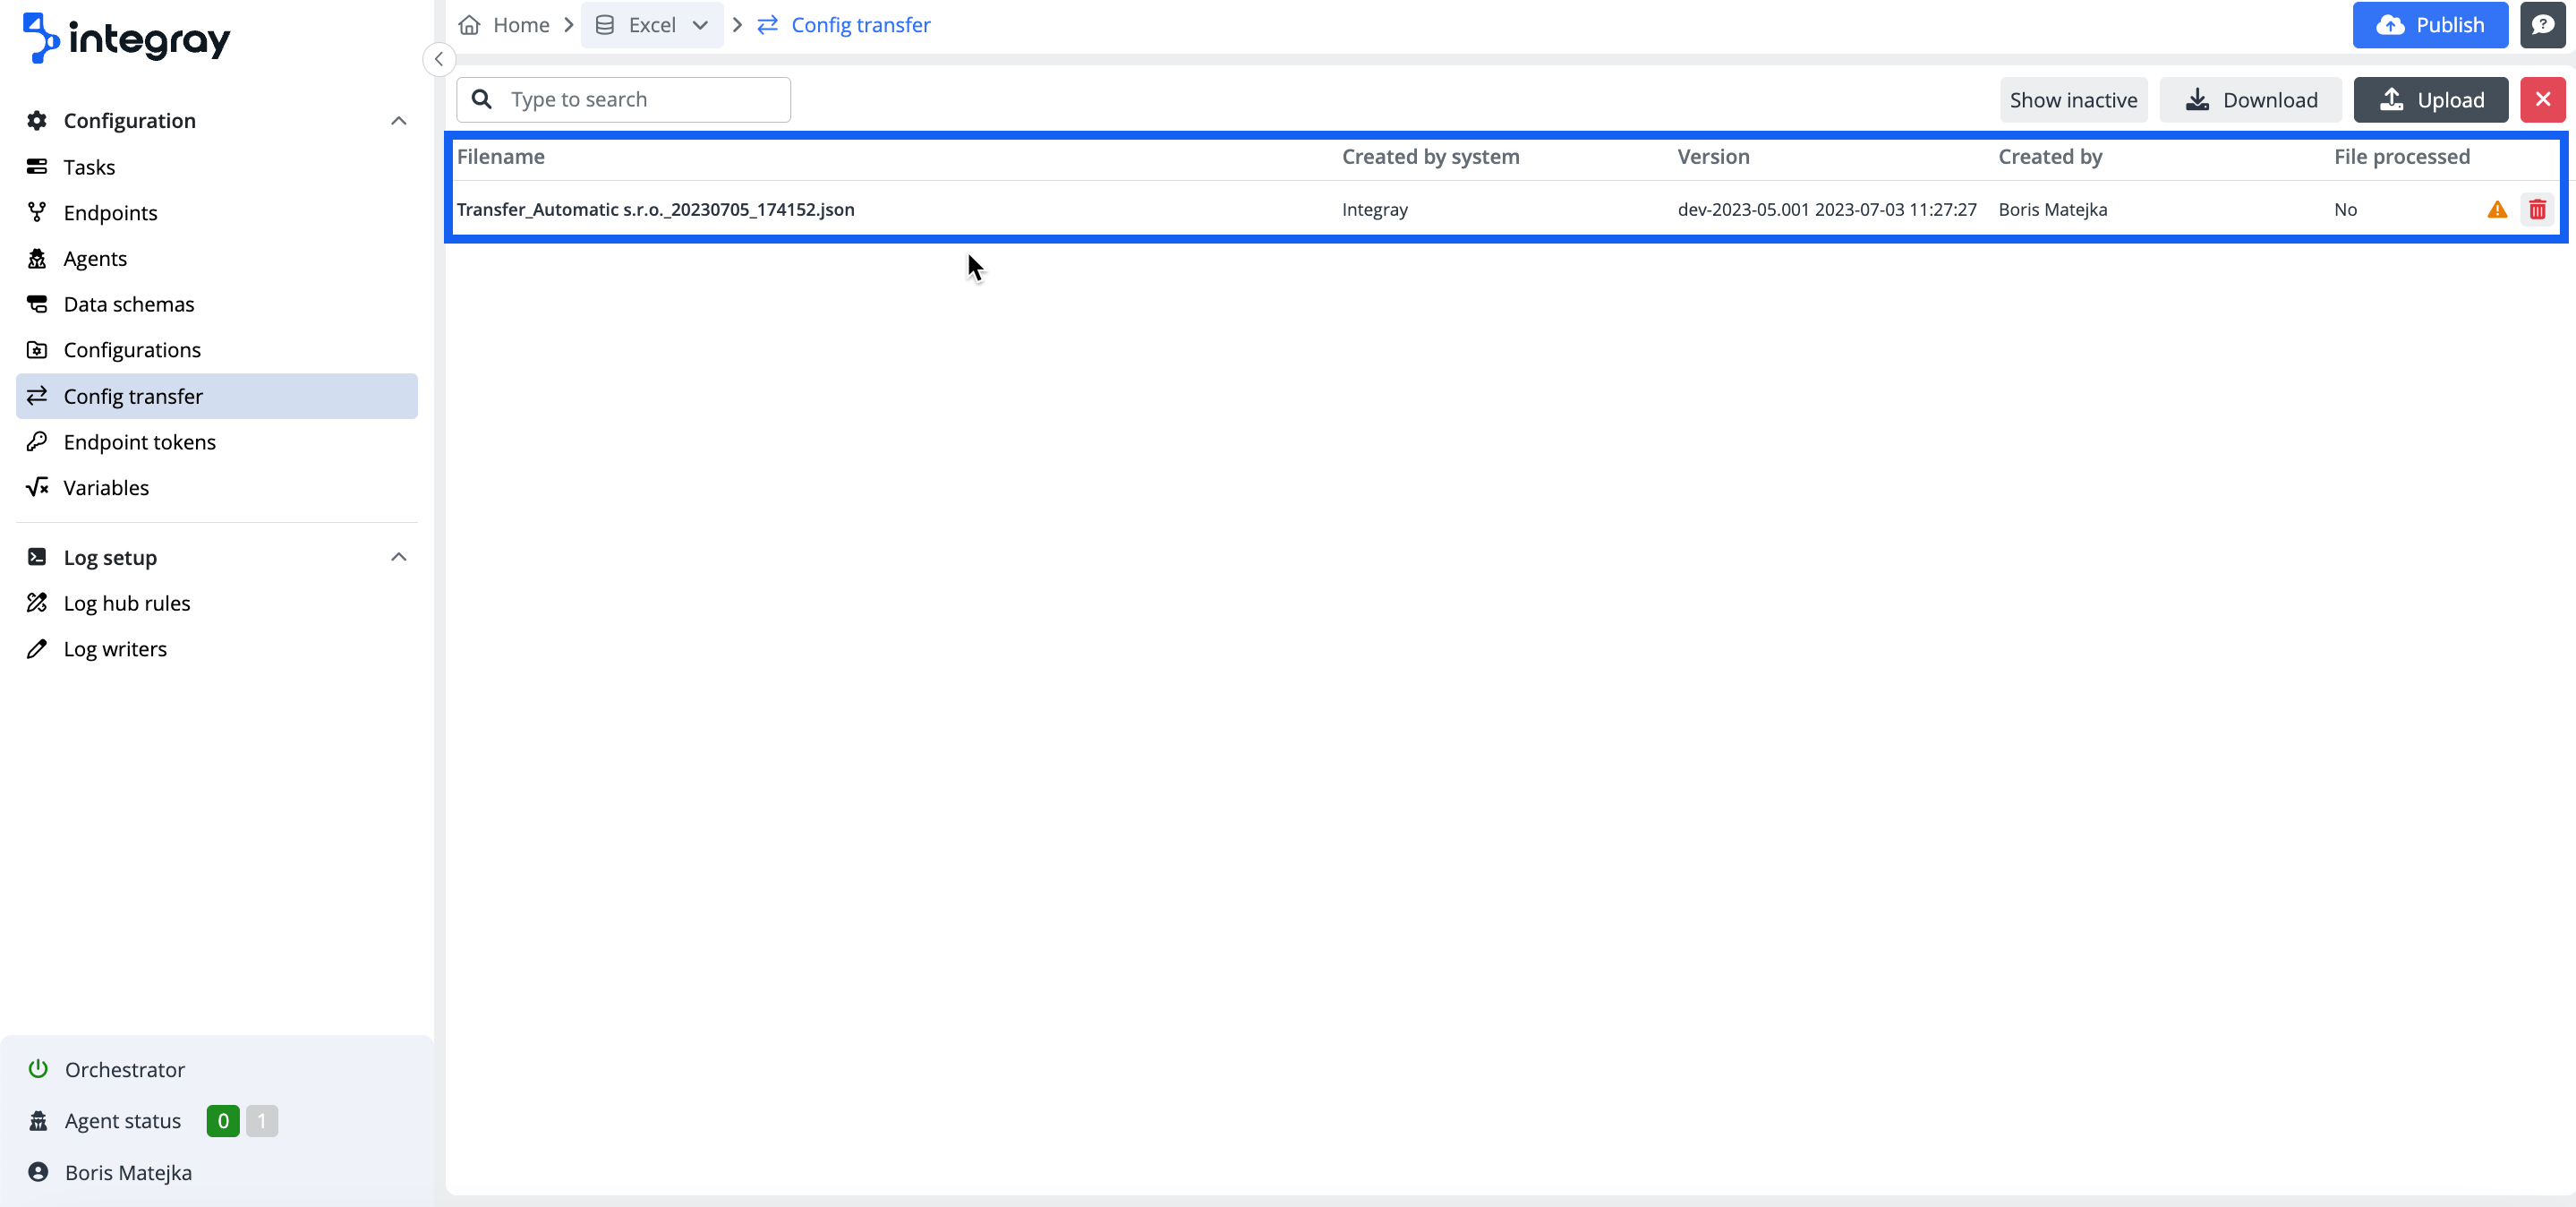
Grid columns
-
Filename - The file name is created automatically in the following structure:
Transfer_<company name>_<timestapm yyyymmdd_hhmmss>.json. The transfer file is always in JSON format. -
Created by system - The indication of the originating system. It will be in most cases Integray, nevertheless, by migrations from DX platform it can also be the DX 2.0.
-
Version - The indication of the originating system version.
Lower version can't be transferred into higher version
It is not possible to transfer the config transfer with the lower Transfer version into higher version.
The system error message will be displayed "Transfer version < ver number > or above is supported."
-
Created by - Name of the user who created the transfer file.
-
File processed - The processing status of the uploaded transfer file.
The Config transfer line on the list contains an additional red trash bin button on the right end of the record line to deactivate the respective transfer file. To reactivate a deactivated file, you need to click on Show active button, find the file and activate it by clicking the grey recycle button on the right end of the record line.
In case the uploaded transfer file includes a connector, which is not available in the destination environment, you will be notified by the orange warning triangle.
Download configuration
The download button executes the download of the current company configurations into a .json file containing all the items described above at the beginning of the page.
- Click the Download button to download the configuration. The file is instantly created and saved to the Download folder of your local machine.
Upload configuration
The upload functionality includes the upload of the .json file containing the configuration, and the option of the detailed settings of the final transfer.
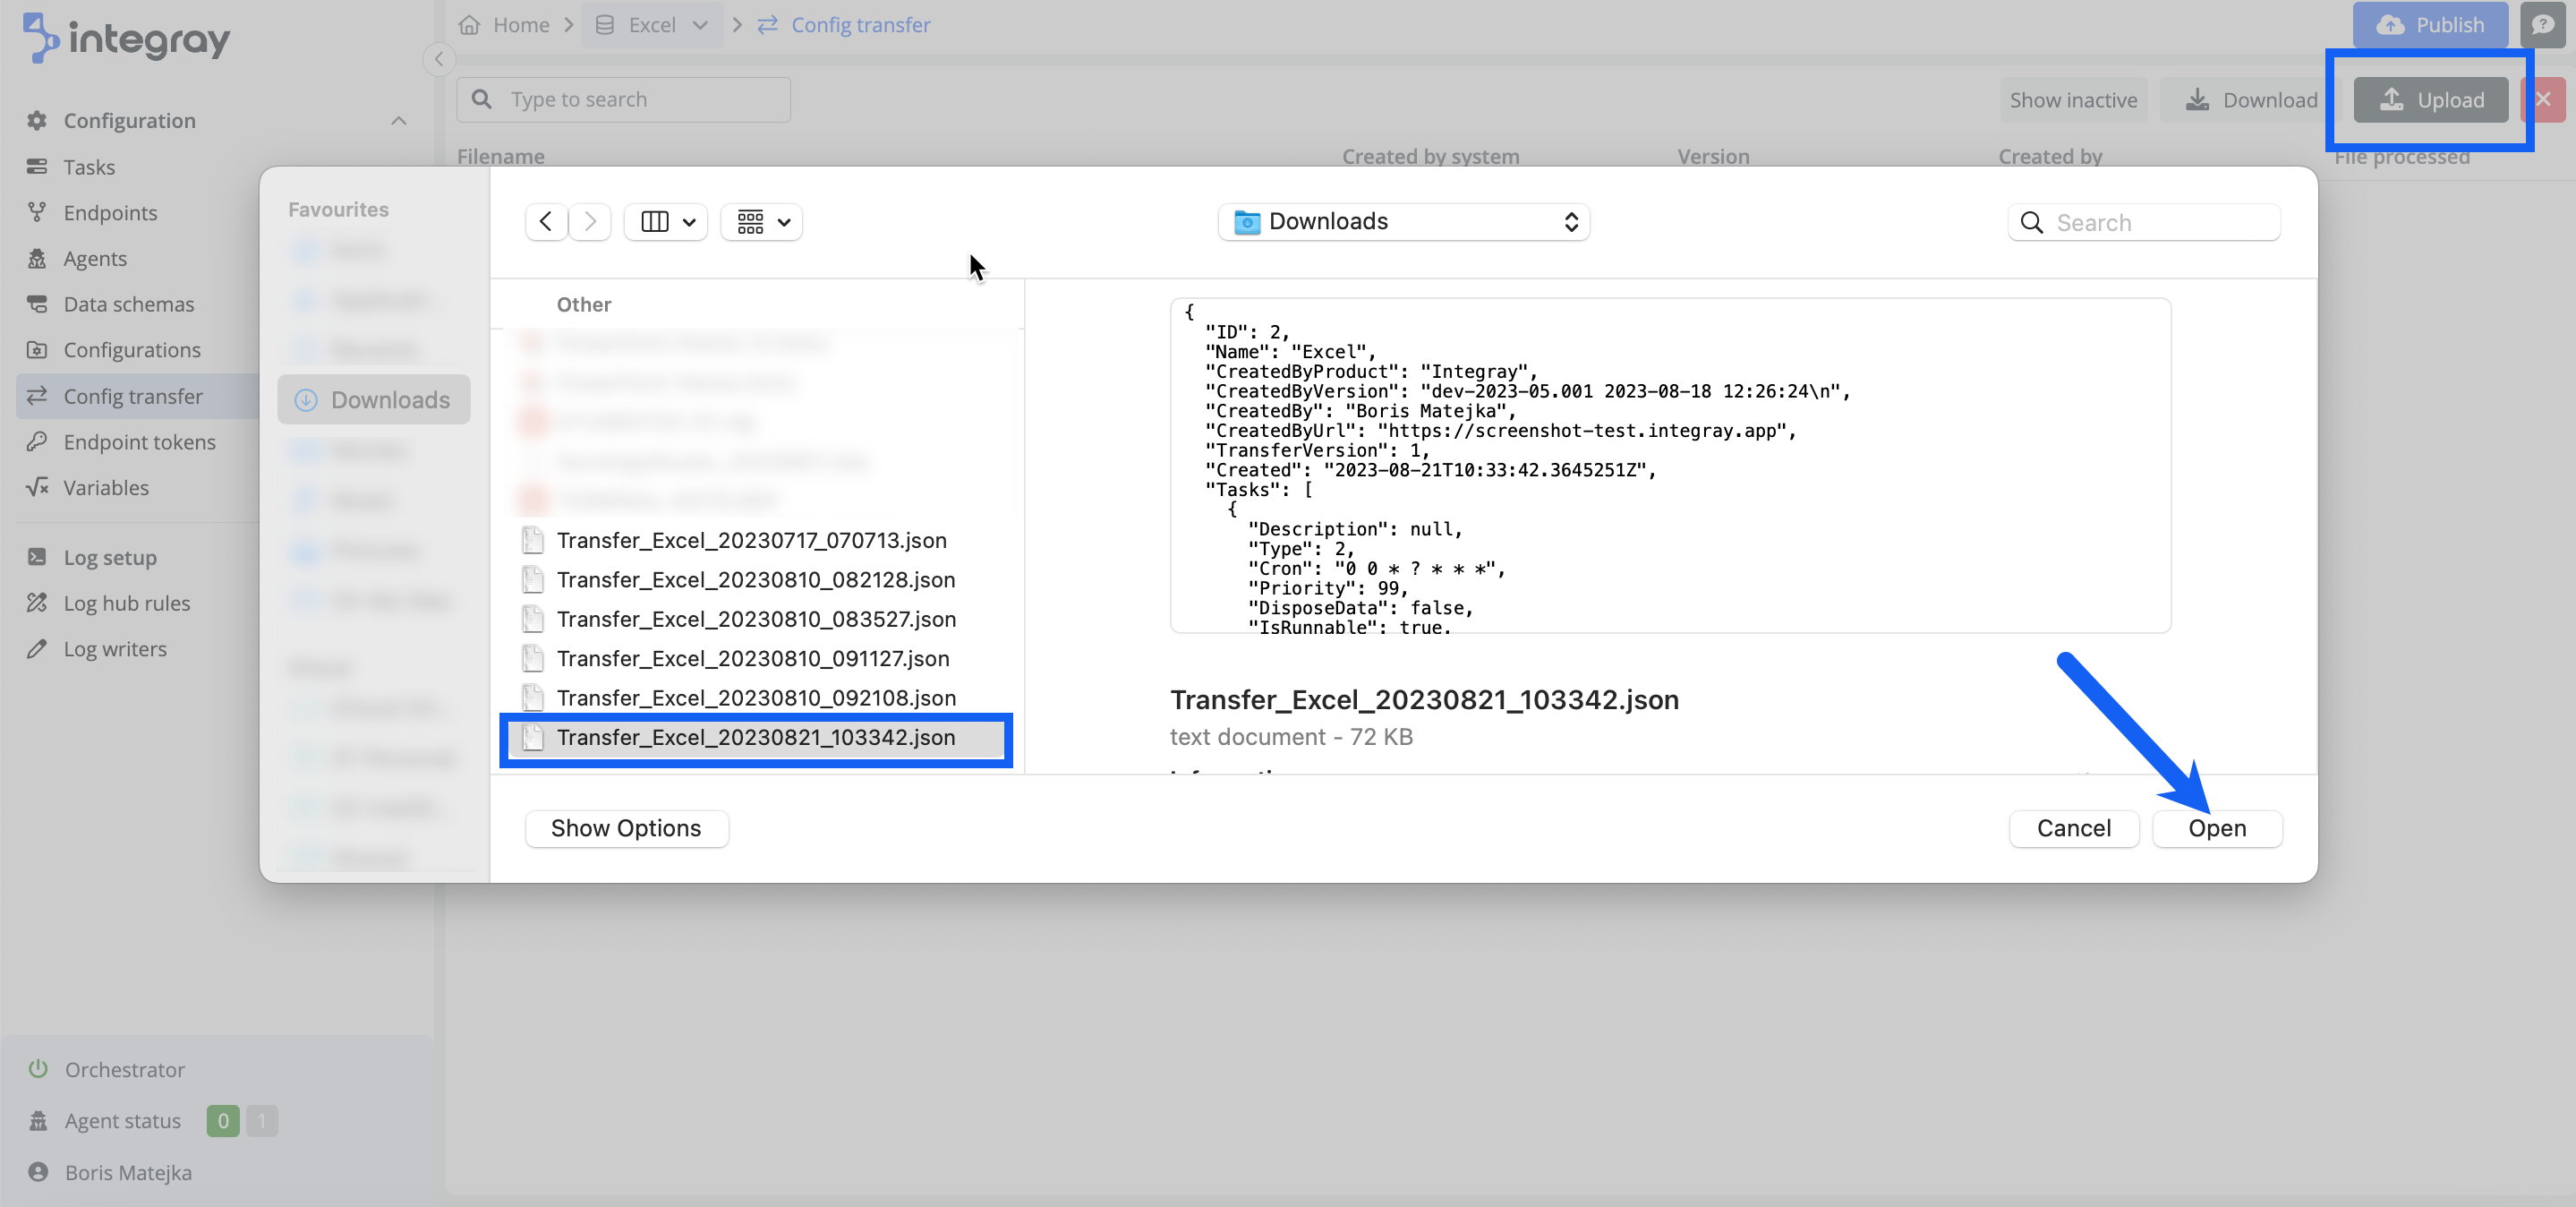
- Click the Upload button to start the upload process. It opens your file browser, where you need to look up and select the transfer file.
- Select the relevant transfer file and confirm.
After successful upload, you will see a modal dialog window Config transfer precheck overview, including the green message: Config was successfully uploaded. The Config transfer precheck overview modal window displays the list of used connectors in transferred tasks, their versions, and an indication of those installed in the target/destination company.
- Click the OK button to proceed further.
Even in case of a successful upload, when all connectors are installed in the destination, you still may face an additional warning: Some of the configurations have invalid references to the task or endpoint. Please verify configurations after file import. This will occur in case you are transferring tasks or endpoints with connections outside the transferred company.
If the Config transfer precheck overview will indicate any of the connectors missing, the OK button will be replaced by the Install button.
- Click the Install button to add the missing connector or its required version. You will be redirected to Administration > Connector repository screen. Check the control New version only to understand, which connectors are missing and will be installed. Click the Install all button to complete the installation.
Warning
The issue with the connectors is indicated in the config transfer precheck overview with the icon of a red circle with the cross beside the connector. Indication in the form of an orange warning triangle can be seen on the Config transfer list on the right side of the Config transfer file record line. To install the connectors, you need to have the role of Administrator assigned. If you don't, please contact your Administrator to manage the missing connector installation in Administration > Connector repository.
Next, you will see the Configuration transfer insert screen.
Configuration transfer insert screen
On this screen, you can see the detail of the transfer itself. The screen is divided into:
-
Grid filters
-
Transfer header
-
Task panel
-
Endpoint panel
-
Others panel
Grid filter
As the config transfer is considered full sync, there are almost no options to affect what is transferred from the source to the destination environment.
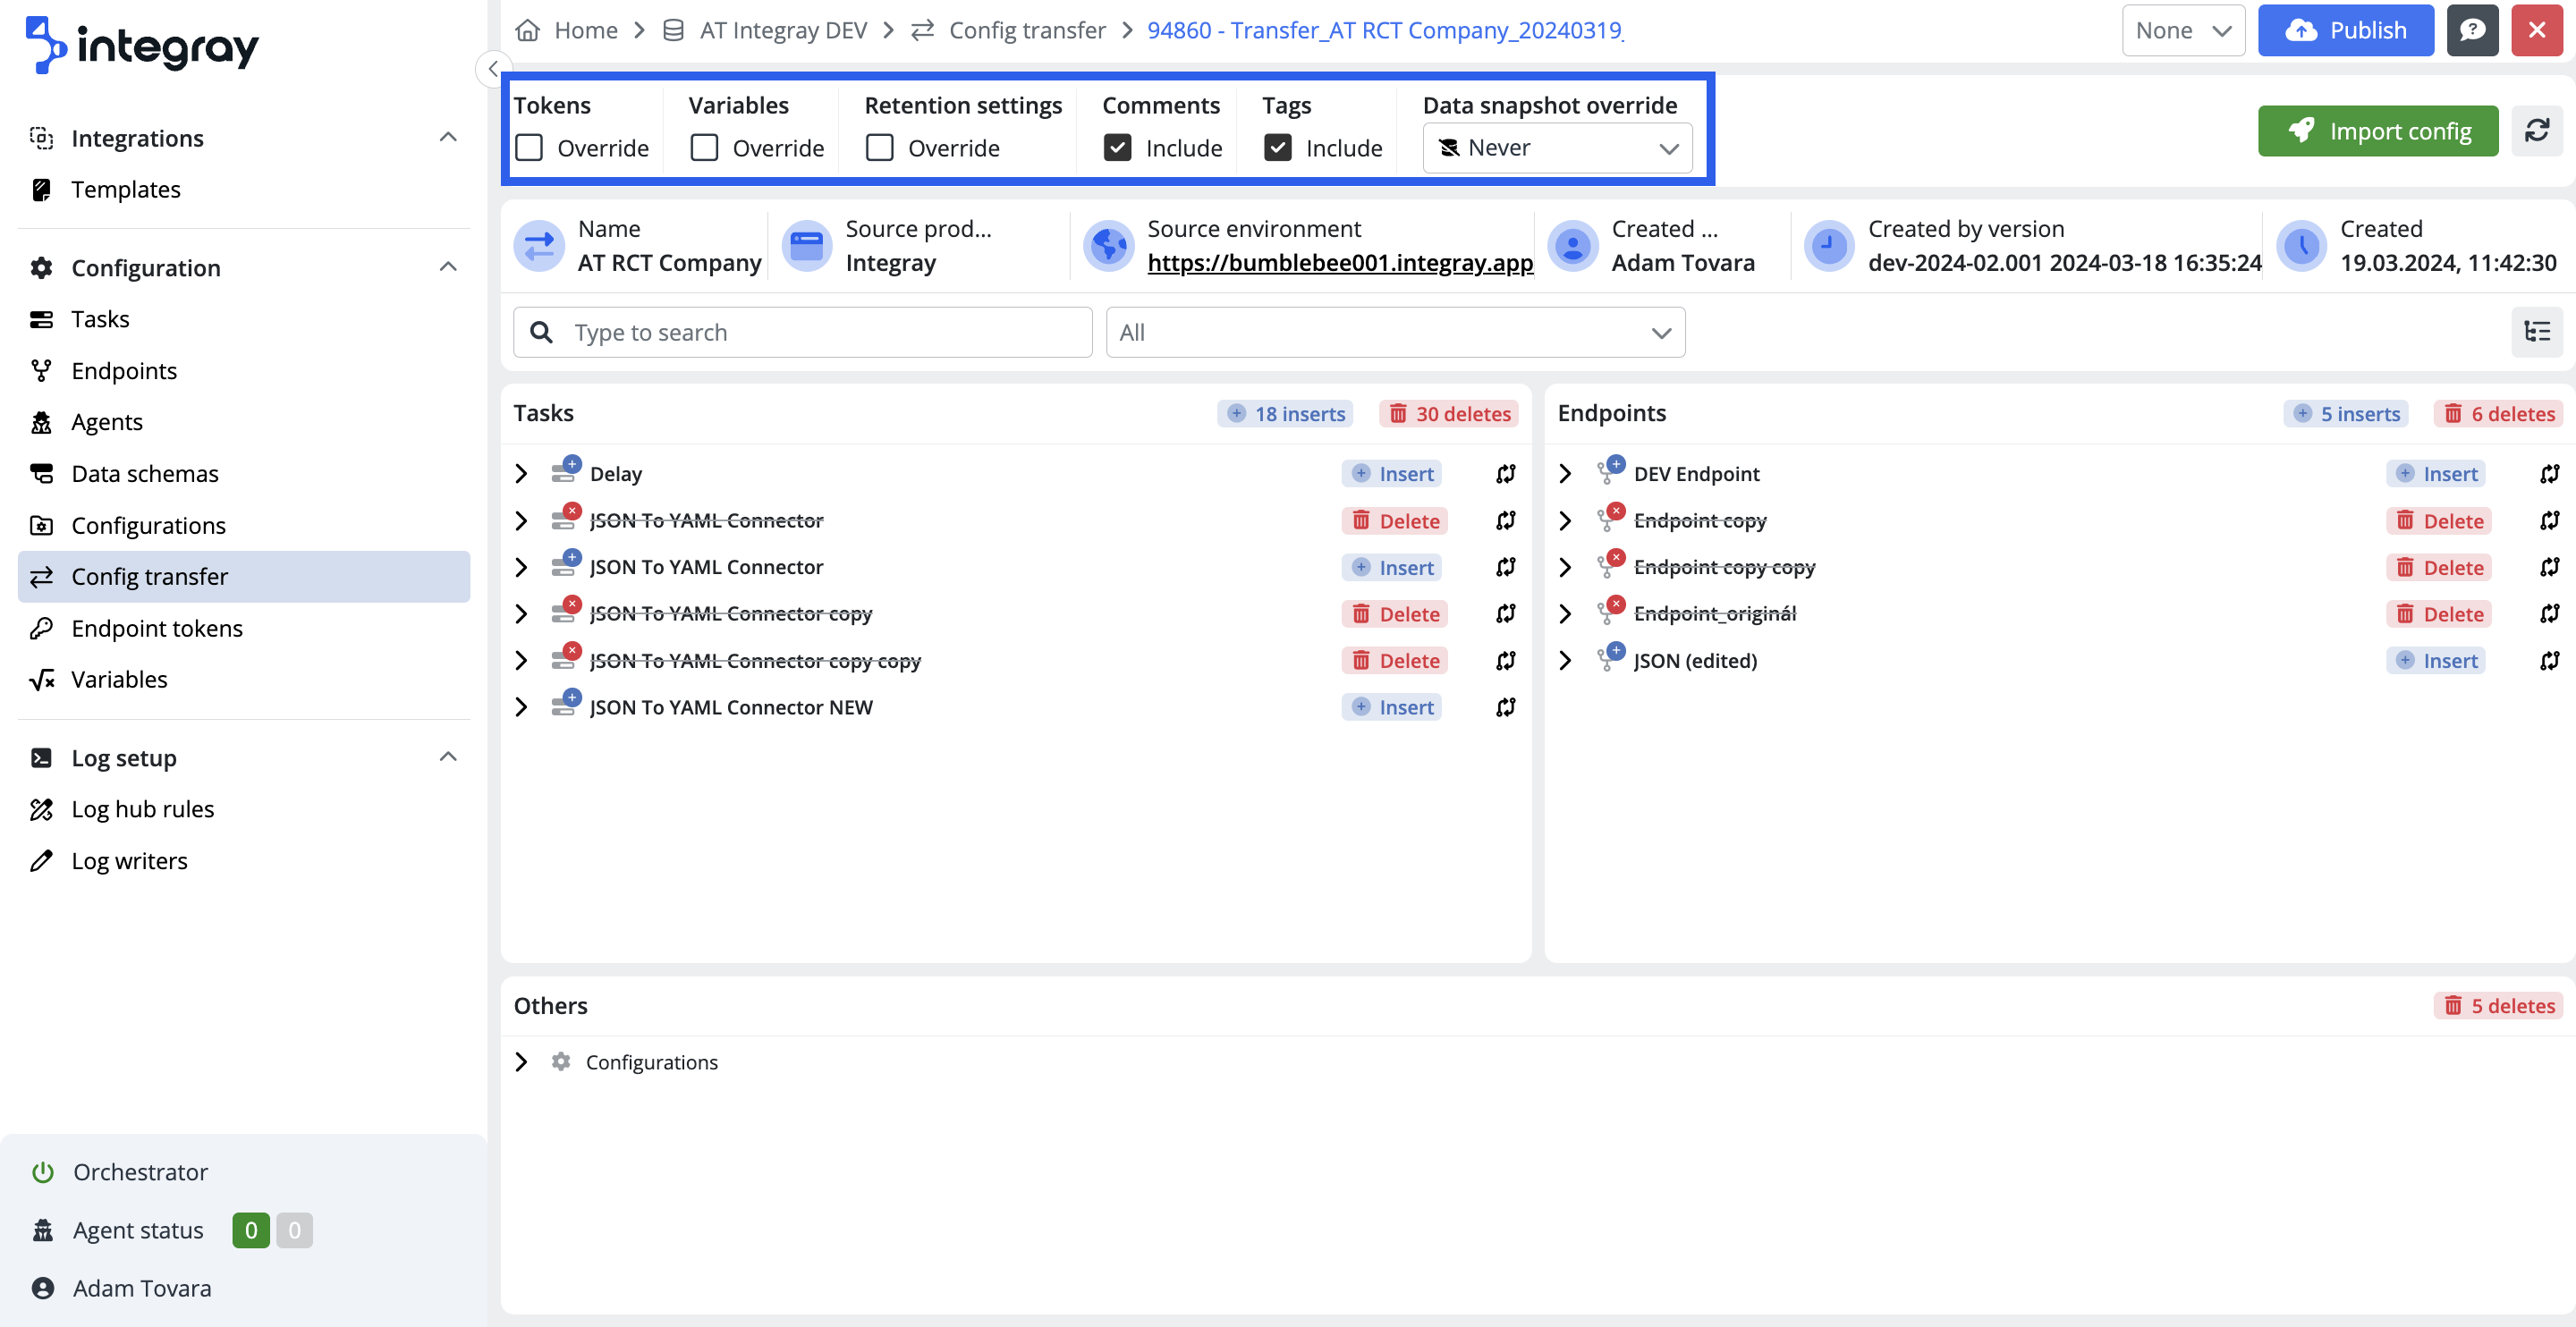
There are however following possibilities to influence: Tokens, Variables, Retention settings, Triggers, Runnable settings Comments, Tags and Data snapshot settings.
During the first configuration transfer for each company, the system sets the following default preferences for these parameters:
- Tokens override: No
- Variables override: No
- Retention settings override: No
- Triggers override: No
- Runnable settings override: No
- Comments include: Yes
- Tags include: Yes
- Data snapshot override: Never
These settings are crucial as they determine the behavior and outcome of the configuration transfer. The system will remember any modifications made to these settings during the initial transfer and automatically apply them as default preferences for subsequent transfers within the same company. This feature is handy for users who frequently employ the same set of settings for Configuration Transfers, as it eliminates the need to adjust these values for each transfer manually.
Override tokens
If set to false, no tokes are overwritten in the target location. In case of an update transfer, when there is already a configuration in the target company, you may have set your relevant target location tokens, which you don't want to change.
Override variables
If set to false, no variable values are overwritten. In case of an update transfer, when there is already a configuration in the target company, you may have set your relevant target location variable values, which you don't want to change.
Override retention settings
If set to false, no task and endpoint retention values are overwritten.
Override triggers
If set to false, no trigger settings are overwritten. This is useful when the destination company already has specific task triggers (such as Manual start, Scheduled CRON, or Endpoint-based execution) that you want to keep unchanged during the configuration transfer.
Override runnable settings
If set to false, the runnable status of tasks is not changed. This prevents overwriting the task execution mode (Runnable or Suspended) in the destination company, which can be critical for managing task behavior after transfer.
Include comments
If set to true, the comments on the task, task step, step configuration, and endpoint will be subject to transfer.
Include tags
If set to true, the tags on the company, task, task step and endpoint will be subject to transfer.
Data snapshot override
Select your required data snapshot behavior for the target location. The default value is set to Don't change, however, you may change it to Never, On error, or Everytime. This option is useful if you transfer the configuration from the Development environment to the Production environment and you want to switch off the data snapshots for Production as it consumes quite some memory. By setting the appropriate choice at the time of transfer, you will avoid manual resetting of individual tasks afterward.
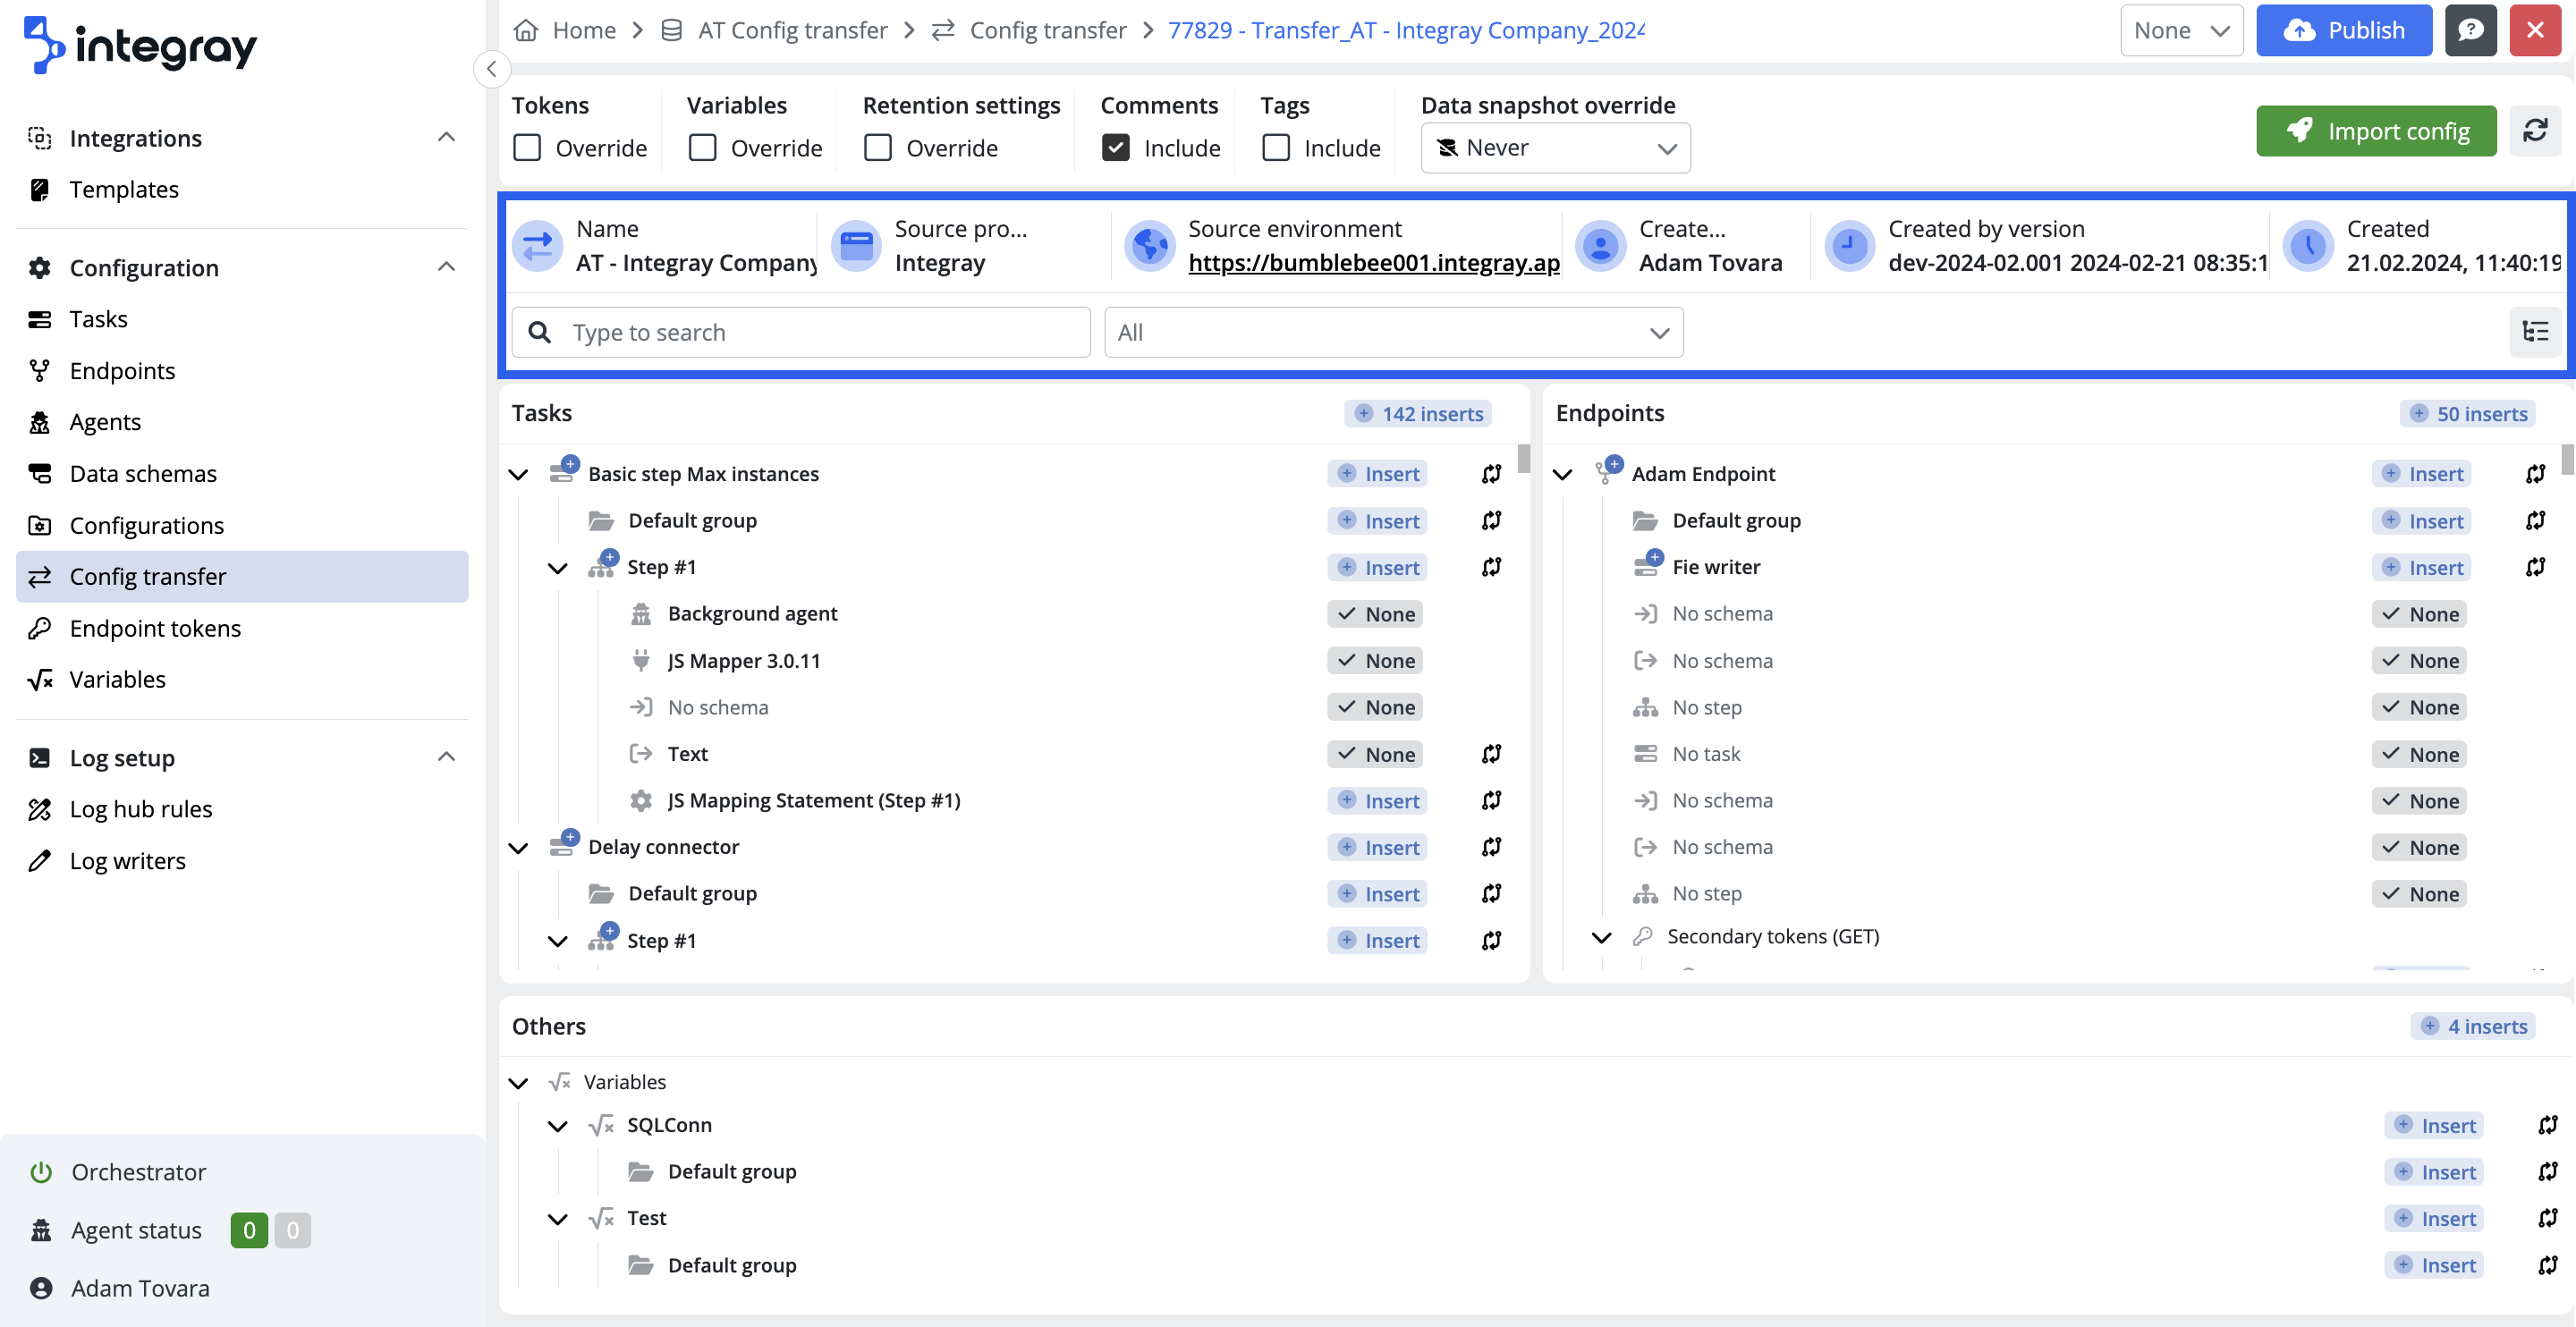
Transfer header
-
Name - The name of the company from which the transfer was downloaded is displayed here.
-
Source product - The source product from which the transfer file originates. The vast majority will be Integray, but there may be other source products such as Data Exchange and its transfer files.
-
Source environment - The application URL of the source environment.
-
Created by - The author of the transfer file in originating environment.
-
Created by version - Here is the version of Integray at the time of downloading the config transfer from the source company
-
Created - Date and time stamp of download of config transfer from the source company
-
Search - The full-text search.
-
Filter field - Combo box where you can filter which items will be displayed in the panels:
Insert,None,Delete,Update. -
Expand/Collapse button - Expands or collapses the hierarchy of the transferred items.
Task panel
The task panel displays the task configuration in a hierarchical view.
-
Task (including its task group)
-
Task step
-
Agent
-
Connector, version
-
Input schema
-
Output schema
-
Configurations
-
-
Endpoint panel
The endpoint panel displays the endpoint configuration in a hierarchical view.
-
Endpoint (including its endpoint group)
-
Connected task
-
Input schema
-
Output schema
-
Output step mapping
Others panel
-
Secondary tokens - the values of the secondary tokens (in not set in filters as to be overidden).
-
Variables - - the values of the variables (in not set in filters as to be overidden).
-
Deleted items - items found not in sync with the transferred items.
Transfer works as Full Sync
Please be advised, that the configuration transfer works as Full Sync i.e. it takes everything from the config transfer file and inserts it to the destination if not found there or updates if found. If there is anything found in the destination environment, that is not in full sync, it will be deleted. The deleted items are listed in the Other panel.
File icon colors and badge type and colors.
File icons
-
Grey file icon
-
Green file icon
-
Yellow file icon
-
Red file icon
Badges
-
None (grey)
-
Insert (green)
-
Update (yellow)
-
Delete (red)
Scenarios
-
Grey file icon & None grey badge
-
Green file icon & Insert green badge
-
Grey file icon & Insert green badge
-
Yellow file icon & Update yellow badge
-
Yellow file icon & None grey badge
-
Grey file icon & Update yellow badge
-
Red file icon & Delete red badge
Import config
Once you are clear about what you are going to import as a new configuration and what effects it will have on your current config from the insert, update, and delete perspective, click the Import config button.
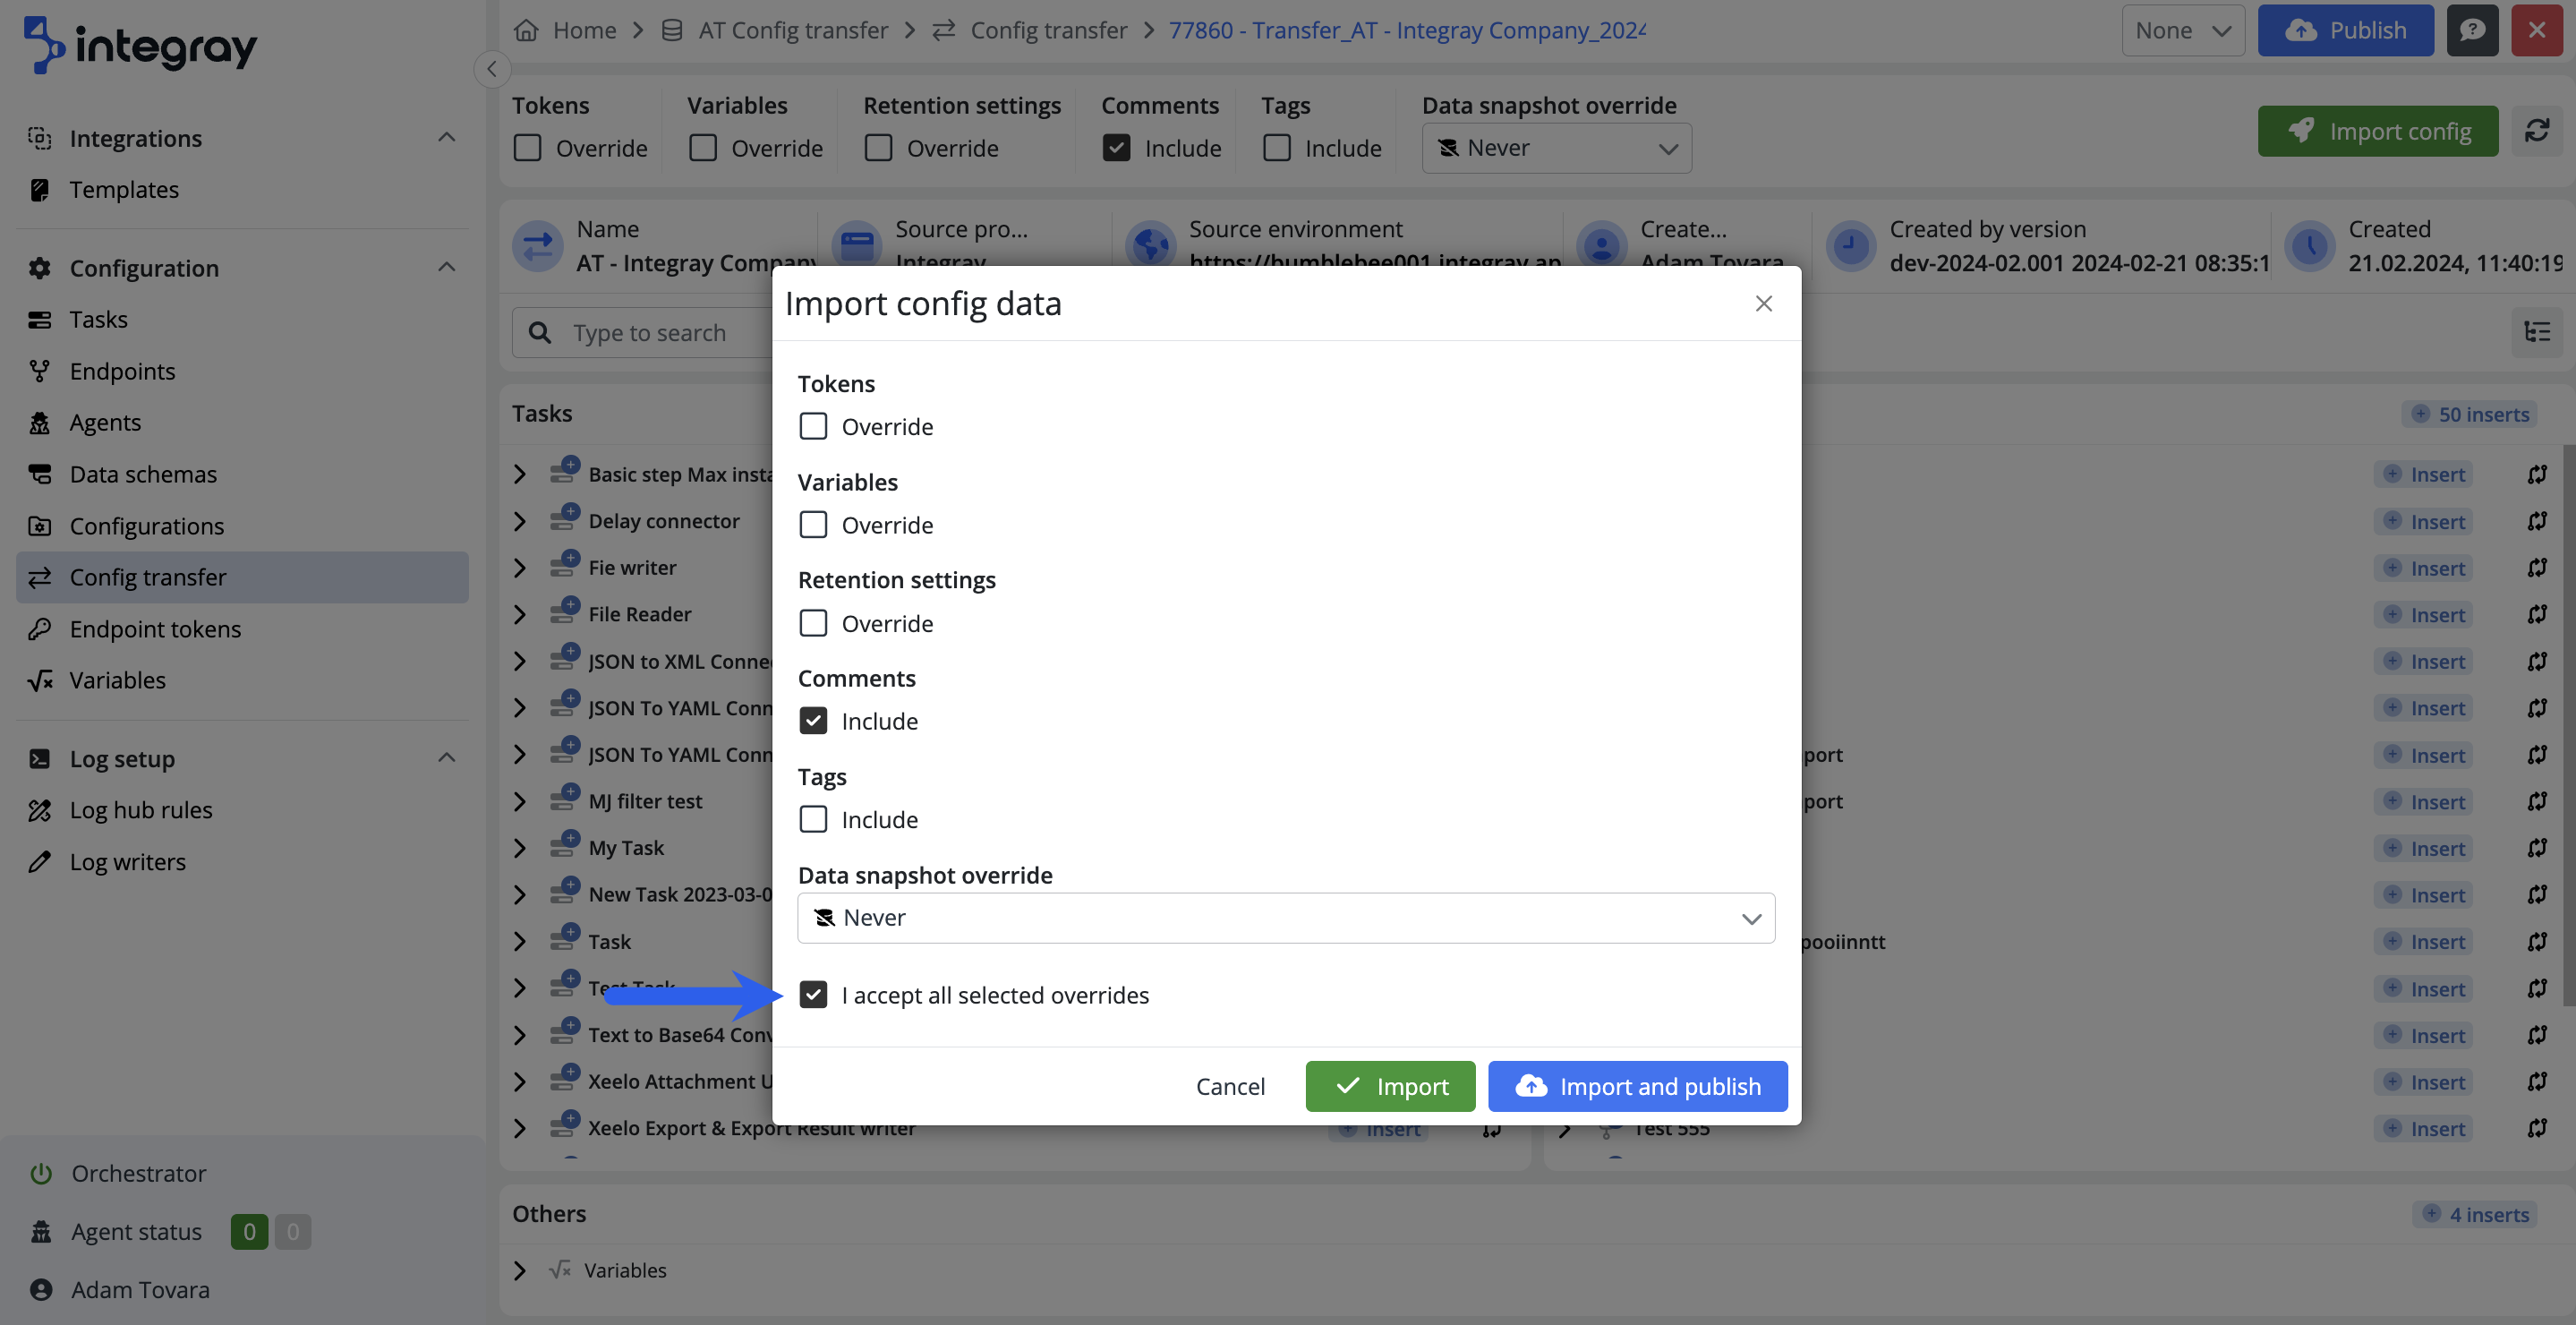
After clicking the Import config button, a modal window will display, offering editing options similar to those in the Grid filter. To proceed with the config transfer, check the I accept all selected overrides checkbox. Following this, you have the option to click either Import or Import and publish. Selecting Import will complete the config transfer without applying the changes. To apply the changes later within the specified company, you can press the Publish button after ensuring the Config transfer aligns with your requirements.
On the other hand, after clicking the Import and publish button, the system will complete the configuration transfer and immediately apply the changes to the current configuration within the specified company. This action ensures that the modifications made during the configuration transfer are implemented without needing a separate publishing step.
Remote config transfer
With Remote config transfer, you have access to a cutting-edge tool that streamlines the migration of configuration settings across diverse environments and companies. This innovative solution eliminates the need for manual intervention, ensuring seamless synchronization between different settings, allowing for the transfer of all configurations listed in the same way as traditional configuration transfer.
Effortless setup
Setting up Remote config transfer is a breeze, prioritizing your convenience above all else. With just a few intuitive steps, you can tailor the tool to your specific requirements without unnecessary complexity.
One crucial aspect of this setup is implementing token-based authentication for remote transfers. Tokens play a pivotal role in facilitating secure communication between environments. By generating a token, you can confidently transfer various elements, including Variables, Retention settings, Comments, Tags, and Data snapshot settings, with the same ease and reliability as traditional configuration transfers.
Source vs. Target
In documentation, terms like source denote the originating company where changes are initiated, while target signifies the recipient company where changes are automatically propagated.
Now let's take a deeper look at how you can easily connect the source company containing the tasks, endpoints, and settings you want to migrate to the target company. Using a simple URL and token mechanism, you can easily establish this connection. Through this process, you are essentially providing a secure path for transferring configurations from the source to the destination. This efficient approach not only simplifies setup, but also ensures that your configurations are transferred securely and reliably between environments.
To configure the Remote configuration transfer successfully, navigate to the source company details menu and locate the Config transfer section. Select the option to Allow sharing remote configuration transfer. In the Remote control section, select the option to generate a token, which you'll use for the configuration transfer process. Use the button Copy remote settings to copy file URL and the token and save the changes.
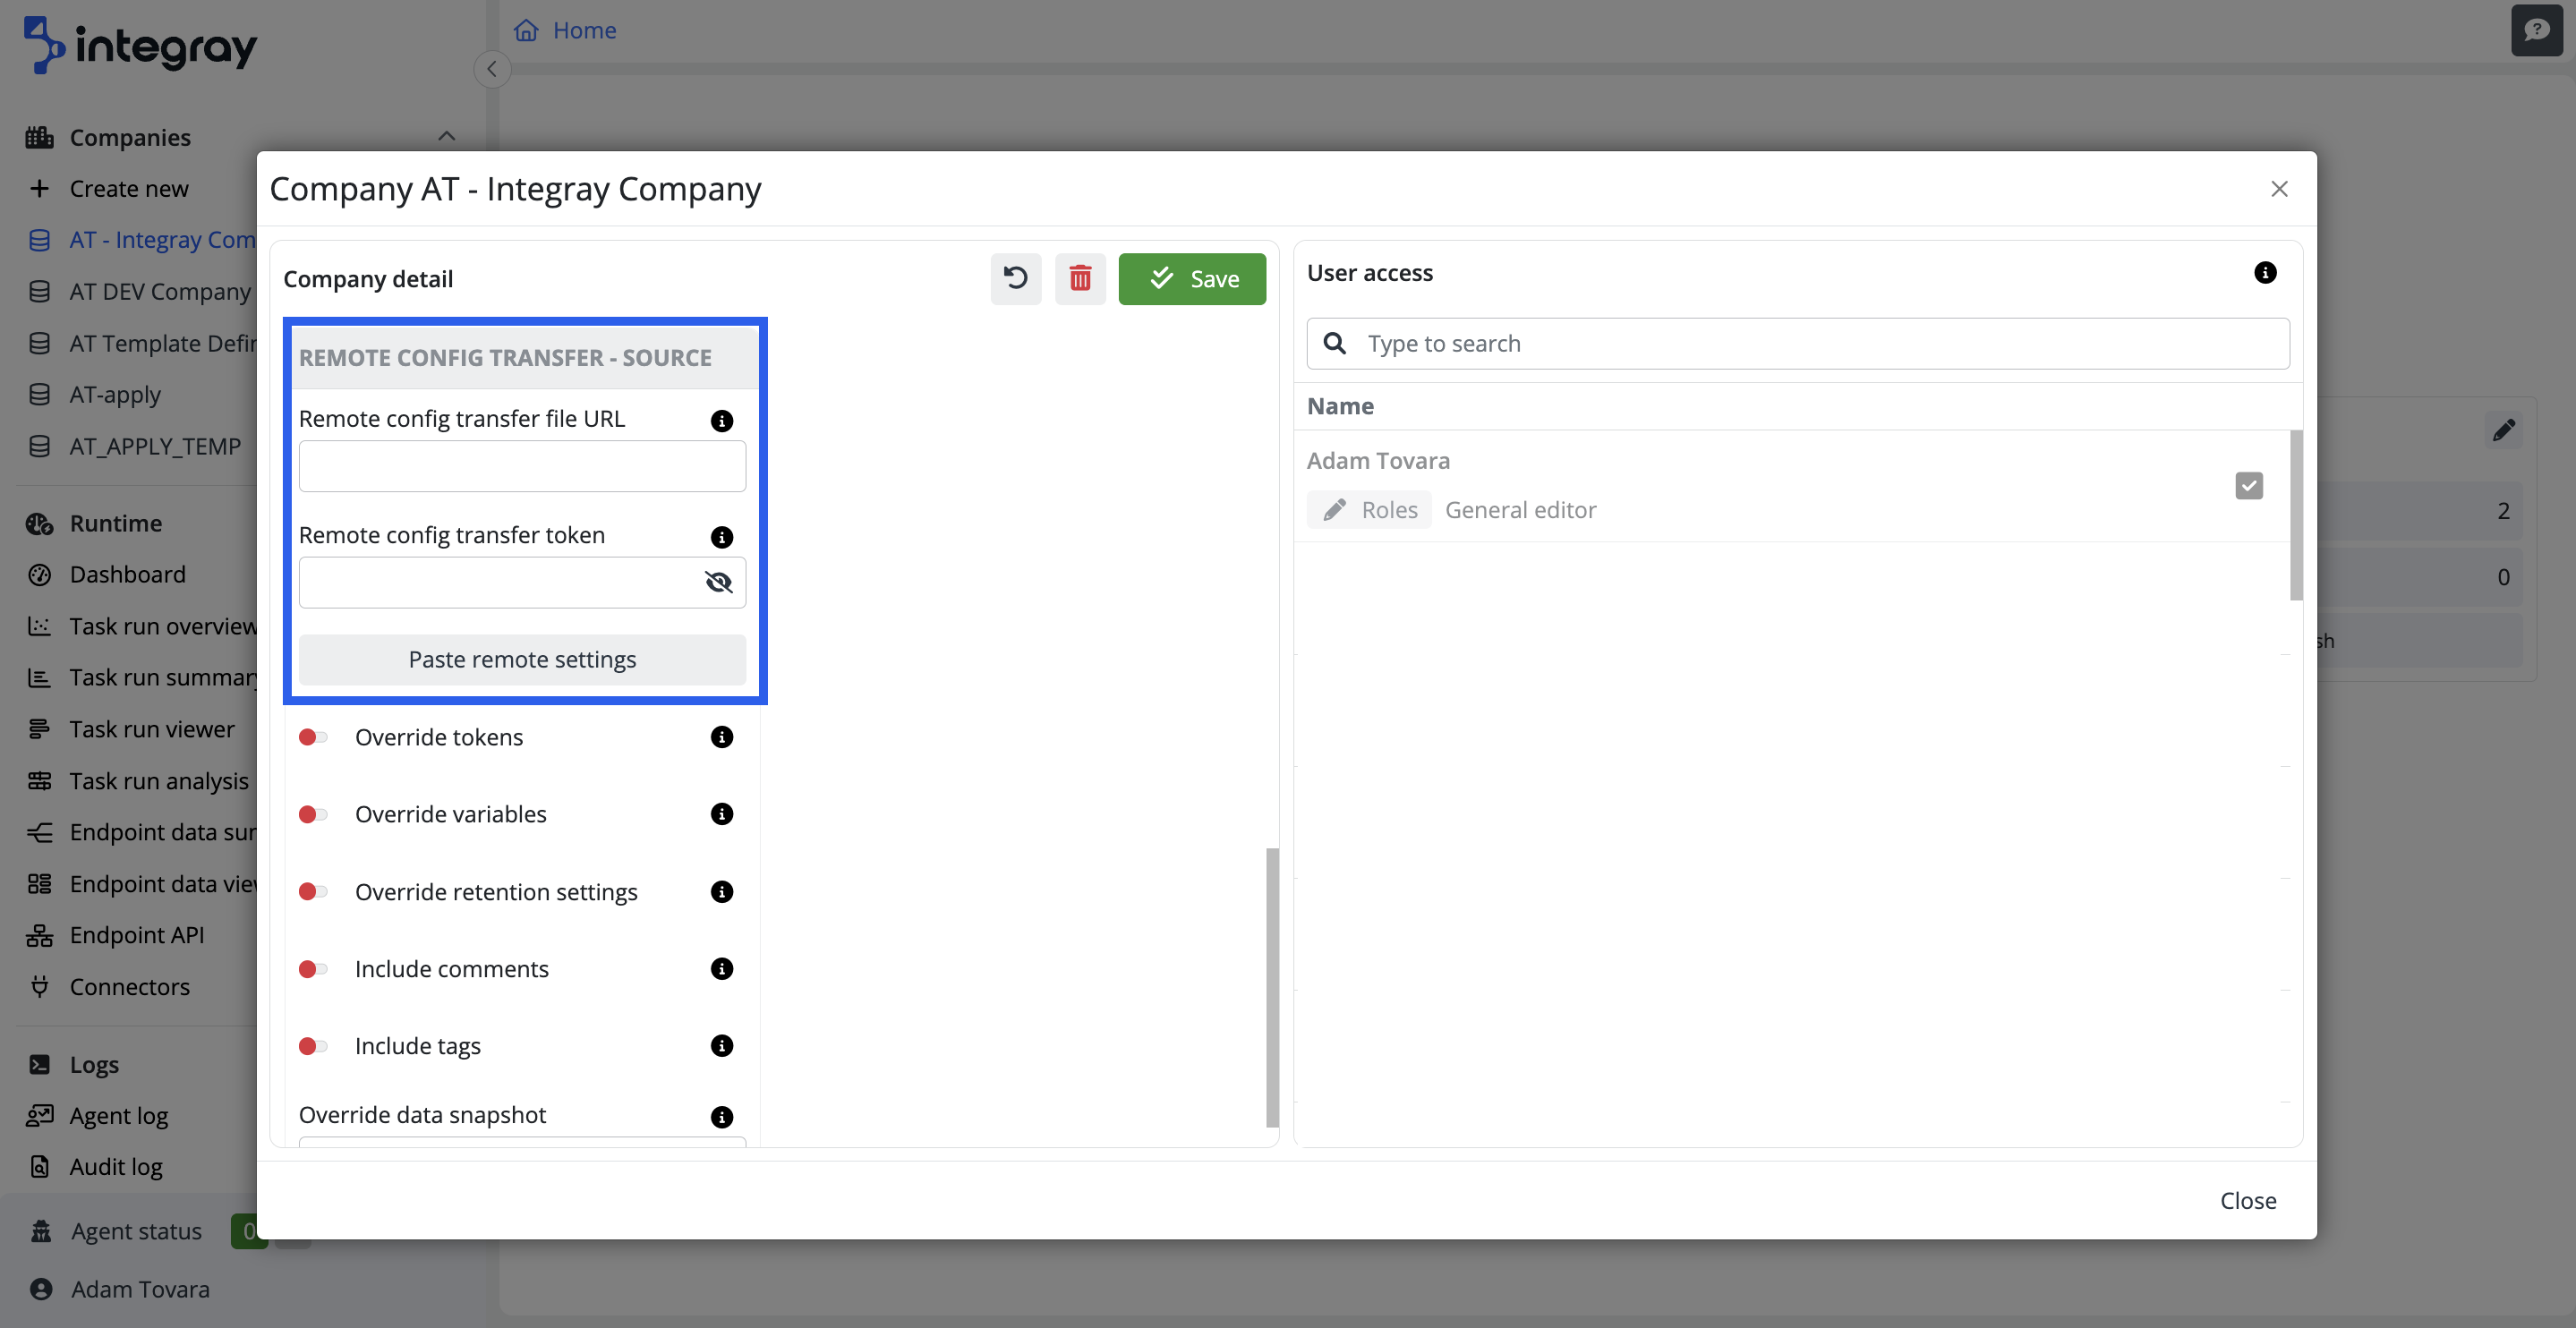
Switch to the target company details menu, find the Remote config transfer - source section, and paste the copied values using the Paste remote settings button. Remember to save the changes.
For detailed information about setting up both companies, refer to the article here.
Config transfer - Load from URL
You can use remote config transfer directly in the standard Remote Config Transfer tab by choosing Load from URL. This automatically downloads information from the URL specified in the target company's details. Then, the insert screen appears, allowing you to customize the grid filter as needed, including what to override and how the snapshot should behave.
Automatic post-transfer publish
The system automatically initiates the Publish process after successfully completing the remote configuration transfer. This process ensures that all newly transferred settings and configurations become active and fully functional in the target environment.
In the Remote config transfer job, when you view the log, you will find records indicating the invocation of the Publish process. Additionally, the log will contain records of successfully executed Publish actions for companies where the remote configuration transfer has been completed. This log provides valuable insights into the status and outcomes of the Publish process in the context of the remote configuration transfer.
For precise logging configurations, you can utilize the Remote Config Transfer Job template in the Log Hub rules. This template provides predefined log behaviors, which can be customized or retained as originally set. For further details, refer to Log Hub rules
Tip
Use the Log writer feature to receive email notifications regarding the status of your remote configuration transfers. This functionality ensures that you are promptly informed whether a transfer is successfully completed or fails for any reason.
Deployment automation
In addition to simplifying configuration management, Remote config transfer empowers you with enhanced control through deployment automation. This feature gives you greater flexibility and predictability in managing deployments across different environments.
This automation layer not only streamlines the deployment process but also provides you with granular control over deployment settings. Whether you're configuring CRON-initiated tasks for regular deployments or utilizing options like Single Fire Run or Run Now for on-demand deployments, you have the flexibility to tailor deployment schedules to your needs.
For more information about Job settings initiated by CRON or options like Single Fire Run or Run Now, refer to article about Jobs.
Potentially resulting in the loss of the data
It is essential to recognize that regardless of how the remote transfer is triggered, the information will be transferred, and the target company will be altered by the data from the source company.
There will be a complete overwrite of information in the target company.
